The Ultimate Guide To Firebase With Next.JS 🔥

A software engineer turned developer relations engineer in the web3 space, from Australia 🇦🇺.
Introduction
Building a full-stack web application can be a daunting task. You'll need to consider:
- Authorization (Signing up and logging in users)
- Databases (Where you'll store your data and where to host it)
- APIs (How your application will communicate with your database)
- Hosting (Where your app will live)
- Design (The look and feel of your application)
- and much more
Firebase is a set of tools developed by Google to help with all of the complexities found in building web applications.
Next.js is a way of building awesome React applications, best known for enabling features such as server-side rendering (SSR) and static site generation (SSG).
By combining these two tools we can create amazing and complex web applications with an even more amazing developer experience.
If you're interested in leveraging these two technologies to build your own projects at a lightning pace⚡, we'll be running through the following in this blog:
- Setting up Next JS with Firebase and Firebase Hooks
- Signing in users with GitHub
- Setting up Real-time database updates with Firestore
- Creating Serverless functions with Cloud Functions
What We Will Build
You can check out the finished product here
Screenshot:
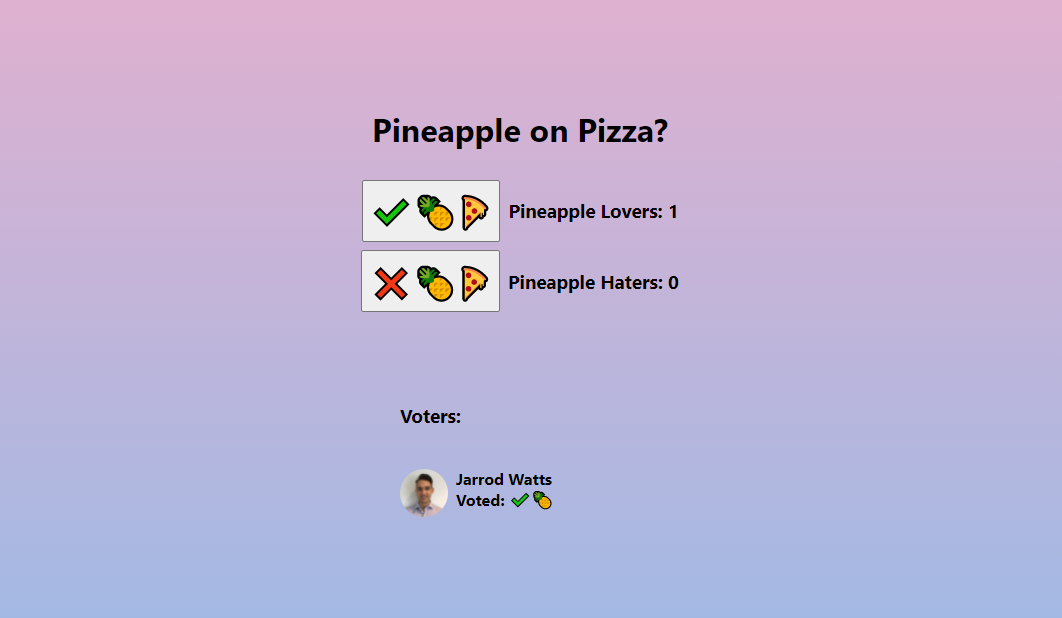
We'll be making a fun little multi-player battle, to finally decide if pineapple belongs on pizza (which it does).
We'll:
- Make sure only signed-in users can vote (and only vote once)
- Store votes in the database
- Show real-time, live updates to the database on the UI
Check out the Code!
Video Lovers 😍
If you prefer to consume your juicy programming content by video, I've also made the video version of this guide over on my YouTube Channel:
Setting up The Project
Next JS
To initialize a new project, run:
npx create-next-app pineapple
Then change directories into the newly created app, and open it up in your code editor:
// Change directories:
cd pineapple
// Open it up in VS Code:
code .
TypeScript (Optional)
For this project, we'll be using very basic TypeScript. If you've never used TypeScript before, maybe this simple project might be the time to try it out and see if you like it.
Next JS supports TypeScript out of the box, by creating a tsconfig.json file at the root of your directory, and running:
npm install --save-dev typescript @types/react @types/node
By running npm run dev, Next JS kindly generates the configuration required to use TypeScript with Next JS.
All there's left to do is to change our .js files to .tsx files.
Cleaning the starter code
We'll go ahead and:
- Delete the
apidirectory and it's contents. - Replace the
htmlinindex.tsxto just return<div>Hello!</div>.
Now we can run npm run dev to preview our simple Hello message!
Get Started With Firebase
Installation
To get started with Firebase, we'll need a few packages:
npm install firebase react-firebase-hooks react-firebaseui
- firebase : The Official Firebase Package
- react-firebase-hooks : Helpful hooks to use for Firebase
- react-firebaseui : Pre-built UI for Firebase Authentication (made for React)
Creating A Firebase Project
To create a new Firebase Project, visit https://console.firebase.google.com/ and hit Add Project.
Give your project a name, enable/disable Google Analytics to your choosing and hit Create Project.
This is the Firebase Console.
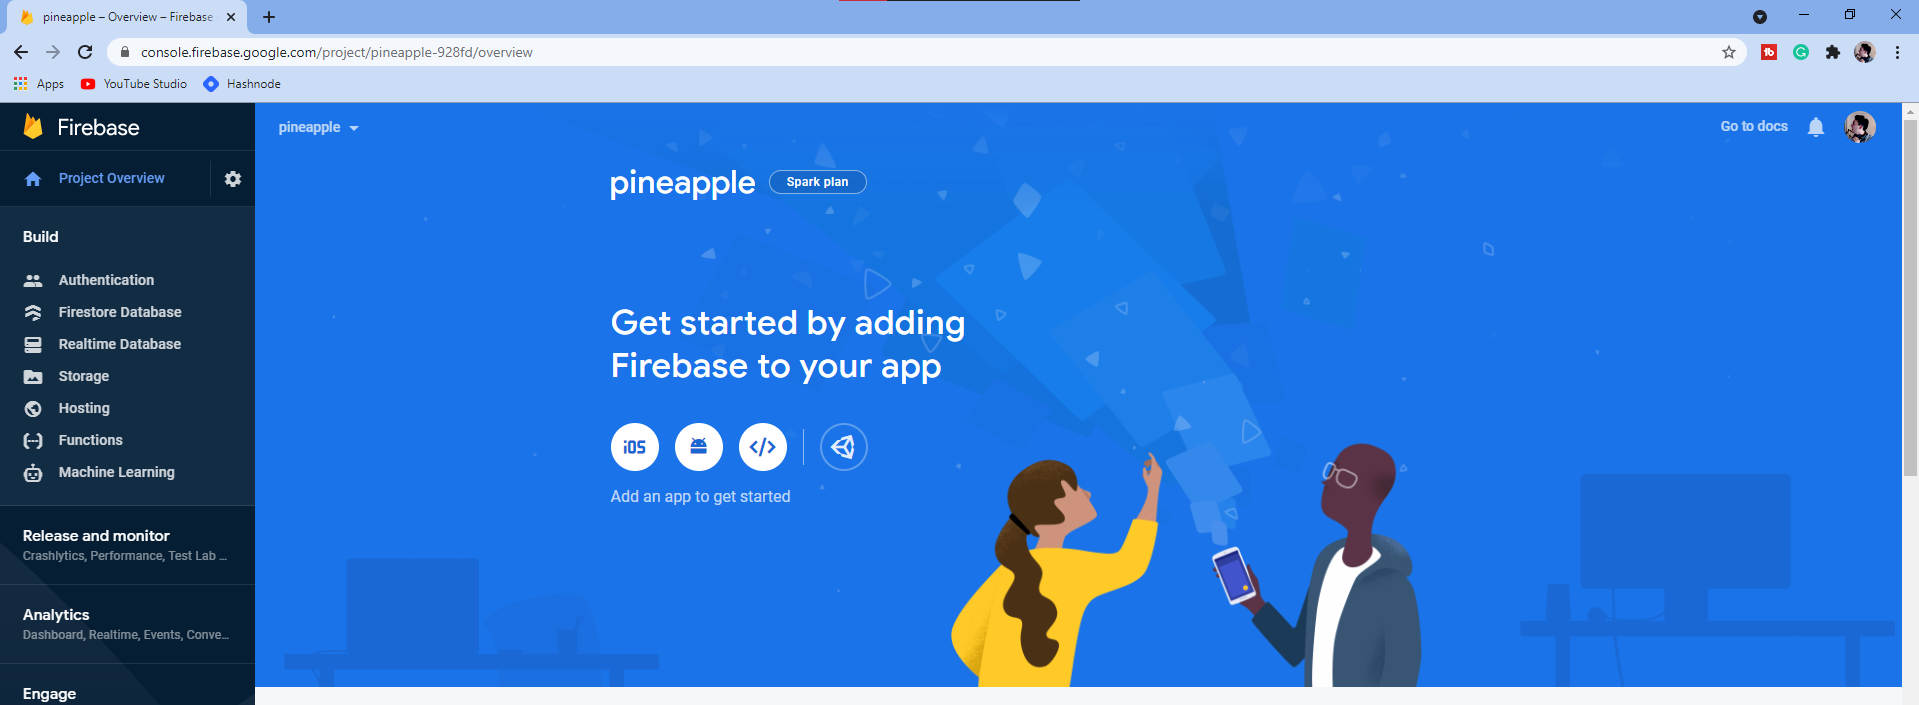 Here's where we will create and configure all of the resources we'll be using in our project, on the left-hand-side menu, you can see all of the resources you can configure for your project.
The ones we'll be using are:
- Authentication
- Firestore Database
- Functions
Configuring The Project
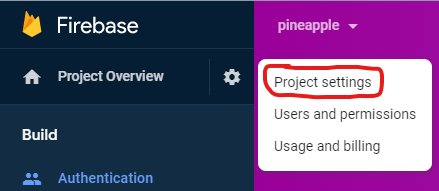
Click the gear icon and navigate to Project Settings
Now we'll need to create a Web App under this Project
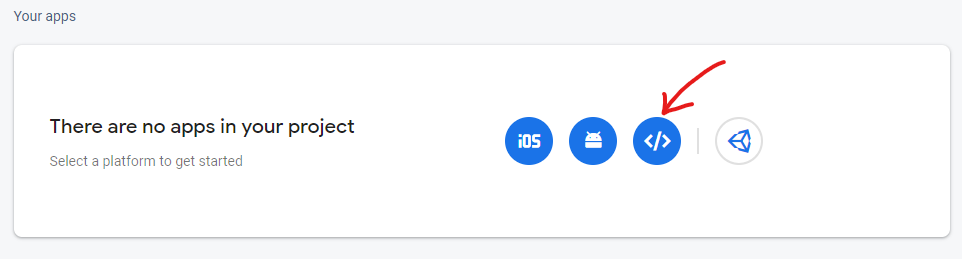
Give it a name and register the application.
Storing Config as Environment Variables
Leave the configuration script open; we'll now convert these key-values into environment variables in our codebase.
Create a .env.local file at the root of your project.
We need to copy these config values into our environment variables, like so:
NEXT_PUBLIC_FIREBASE_API_KEY=<your-api-key>
NEXT_PUBLIC_FIREBASE_AUTH_DOMAIN=<your-auth-domain>
NEXT_PUBLIC_FIREBASE_PROJECT_ID=<your-project-id>
NEXT_PUBLIC_FIREBASE_STORAGE_BUCKET=<your-storage-bucket>
NEXT_PUBLIC_FIREBASE_MESSAGING_SENDER_ID=<your-sender-id>
NEXT_PUBLIC_FIREBASE_APP_ID=<your-firebase-app-id>
Great, now we have all of our configuration values stored in Environment Variables - this means we don't expose our private configuration values to the public!
Initializing Firebase in our App
To use the configuration we just setup, create a firebase directory at the root of your project.
Client-side Configuration
Create a clientApp.ts in the firebase folder, containing:
import firebase from "firebase/app";
import "firebase/auth";
import "firebase/firestore";

const clientCredentials = {
  apiKey: process.env.NEXT_PUBLIC_FIREBASE_API_KEY,
  authDomain: process.env.NEXT_PUBLIC_FIREBASE_AUTH_DOMAIN,
  projectId: process.env.NEXT_PUBLIC_FIREBASE_PROJECT_ID,
  storageBucket: process.env.NEXT_PUBLIC_FIREBASE_STORAGE_BUCKET,
  messagingSenderId: process.env.NEXT_PUBLIC_FIREBASE_MESSAGING_SENDER_ID,
  appId: process.env.NEXT_PUBLIC_FIREBASE_APP_ID,
};

if (!firebase.apps.length) {
  firebase.initializeApp(clientCredentials);
}

export default firebase;
Here we are simply initializing Firebase with our configuration, and returning firebase so we can use it in other parts of our application.
Now we have created, configured, and linked our Firebase App to our codebase.
Let's set up some Firebase Features.
Authentication
To enable Firebase Authentication, go to the Firebase Console and click Authentication --> Get Started.
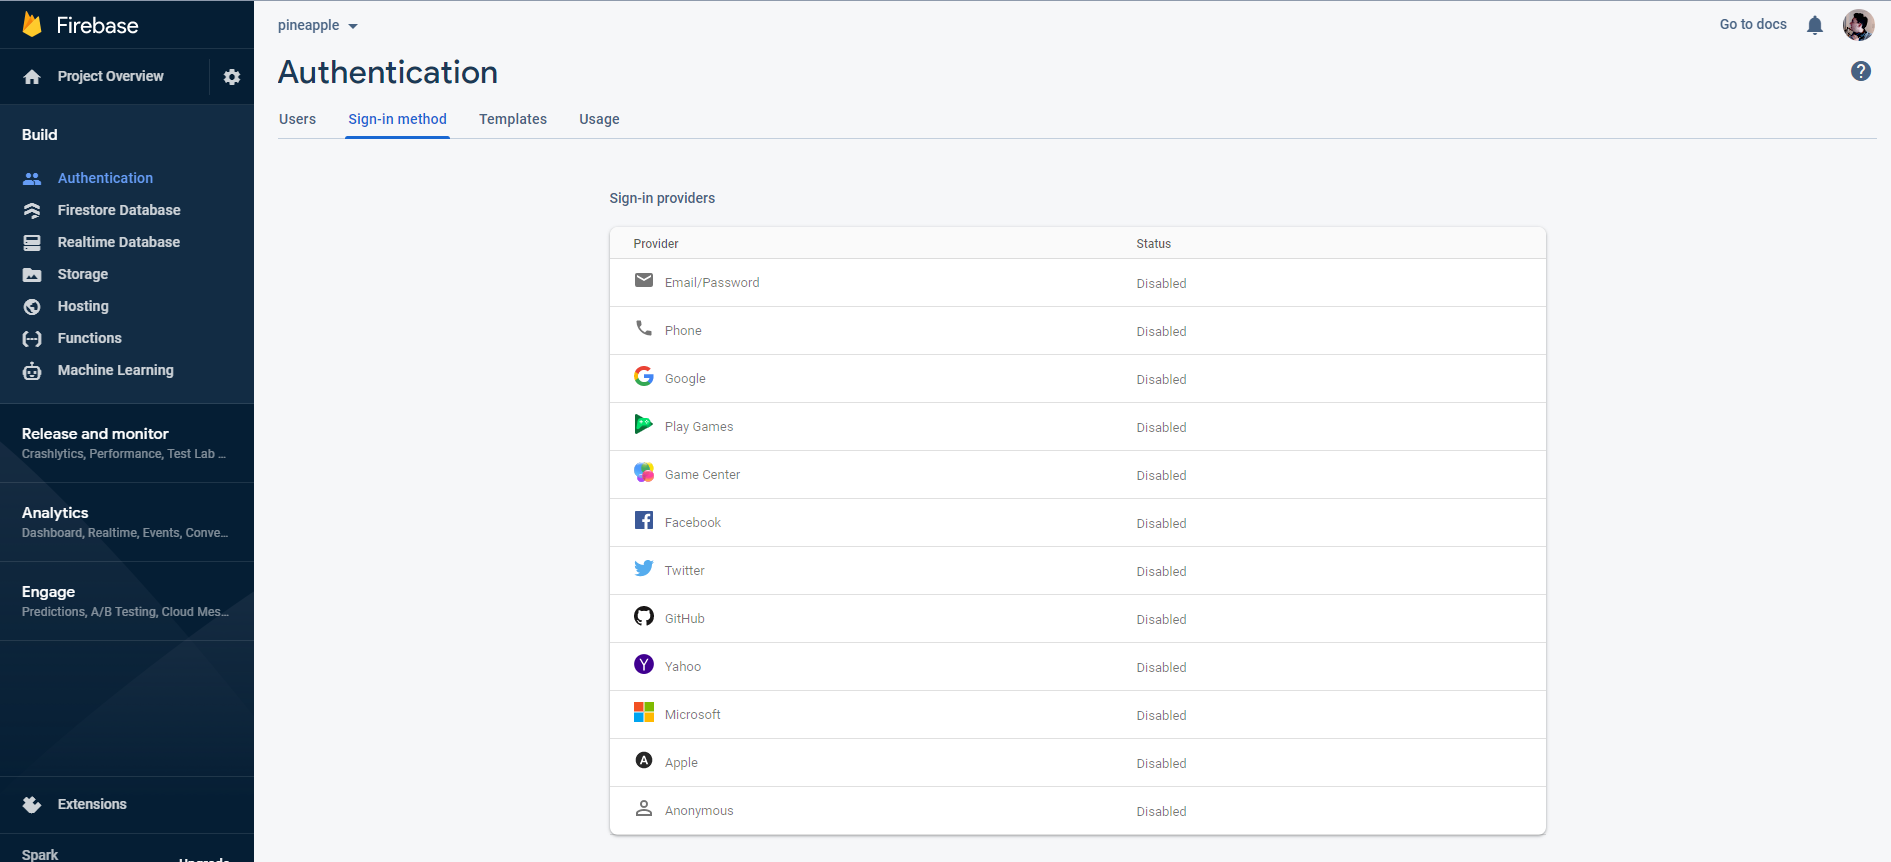
For this project, I am going to be enabling GitHub Authorization, if you'd like to do the same, we'll create a GitHub App now.
Creating a GitHub Application
First, copy the authorisation callback URL and use it to create your GitHub Oauth Application.
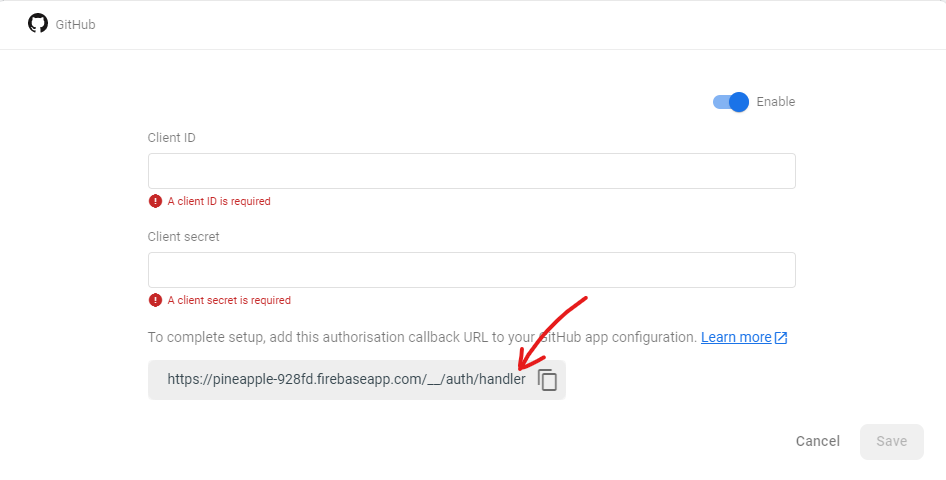
On the GitHub Homepage, click your profile icon in the top right > Settings > Developer Settings > OAuth Apps > Register a new Application
Pick a name for your GitHub OAuth Application, and use the URL we copied from Firebase.
Generate a Client Secret, and copy both the
- Client ID
- Client Secret into the GitHub Auth configuration window, we opened in Firebase.
Cool! Now users will be able to sign in with their GitHub account.
Let's do some work on the front-end to replicate that.
Creating the Signup and Sign In form
Now let's create a page where users can signup to use our application.
Create a new file under the pages directory called auth.tsx.
We'll use the library we installed earlier, react-firebaseui to display a pre-built Login form:
// auth.tsx
import React from "react";
import StyledFirebaseAuth from "react-firebaseui/StyledFirebaseAuth";
import firebase from "../firebase/clientApp";

// Configure FirebaseUI.
const uiConfig = {
  // Redirect to / after sign in is successful. Alternatively you can provide a callbacks.signInSuccess function.
  signInSuccessUrl: "/",
  // GitHub as the only included Auth Provider.
  // You could add and configure more here!
  signInOptions: [firebase.auth.GithubAuthProvider.PROVIDER_ID],
};

function SignInScreen() {
  return (
    <div>
      <h1>Pineapple Login</h1>
      <p>Please sign-in:</p>
      <StyledFirebaseAuth uiConfig={uiConfig} firebaseAuth={firebase.auth()} />
    </div>
  );
}

export default SignInScreen;
Now if we visit the /auth route at http://localhost:3000 and sign up with our GitHub profile, we'll be successfully signed in and re-directed to the / home page.
Although we can't really see what's happening right now, so let's set up something to display if we are signed in on the home page.
To detect whether the user is currently signed in, we'll use the react-firebase-hooks library we installed earlier.
This library has a hook called useAuthState to get the current signed in user - let's check it out.
index.tsx:
// index.tsx
import Head from "next/head";
import Image from "next/image";
import styles from "../styles/Home.module.css";
import firebase from "../firebase/clientApp";
// Import the useAuthStateHook
import { useAuthState } from "react-firebase-hooks/auth";

export default function Home() {
  // Destructure user, loading, and error out of the hook.
  const [user, loading, error] = useAuthState(firebase.auth());
  // console.log the current user and loading status
 console.log("Loading:", loading, "|", "Current user:", user);

  return <div>Hello!</div>;
}
Now let's revisit our home page and open up the console:
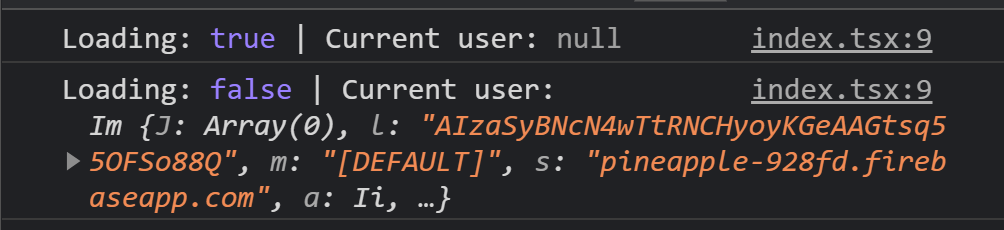
Great! We can see that we are currently signed in as the user value is printing out the value of our current user.
Even better, all of these destructured variables are properly typed for TypeScript.
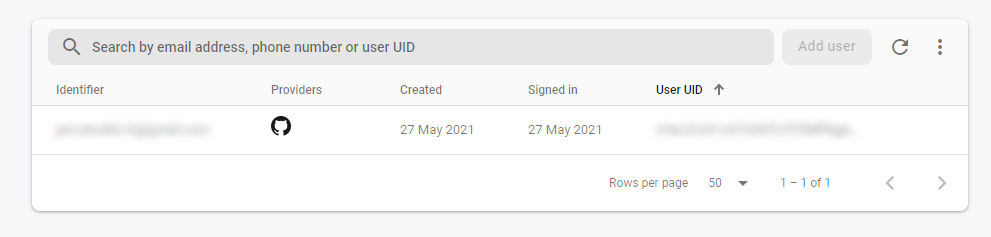
Note: You can double-check this worked in the Firebase Console Auth Tab:
Setting up a basic application
To keep our focus on displaying Firebase, let's make a very simple UI for now, and come back to it later.
Let's create two buttons:
- One for saying the user DOES agree with pineapple on pizza
- One for saying the user DOESN'T agree with pineapple on pizza
// index.tsx
return (
    <div
      style={{
        display: "flex",
        height: "100vh",
        width: "100vw",
        alignItems: "center",
        justifyContent: "center",
      }}
    >
      <button style={{ fontSize: 32, marginRight: 8 }}>✔️🍍🍕</button>
      <button style={{ fontSize: 32 }}>❌🍍🍕</button>
    </div>
  );
Awesome, I hope you are ready to click the ✔️🍍🍕 once we've got it connected to our Firestore database!
Now's probably a good time to talk about that!
FireStore
Firestore Databases are NoSQL databases, hosted on the cloud; that we can connect to via the Firebase clientApp we set up earlier.
To enable Cloud Firestore, in the Firebase Console, click Firestore Database > Create Database > Start in test mode > Pick a region you like, and Enable.
Cool! Now we have an empty database on the cloud.
Adds cloud databases to resume 
Creating Dummy Data
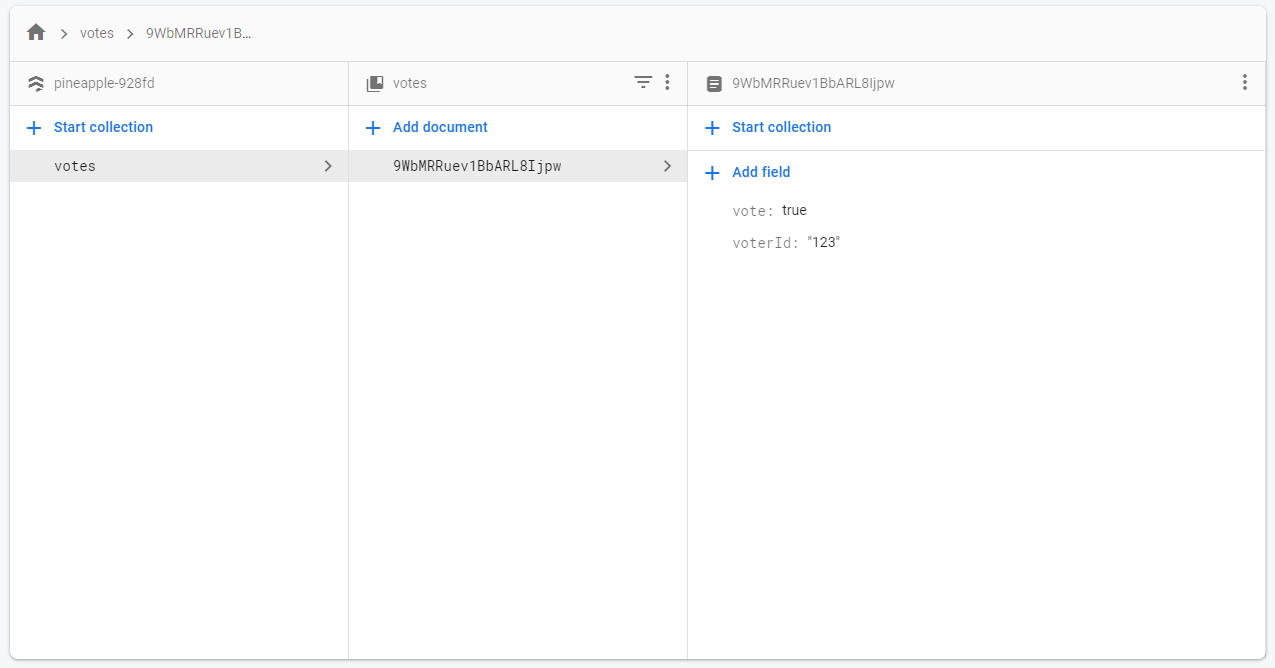
In the Firebase Console, let's go ahead and create a Collection and a Document and fill them with some dummy data.
Let's create a Collection called Votes and a dummy document, so our database looks like this:
Reading Data on the frontend
To connect to our database to the frontend and read data in, we'll use another hook from the react-firebase-hooks library.
This time, we'll use the useCollection hook - which retrieves and monitors a Collection in Cloud Firestore. It listens to live updates and stores the latest data for us, in the value field.
Let's set that up now. Add the following to our index.tsx:
import { useCollection } from "react-firebase-hooks/firestore";

export default function Home() {
// ... existing  hook code ...

const [votes, votesLoading, votesError] = useCollection(
    firebase.firestore().collection("votes"),
    {}
  );

  if (!votesLoading && votes) {
    votes.docs.map((doc) => console.log(doc.data()));
  }
Now if we take a look at our console on the website:
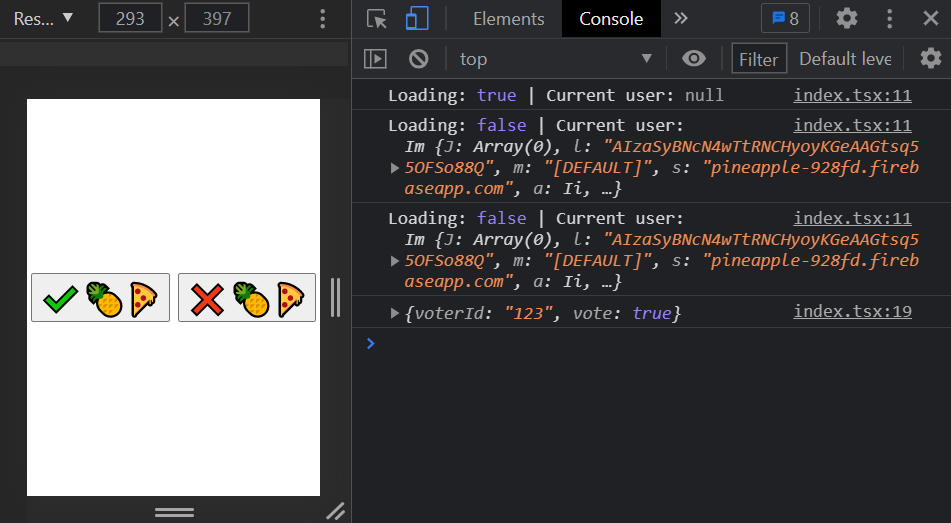
✅ Pineapples ✅ Pizzas ✅Cloud Database Connectivity!
What more could you ask for!
Well... Hopefully you asked for more features, 'cos we are going to add them!
Creating a Vote Document
Whenever someone hits one of our two buttons, we want to reflect that in our database, by creating a vote document in the votes collection.
To do that, we will make a function addVoteDocument to write a document to our cloud database.
// index.tsx
 const addVoteDocument = async (vote: string) => {
    await db.collection("votes").doc(user.uid).set({
      vote,
    });
  };
We'll also need to define the db variable at the top of our Home function.
const db = firebase.firestore();
Then we'll set our two buttons to call this function with two different arguments: yes for the pineapple lovers and no for the pineapple haters!
// index.tsx
     <button
        style={{ fontSize: 32, marginRight: 8 }}
        onClick={() => addVoteDocument("yes")}
      >
        ✔️🍍🍕
      </button>
      <button style={{ fontSize: 32 }} onClick={() => addVoteDocument("no")}>
        ❌🍍🍕
      </button>
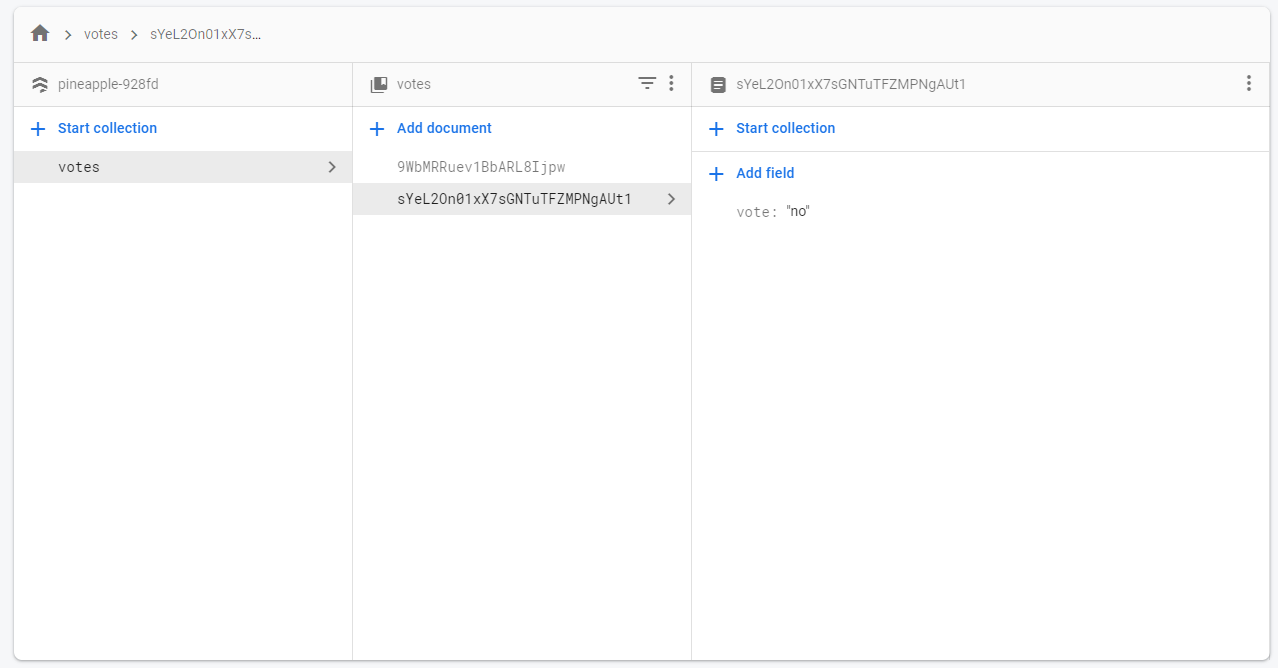
Now if we test it out on the UI, we can see we are creating a document in the votes collection, and the name of the document is the uid of the user that made the vote.
This will allow us to ensure users are only voting once; since the document will be overwritten if the same user votes more than once.
The document we created looks like this:
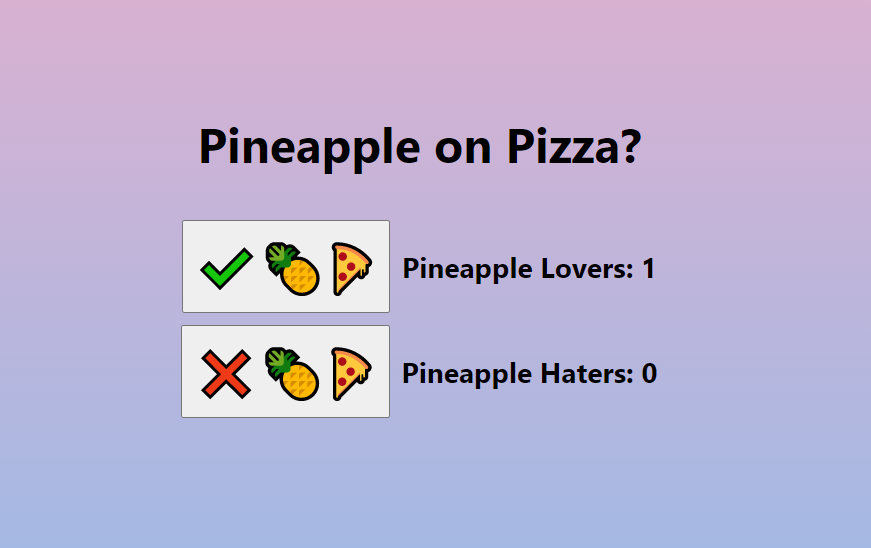
Displaying a counter on the UI
Let's update our UI to display how many people have voted yes or no:
// index.tsx
return (
    <div
      style={{
        display: "flex",
        height: "100vh",
        width: "100vw",
        alignItems: "center",
        justifyContent: "center",
        flexDirection: "column",
        gridGap: 8,
        background:
          "linear-gradient(180deg, rgba(238,174,202,1) 0%, rgba(148,187,233,1) 100%)",
      }}
    >
      <h1>Pineapple on Pizza?</h1>

      <div style={{ flexDirection: "row", display: "flex" }}>
        <button
          style={{ fontSize: 32, marginRight: 8 }}
          onClick={() => addVoteDocument("yes")}
        >
          ✔️🍍🍕
        </button>
        <h3>
          Pineapple Lovers:{" "}
          {
            votes?.docs?.filter(
              (doc) => doc.data().vote === "yes"
            ).length
          }
        </h3>
      </div>
      <div style={{ flexDirection: "row", display: "flex" }}>
        <button
          style={{ fontSize: 32, marginRight: 8 }}
          onClick={() => addVoteDocument("no")}
        >
          ❌🍍🍕
        </button>
        <h3>
          Pineapple Haters:{" "}
          {
            votes?.docs?.filter(
              (doc) => doc.data().vote === "no"
            ).length
          }
        </h3>
      </div>
    </div>
  );
For all the TypeScript lovers out there, we can create a type for the data expected in the document.
type VoteDocument = {
  vote: string;
};
Then we can modify the above code to be the following:
(doc) => (doc.data() as VoteDocument).vote === "yes"
Awesome, here's what we have so far:
Cloud Functions
To take our code to the next level, I'd like to show who is voting yes and no to the ultimate pineapple question.
To do that, we'd need to store user data somewhere - which we can do by using a Cloud function.
The cloud function we are going to create is to store user data in a user document (inside a new users collection) - which will be triggered every time a user signs up!
Let's get started.
Initializing Cloud Functions
To enable cloud functions, go to the Functions tab on the Firebase Console.
In order to create cloud functions, we first need to upgrade our project to the Blaze Pay as you go plan. I would recommend setting a budget of whatever you are comfortable with.
Not to worry, unless you are getting a significant number of users, we won't actually pay a cent, since we get 2 million invocations per month Free!
Once that is set up, we'll click Get Started.
To create cloud functions, we'll need to install the Firebase CLI, by running:
npm install -g firebase-tools
and also:
npm install firebase-functions
Once that is installed, run firebase login to login to the CLI with your Google account.
To initialize the Cloud functions, run firebase init functions, and accept the following configuration:
? Please select an option: Use an existing project
? Select a default Firebase project for this directory: pineapple-928fd (pineapple)
? What language would you like to use to write Cloud Functions? TypeScript
? Do you want to use ESLint to catch probable bugs and enforce style? No
? Do you want to install dependencies with npm now? Yes

+  Firebase initialization complete!
If we go back to our project and take a look, you'll notice a number of files have been added:
myproject
 +- .firebaserc    # Hidden file that helps you quickly switch between
 |                 # projects with `firebase use`
 |
 +- firebase.json  # Describes properties for your project
 |
 +- functions/     # Directory containing all your functions code
      |
      +- .eslintrc.json  # Optional file containing rules for JavaScript linting.
      |
      +- package.json  # npm package file describing your Cloud Functions code
      |
      +- index.js      # main source file for your Cloud Functions code
      |
      +- node_modules/ # directory where your dependencies (declared in
                       # package.json) are installed
Writing the function
We write our functions in the functions/src/index.ts file.
We can create a function that triggers when an Firebase user is created, using the functions.auth.user().onCreate() event handler.
So our code is going to look something like this:
export const createUserDocument = functions.auth.user().onCreate((user) => {
    // ...
});
The user value here is of type auth. UserRecord, meaning we can access things like:
- displayName
- uid
- photoURL
We'll use this information to create a new document for each user that signs up.
Create a function inside the functions/src/index.tsx file that looks like this:
import * as functions from "firebase-functions";

const admin = require("firebase-admin");
admin.initializeApp();
const db = admin.firestore();

export const createUserDocument = functions.auth.user().onCreate((user) => {
  db.collection("users")
    .doc(user.uid)
    .set(JSON.parse(JSON.stringify(user)));
});
Next we'll run firebase deploy --only functions to deploy this function to the cloud.
Now if we delete ourselves as a user from the Authentication tab inside the Firebase Console, and try sign up again through GitHub via our /auth route, a document will be created for us in FireStore:
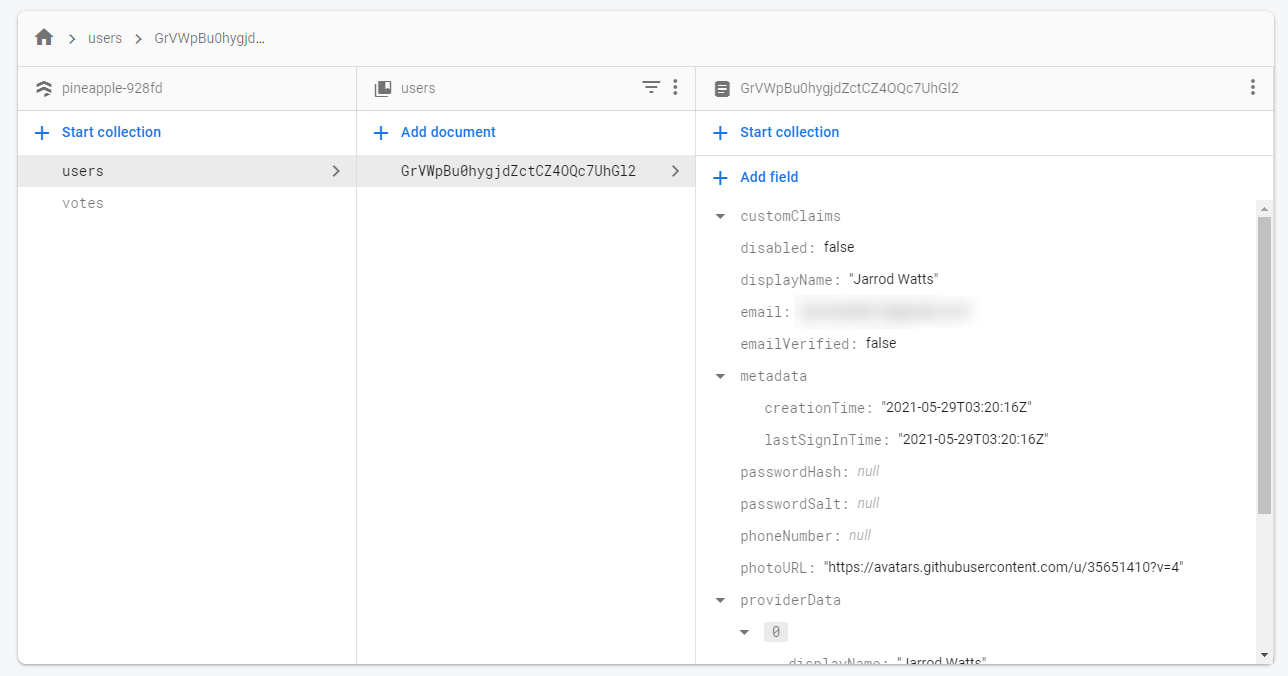
Cleaning up the UI
Now all that's left to do is:
- Show the sign up page on the home page rather than a separate route,
- Display a list of users who have submitted their votes.
Creating a Signup / Sign in Screen Component
I'm going to delete our auth page, and instead create a components directory and then a auth component within that folder.
// components/Auth.tsx
import React from "react";
import StyledFirebaseAuth from "react-firebaseui/StyledFirebaseAuth";
import firebase from "../firebase/clientApp";

// Configure FirebaseUI.
const uiConfig = {
  // Redirect to / after sign in is successful. Alternatively you can provide a callbacks.signInSuccess function.
  signInSuccessUrl: "/",
  // We will display GitHub as auth providers.
  signInOptions: [firebase.auth.GithubAuthProvider.PROVIDER_ID],
};

function SignInScreen() {
  return (
    <div
      style={{
        maxWidth: "320px",
        display: "flex",
        flexDirection: "column",
        alignItems: "center",
        justifyContent: "center",
      }}
    >
      <h1>Pineapple Login</h1>
      <p>Please sign-in:</p>
      <StyledFirebaseAuth uiConfig={uiConfig} firebaseAuth={firebase.auth()} />
    </div>
  );
}

export default SignInScreen;
Then let's show different screens depending on the state of the user on the main index.tsx page:
import Auth from "../components/Auth";

// ...

return (
    <div
      style={{
        display: "flex",
        height: "100vh",
        width: "100vw",
        alignItems: "center",
        justifyContent: "center",
        flexDirection: "column",
        gridGap: 8,
        background:
          "linear-gradient(180deg, rgba(238,174,202,1) 0%, rgba(148,187,233,1) 100%)",
      }}
    >
      {loading && <h4>Loading...</h4>}
      {!user && <Auth />}
      {user && (
        <>
          <h1>Pineapple on Pizza?</h1>

          <div style={{ flexDirection: "row", display: "flex" }}>
            <button
              style={{ fontSize: 32, marginRight: 8 }}
              onClick={() => addVoteDocument("yes")}
            >
              ✔️🍍🍕
            </button>
            <h3>
              Pineapple Lovers:{" "}
              {
                votes?.docs?.filter(
                  (doc) => (doc.data() as VoteDocument).vote === "yes"
                ).length
              }
            </h3>
          </div>
          <div style={{ flexDirection: "row", display: "flex" }}>
            <button
              style={{ fontSize: 32, marginRight: 8 }}
              onClick={() => addVoteDocument("no")}
            >
              ❌🍍🍕
            </button>
            <h3>
              Pineapple Haters:{" "}
              {
                votes?.docs?.filter(
                  (doc) => (doc.data() as VoteDocument).vote === "no"
                ).length
              }
            </h3>
          </div>
        </>
      )}
    </div>
  );
Now lets create another component components/VoterList.tsx that is responsible for showing which users have voted and what they voted for.
// components/VoterList.tsx
import React, { ReactElement } from "react";
import { useDocument } from "react-firebase-hooks/firestore";
import firebase from "../firebase/clientApp";

interface Props {
  // id is the id of the vote document
  // (which is also the uid of the user, and the name of the user doucment for that user)
  id: string;
  vote: string;
}

export default function VoterList({ id, vote }: Props): ReactElement {
  const [value, loading, error] = useDocument(
    firebase.firestore().doc(`users/${id}`)
  );

  if (loading) {
    return <h6>Loading...</h6>;
  }

  if (error) {
    return null;
  }

  return (
    <div
      style={{
        maxWidth: "320px",
        display: "flex",
        flexDirection: "row",
        alignItems: "center",
      }}
    >
      <img
        style={{
          borderRadius: "50%",
          maxHeight: "48px",
          marginTop: "8px",
          marginRight: "8px",
        }}
        src={value.data().photoURL}
      />
      <div>
        <h4 style={{ marginBottom: 0 }}>{value.data().displayName}</h4>
        <h4 style={{ marginTop: 0 }}>
          Voted: {vote === "yes" ? "✔️🍍" : "❌🍍"}
        </h4>
      </div>
    </div>
  );
}
And map each vote document to display a VoterList component in our index.tsx file:
// index.tsx
import VoterList from "../components/VoterList";

// ...

<div style={{ marginTop: "64px" }}>
            <h3>Voters:</h3>
            <div
              style={{
                maxHeight: "320px",
                overflowY: "auto",
                width: "240px",
              }}
            >
              {votes?.docs?.map((doc) => (
                <>
                  <VoterList id={doc.id} key={doc.id} vote={doc.data().vote} />
                </>
              ))}
            </div>
          </div>
Voilà!
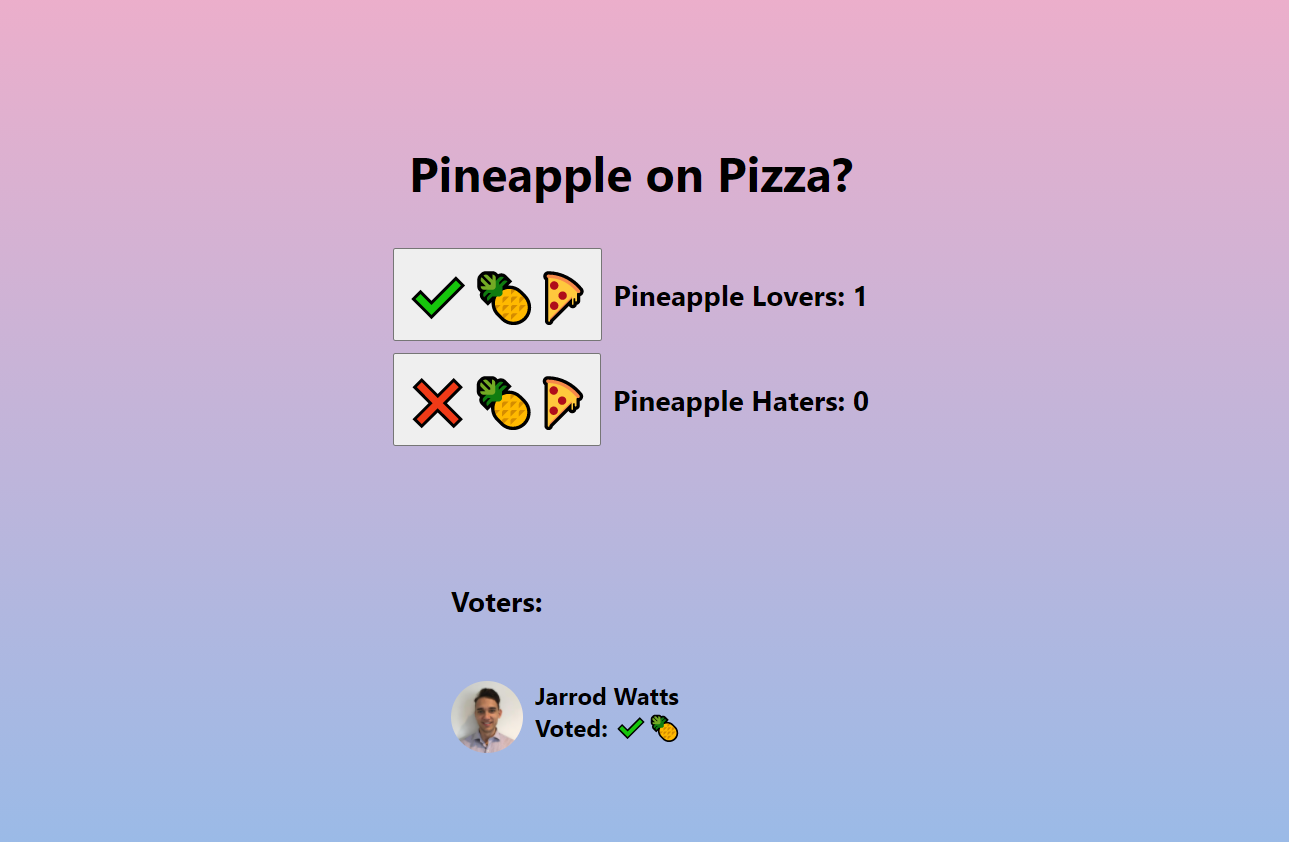
Now we can see who votes for what in real time.
Conclusion
Firebase is an incredible tool to get up and running with complex features of a full-stack application. With minimal effort required, we can create a full-stack web application with a live-updating database, an authentication system and cloud functions super easy.
If you're looking to build a SaaS application or a web-application at lightning pace, Firebase and Next JS provide an amazing toolset to get off the ground and into production with an incredible developer experience.
Connect With Me!
YouTube: youtube.com/channel/UCJae_agpt9S3qwWNED0KHcQ
Twitter: twitter.com/JarrodWattsDev
GitHub: github.com/jarrodwatts
LinkedIn: linkedin.com/in/jarrodwatts
Website: jarrodwatts.com