I Fixed Web3 Onboarding
A software engineer turned developer relations engineer in the web3 space, from Australia 🇦🇺.
In this guide, I'll show you how to create a web3 onboarding experience that allows users to interact with your smart contracts without ever creating their own wallet.
I'll walk through how to:
Create a smart wallet factory contract (using EIP-4337 account abstraction)
Create new smart wallets on-demand for users from the factory
Allow users to interact with a smart contract from their created smart wallets
Bonus: generate EOA wallets for users under the hood - for a signless UX!
Let's dive into it.
Recap: what's account abstraction again?
If you aren't already familiar with account abstraction or EIP-4337 in particular, check out my previous blog post for a beginner-friendly introduction:
TLDR: EIP-4337 adds several important features to better support smart wallets:
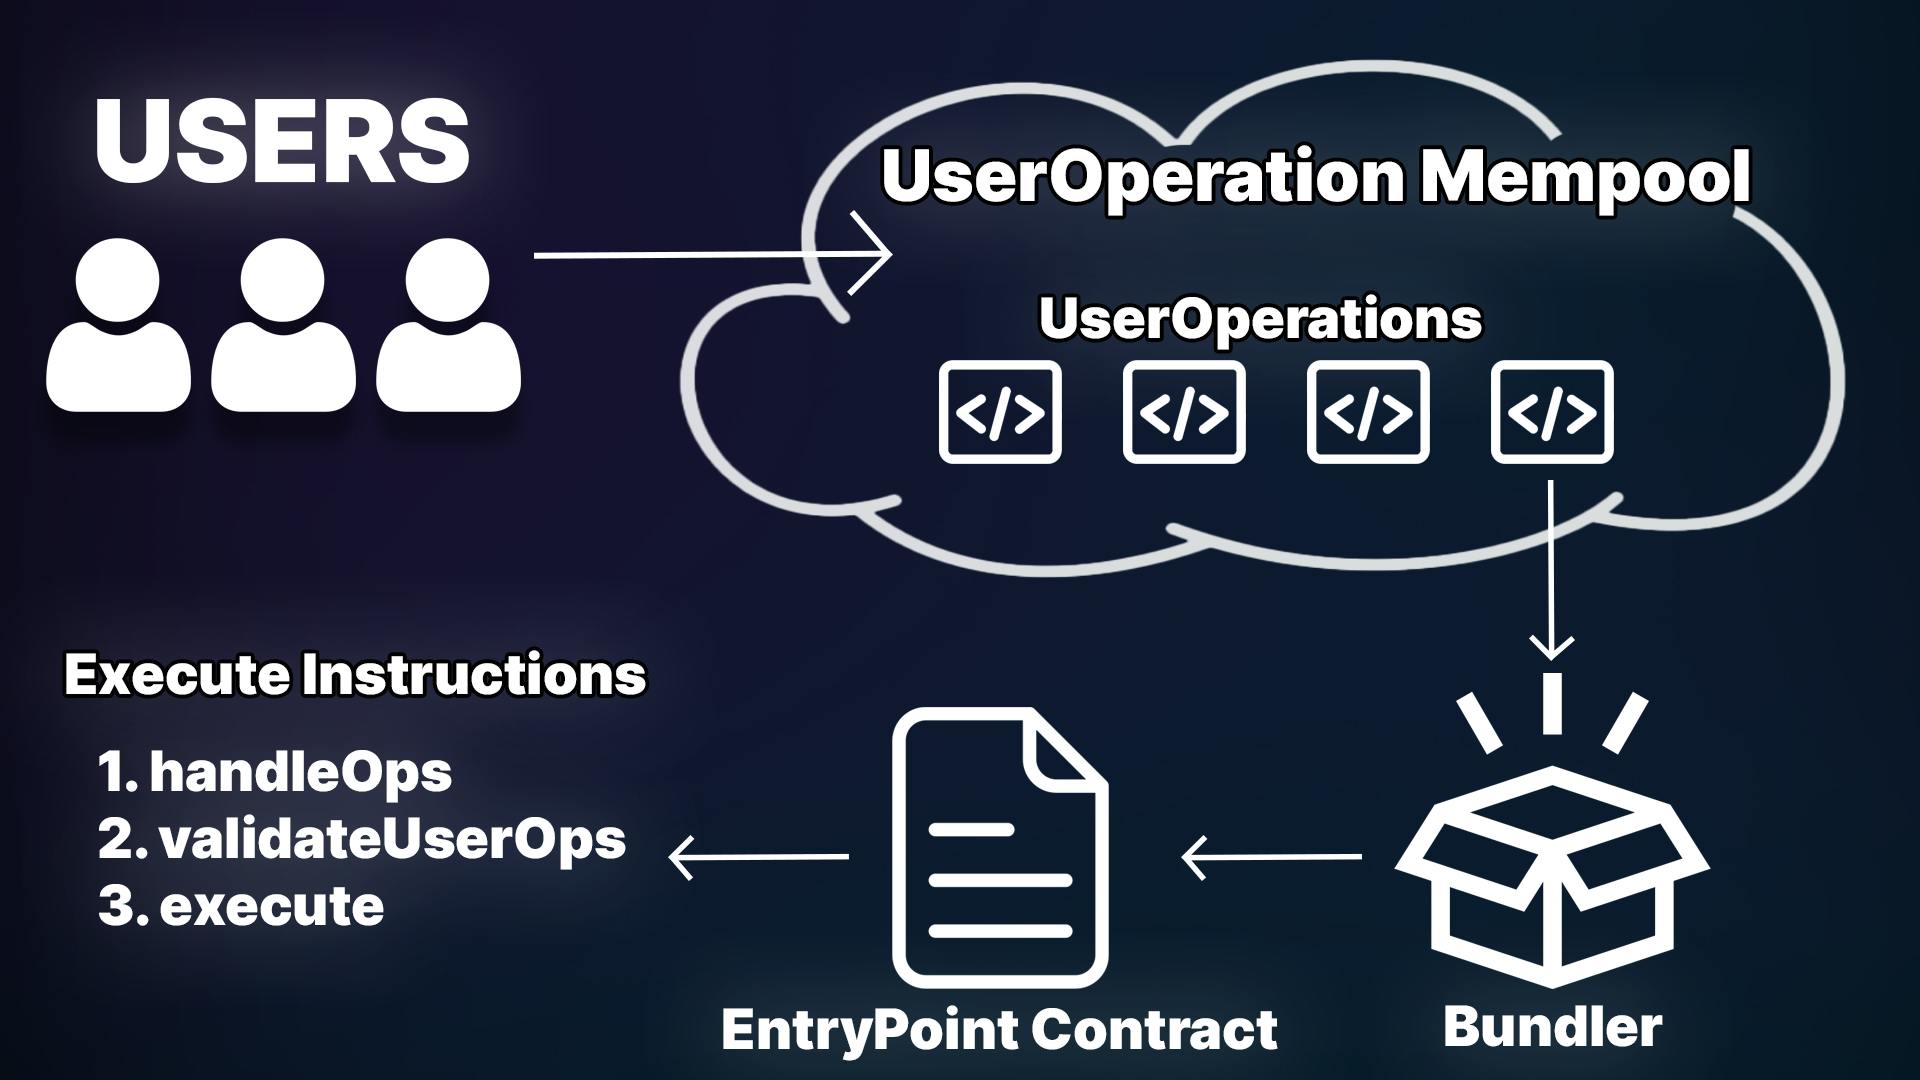
UserOperation: A new, special kind of operation that gets sent to a new mempool (a waiting zone to be picked up by nodes) called the "alt mempool".Bundlers: Nodes that bundle togetherUserOperationsfrom the alt mempool, and send them to aEntry Pointsmart contract for them to be executed.Entry Point: A smart contract responsible for executing bundles ofUserOperationsthat were submitted by bundlers.
Implementing Account Abstraction
All this sounds great, but how do we implement this in a real-world application?
That's what we're going to cover in this guide, we'll break it into two parts:
Creating & deploying the smart wallet factory contract.
Building a web3 application that creates wallets for users under the hood and allows them to interact with our app from their generated wallets!
Let's get started.
Creating a Smart Wallet Factory Contract
The first thing we'll do is create a factory contract, responsible for the creation of new smart wallet contracts. By using a factory, we can deploy new smart wallets for users on demand; simply by asking the factory to create a new one.
To create a factory smart contract, head to the thirdweb Explore page, and scroll down to the "Smart Wallet" section:
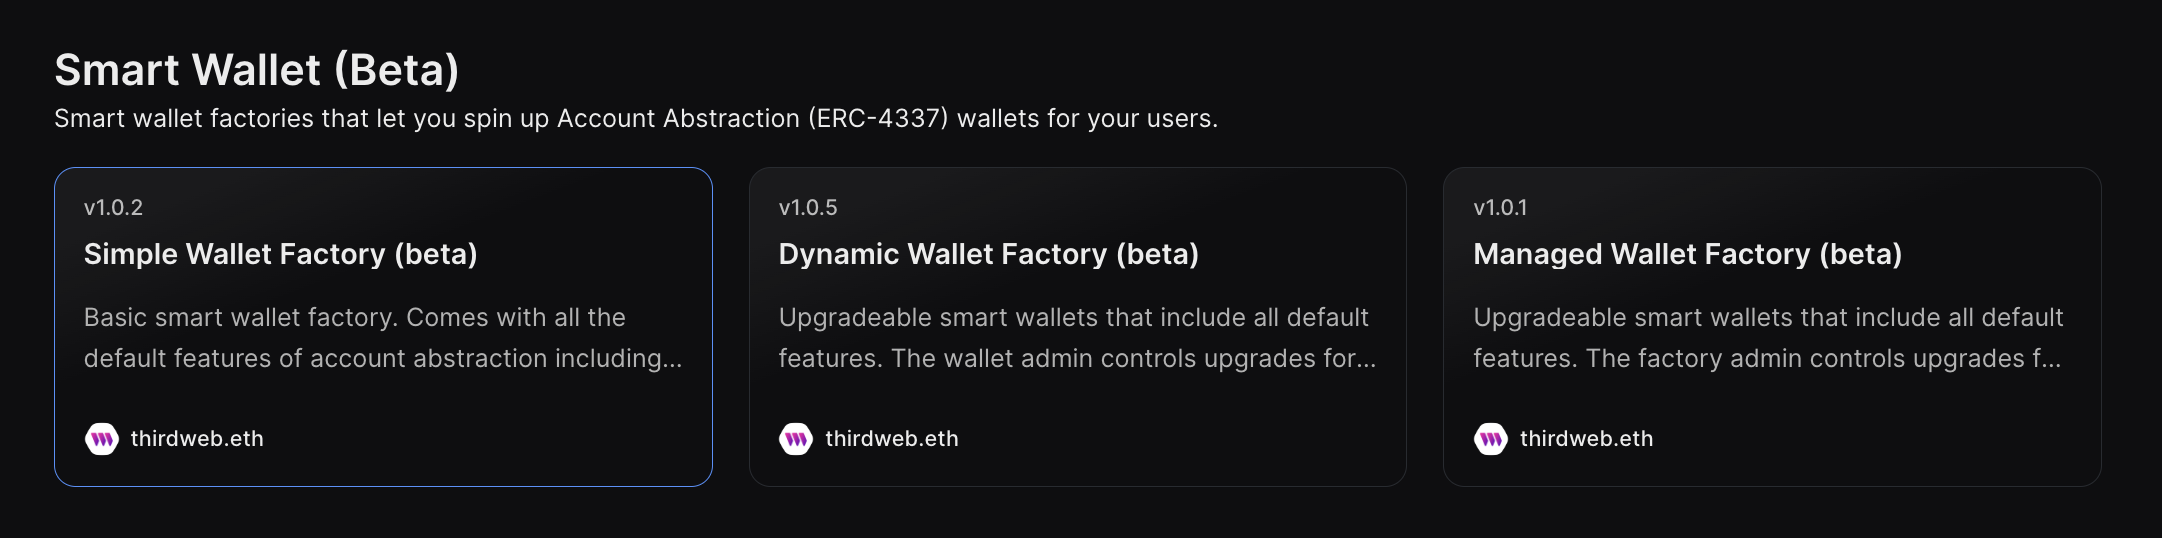
Select the Simple Wallet Factory smart contract, and click Deploy now:

Leave the default value for the _entrypoint parameter, and click Deploy Now again!

Deploy to one of the smart wallet supported chains such as Mumbai or Goerli.
In the future, all EVM chains will be supported, but currently, only 6 have the smart wallet infrastructure available to use.
Once deployed, you'll be taken to the dashboard for your smart contract:
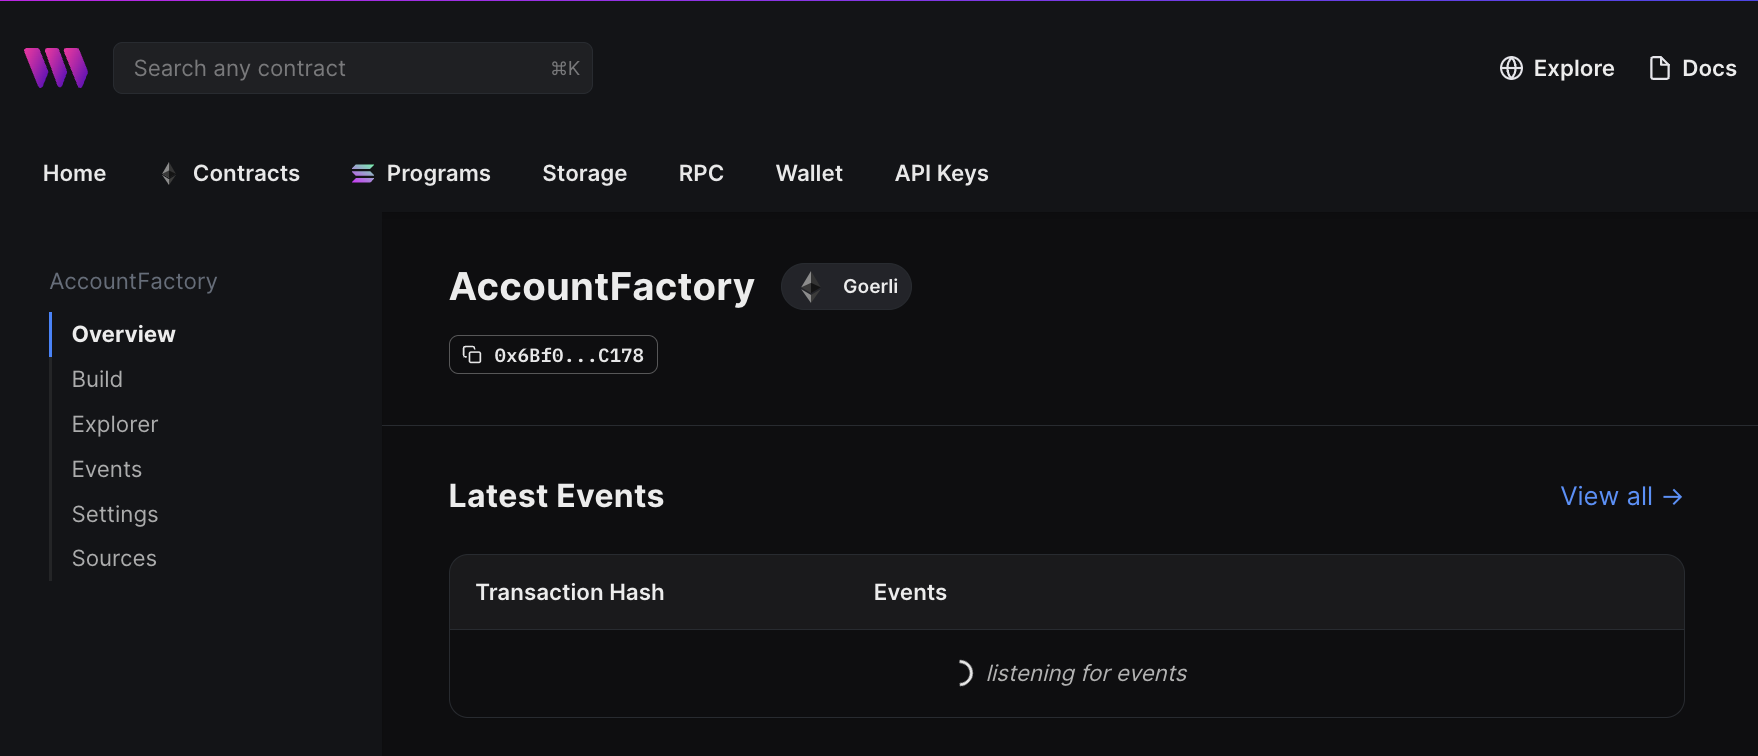
Woo! 🥳 That's step one complete, we now have our own smart wallet factory contract deployed to the blockchain.
How the Wallet Factory Works
For those curious about how this smart contract works, this section is for you.
If you head to the Sources tab on your contract dashboard, you can see that the AccountFactory.sol contract inherits the BaseAccountFactory.sol contract; which is what provides us with the core functionality.
This contract includes features such as:
createAccount: To produce a new smart wallet contract.addSignerandremoveSigner: To control which signers can act on behalf of a smart wallet.
Each time createAccount is called, a new Account contract is deployed and initialized.
The Account.sol smart contract is the contract that gets produced by the factory.
It contains the functions required to be an EIP-4337 compatible smart wallet such as validateUserOp to confirm the validity of the operation, and execute to run the logic defined in the operation.
Why's this Matter?
What we're going to do with this factory is generate smart wallets for users under the hood. We'll perform a two-step process to easily onboard users into the application:
Generate a new EOA wallet for the user and store it on their machine
Generate a smart wallet for the user, using the wallet from step 1's signer as a valid signer for the smart wallet.
This way, the user will interact with our application from their generated smart wallet. By using the signer of the generated EOA to approve transactions, we can hide any prompts or approvals from the user.
Creating the Application
We'll be creating a Next.js + TypeScript application with the thirdweb React SDK installed to add our web3 features and capabilities.
To get started, create a new project with the SDK pre-configured by running the following command from your terminal:
npx thirdweb create app --evm --next --ts
You don't have to use Next.js or TypeScript, these are just my personal preferences.
Once the project is created, we're ready to start adding the connect wallet UI and integrate our account factory smart contract.
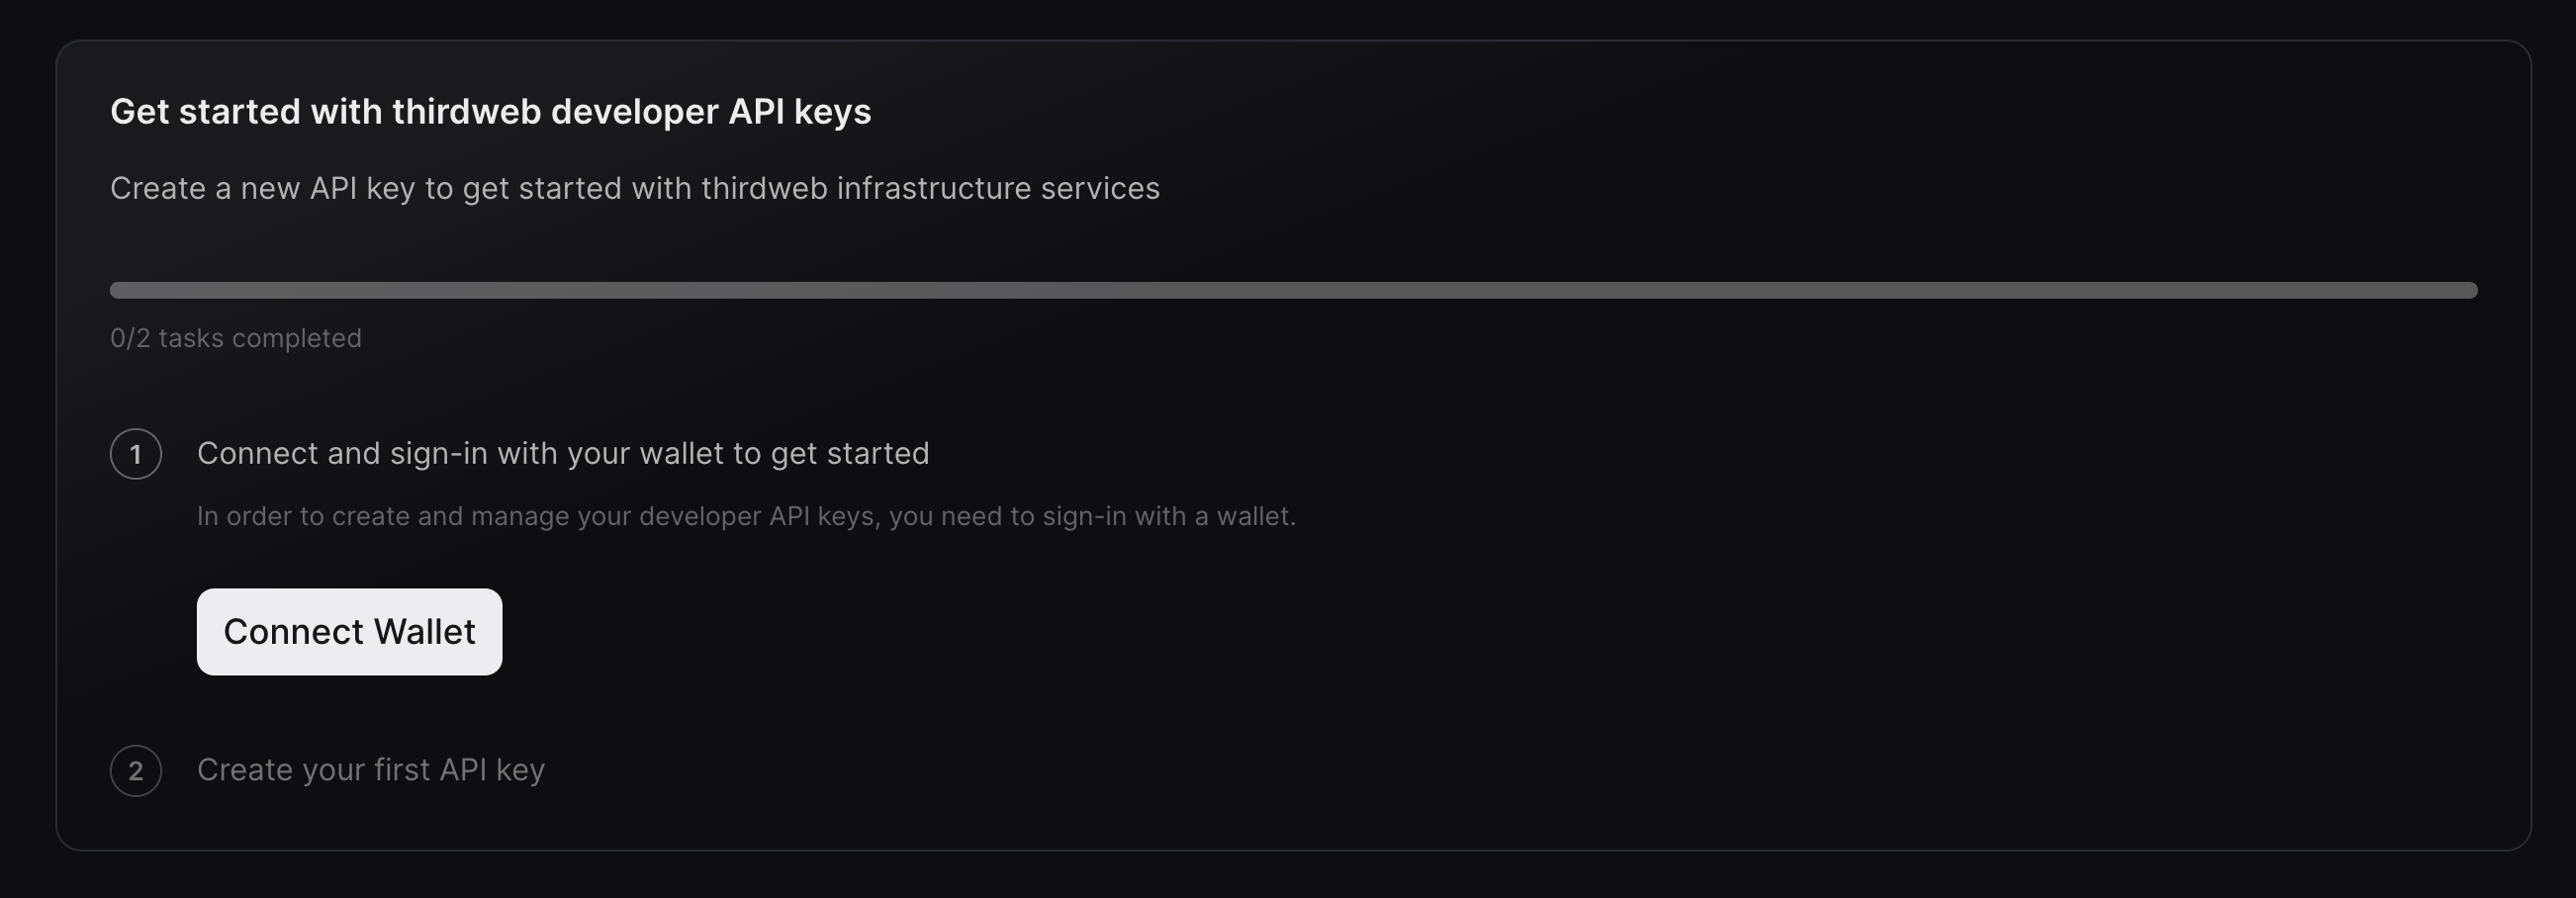
Get a thirdweb Developer API Key
From the thirdweb dashboard, connect your wallet and sign a message to get an API key; we'll need it for the next step.
Add Smart Wallet Support
Back in our application, head to the _app.tsx page and change the activeChain to be mumbai, or one of the other currently supported chains.
import { ThirdwebProvider } from "@thirdweb-dev/react";
import type { AppProps } from "next/app";
import "../styles/globals.css";

const activeChain = "mumbai";

function MyApp({ Component, pageProps }: AppProps) {
  return (
    <ThirdwebProvider activeChain={activeChain}>
      <Component {...pageProps} />
    </ThirdwebProvider>
  );
}

export default MyApp;
The ThirdwebProvider component allows us to define a supportedWallets prop; to specify which wallets we want to support in the application. For us, we're going to specify that we want to support smart wallets.
Your code should now looks like this:
import type { AppProps } from "next/app";
import { smartWallet, ThirdwebProvider } from "@thirdweb-dev/react";
import "../styles/globals.css";

const activeChain = "mumbai";

function MyApp({ Component, pageProps }: AppProps) {
  return (
    <ThirdwebProvider
      activeChain={activeChain}
      supportedWallets={[
        smartWallet({
          factoryAddress: "xxx", // Address of your account factory smart contract
          thirdwebApiKey: "xxx", // The API key you got from the previous step
          gasless: true,
        }),
      ]}
    >
      <Component {...pageProps} />
    </ThirdwebProvider>
  );
}

export default MyApp;
Create the Connect Wallet Button
On the index.tsx page, let's display a connect wallet button now. The thirdweb React SDK includes a ConnectWallet component, which reads the supportedWallets we just defined, and displays all of the supported options in a modal.
Simply import and render the ConnectWallet component on the home page:
import { ConnectWallet } from "@thirdweb-dev/react";
import type { NextPage } from "next";

const Home: NextPage = () => {
  return <ConnectWallet />;
};

export default Home;
Now let's preview our homepage by running npm run dev and visiting localhost:3000.
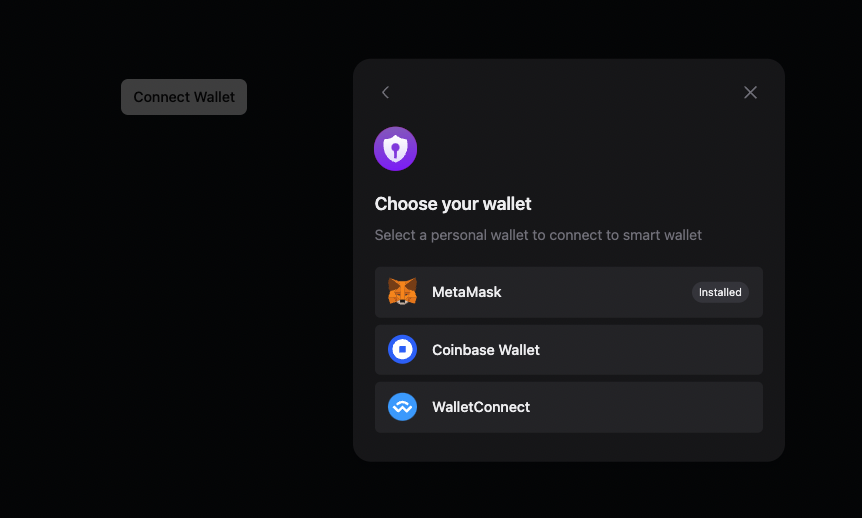
Voilà! Once we connect with a personal wallet (an EOA), we are connected to a smart wallet account. The address you see from the connect wallet button is the wallet address of your smart wallet account:
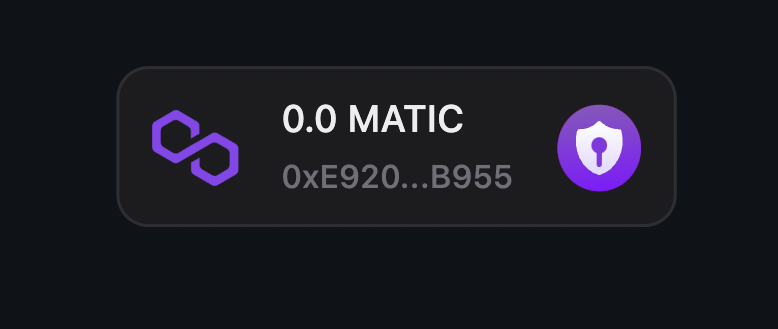
Note: This is a deterministic address; meaning this will be the address of the smart contract for this EOA/signer, but the actual contract is not deployed by the factory until a transaction is initiated by this smart wallet. We know the contract address ahead of time by using the predictDeterministicAddress function.
We can now interact with any smart contract such as an NFT drop directly from our smart contract wallet, and it will go through the full EIP-4337 flow.
I'll demo that process in the final section of this guide; showing you how our UserOperation gets picked up by the bundler, and sent to the entry point smart contract.
But first, let's talk about onboarding. With this setup, we still ask the user to provide an EOA before generating a smart wallet for them. Let's see how we can fix this.
Improving the Onboarding Experience
You might be saying something like "Isn't the point of account abstraction to improve onboarding? If users still need to have an EOA like MetaMask, what's the point of all this?"
The app we've built so far allows users to interact with our application using a smart wallet that gets generated for them. However, we still require users to connect a personal wallet / EOA beforehand.
This is because smart wallets still require a signature from one of the smart wallet's approved signers to confirm the action taking place on the smart contract.
Rather than asking users to provide their own wallet to act as a signer for the smart wallet we generate, let's also generate an EOA wallet, and use that generated wallet's signer as a signer for the smart wallet!
Introducing... local wallets!
Local Wallets
The local wallet is a non-custodial solution that creates wallets for users under the hood and stores the wallet's private key on the device.
This way, as the app developer, we are creating wallets for the user under the hood without them knowing, and storing the wallet's private key on the user's device.
By combining the local wallet with the smart wallet, we can provide a smoother experience, that looks like this:
We generate an EOA wallet for the user under the hood.
We then generate a smart wallet for the user under the hood (again, it is not actually deployed until it is required).
The generated EOA is a signer for the generated smart wallet.
The user interacts with our app without ever signing messages or approving transactions since we (the app developer) have access to their local wallet signer.
To replace the personal wallet step with this local wallet flow, we simply add an array of personalWallets to the smartWallet we set up earlier in the _app.tsx page, like so:
function MyApp({ Component, pageProps }: AppProps) {
  return (
    <ThirdwebProvider
      activeChain={activeChain}
      supportedWallets={[
        smartWallet({
          factoryAddress: "xxx",
          thirdwebApiKey: "xxx",
          gasless: true,
          // Local wallet as the only option for EOA
          personalWallets: [
            localWallet({
              persist: true,
            }),
          ],
        }),
      ]}
    >
      <Component {...pageProps} />
    </ThirdwebProvider>
  );
}
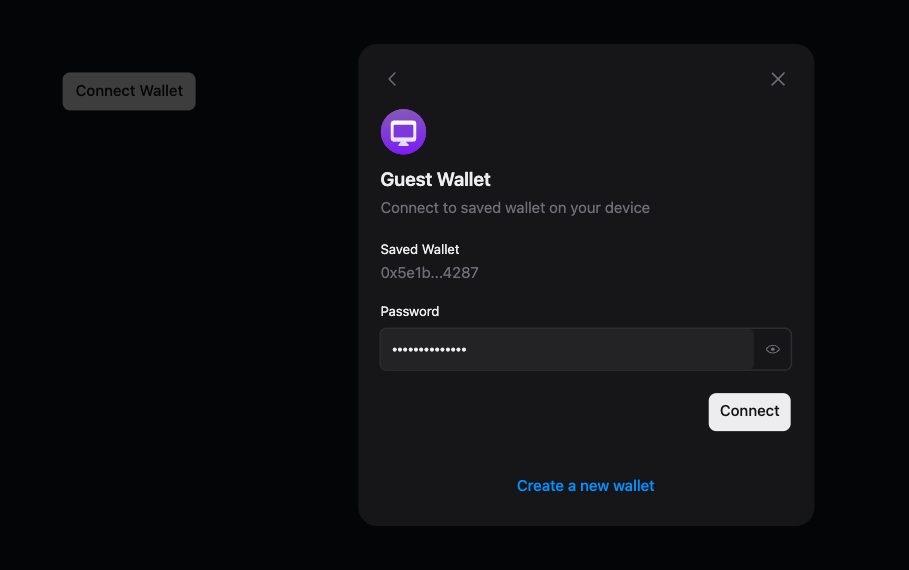
Here, we're saying that the only option users have to connect with a personal wallet is a local wallet; one that we're going to generate for them.
On the UI, this shows the "Continue as guest" option to our users; which asks them to set up a password to secure their wallet on the device.
Users can re-enter this password next time they want to interact with our application to access the same wallet:
Now, we generate both the EOA and the smart wallet for the user. 🔥
When users interact with our contracts from within the application, they never see a "sign message" or "approve transaction" prompt!
The actions of the smart contract wallet are automatically signed by the generated EOA under the hood! Let's take a look.
Final Demo
View the demo: https://twitter.com/jarrodWattsDev/status/1655460223413522434
To showcase this process, I deployed a simple NFT Drop smart contract to view how users can now interact with our app and perform an action such as minting an NFT without ever connecting a wallet or signing/approving a transaction.
Let's view the full flow from a user perspective.
I click "Connect Wallet", type in a password, and the application generates an EOA wallet for me. Meaning I don't need to set up any browser extension/wallet.
A smart wallet gets generated for me under the hood. My EOA from step one is a valid signer for this smart wallet.
I click "Mint NFT", acting on behalf of my smart wallet.
The app uses my generated EOA to sign the message under the hood.
This approves the transaction for the smart wallet (since my EOA signer is a valid signer for the smart wallet).
From here, we kick off the EIP-4337 account abstraction flow.
After our EOA signs the message under the hood, a
UserOperationis submitted to the alt mempool, containing the information that we want to mint an NFT to the smart wallet.The bundler picks up this
UserOperation, batches them together with other ones, and submits them to the entry point smart contract.The entry point smart contract runs its
handleOpsfunction, which runs two functions on our smart wallet contract:validateUserOps: Does this have a valid signature from one of my signers? (Yes, our app signs the message under the hood)execute: Since this looks legit, let's actually run the code.
But... How is it Gasless?
After the execute function is run by the smart wallet, typically this is the point that the smart wallet contract would pay the gas fee for the transaction to take place.
However, since we set the gasless flag to be true in our application, this enables thirdweb's paymaster infrastructure to be utilized. Paymasters are smart contracts that can sponsor transactions for other users; AKA, pay the gas fee.
This allows our smart wallet to execute valid transactions without being pre-loaded with funds, and have the paymaster smart contract handle the gas fees; without using a centralized service such as a relayer!
You can view the full IPaymaster.sol interface on thirdweb's GitHub.
Wrapping Up
We've covered a lot in this guide, from generating EOA's, smart wallet factories, and EIP-4337 paymasters. I believe these will be important concepts for us to know in the coming months as we start to create better onboarding experiences for our users.
The bar to enter web3 applications is too high, and account abstraction offers a solution that is available to us now. It's up to us as developers to lower these gates and take the pain away from users by handling these complexities under the hood.
All of the resources I've referenced in this are open source and can be found below.
If you enjoy this kind of content, please consider following my blog for more written content and follow me on Twitter for video and short-form stuff.
Thank you for reading!
Links & Resources
Smart Contracts
Application
Other Tools