How I Built "Squid Game, Except Its Coding Interview Questions"!

A software engineer turned developer relations engineer in the web3 space, from Australia 🇦🇺.
Spoiler Alert: This blog post makes several references to the show Squid Game, if you don't want to see spoilers, I'd recommend looking away!
Introduction
I built Squid Game, except it's coding interviews, well, sort of... Let me explain!
For those who have been living under a rock, Squid Game is a game where competitors must complete challenges, and if they fail, (spoiler alert), they meet their unfortunate end! 💀
Coding interviews are notoriously difficult and are often mocked amongst the programming community, as they often don't reflect what the actual job entails.
Struggling through Leetcode questions is a problem that a number of us have had to go through in our lives, so I wanted to spice the process up a bit.
What if we could compete in Leetcode questions, and you died if you failed?
Maybe that's a bit extreme.

What if we could all compete in a Squid Game together, but instead of playing tug of war, or red light green light, we had to solve Coding Interview Questions!
That's exactly what I've been working on for the past few weeks.
For those interested in the process and the end result, I'd love for you to check out my YouTube video below.
In this blog post, we're going to explore the intricate details under the hood of how I built this, what tech stack I used, and dive into the code for us nerds to enjoy!
Check Out The Site
Before we get started, if you're interested in the site itself, check it out:
The site: https://squidgame-eight.vercel.app/
And the code can be found below, please consider starring the repo!
The Vision
The vision I had for this project was for it to feel intense.
I wanted it to feel like there was a real sense of, am I absolutely sure this code is right before I submit it? for the users who play the game.
In a nutshell, there's a few core concepts we can break this system down to:
- A
gamewhich has manyquestionsand manyplayers - A player can have many
submissionswithin agame
Here's a screenshot of the initial "design" I came up with before coding anything
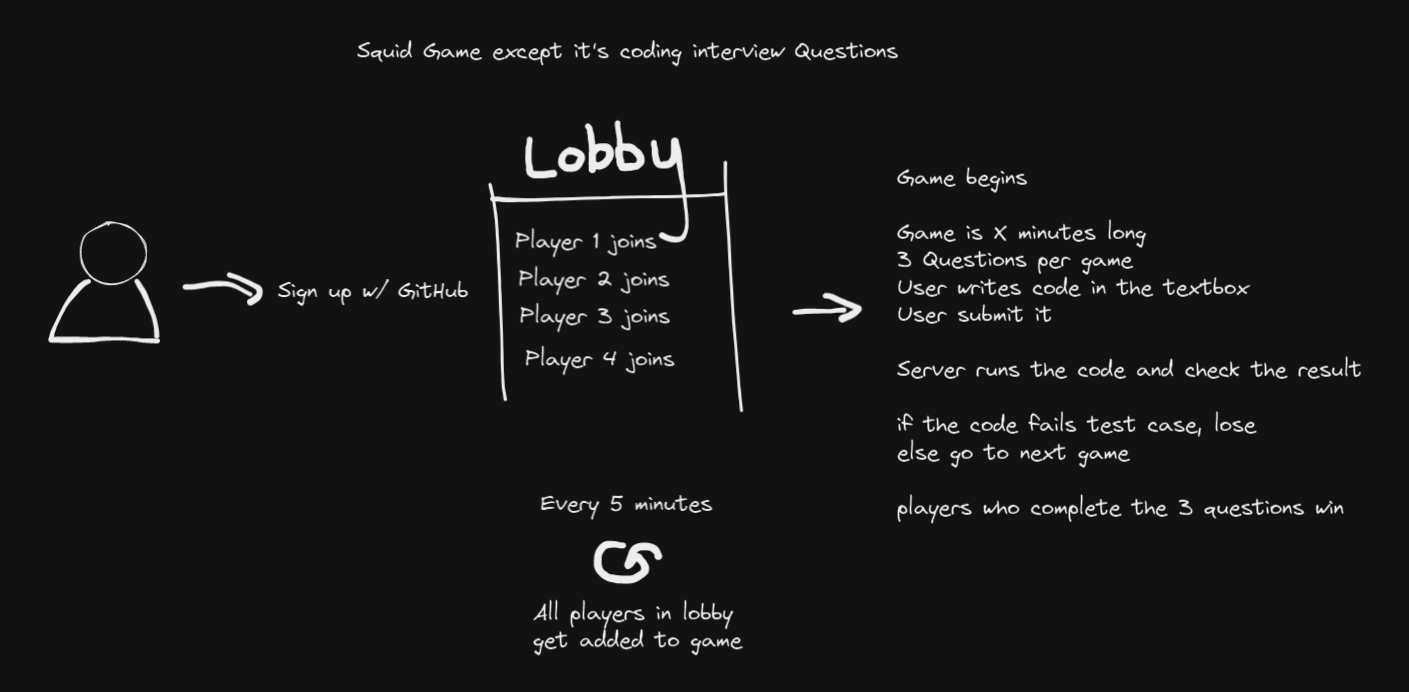
Sounds pretty simple, right?
Yeah I thought so too...
It's not that simple

Surprisingly, the diagram is actually very close to what the end result of the project architecture looks like.
However, let's say there were complications along the way!
Mainly, problems surrounding code execution.
When it comes to users, you can't trust anybody! (sorry, Sandeep Panda), especially when it comes to running code!
There is a key step that I overlooked the level of complexity required from that diagram:
Server runs the code and checks the result
Let's assume we could trust our users to run safe code, there's still:
- Accepting different language types
- Compiling and running files of different languages
- Passing in arguments to functions and running user-written functions
- Executing the functions in an isolated environment
- Running tests on the functions to check the result
As you can see, a number of questions are raised!
What about the issue of running unsafe code? Users could write code to:
- Access restricted data such as user emails
- Hold the system in an infinite loop
- Delete everything on the system
- Hack the White House (okay, maybe not this one)

The main challenge surrounding this project is how could I possibly run user code safely? Well, let's hold that thought and explore the broader scope of how this project all fits together.
The Tech Stack
I built this project using JavaScript frameworks and a serverless backend hosted on Google Firebase:
- Next JS 🖤
- Firebase 🔥
- Material UI 💅
- TypeScript 💁
- Some code generated by GitHub Copilot 🤖 (which is awesome)
Next.JS (which is what Hashnode) are using, by the way! Is an incredible front end framework that adds a tonne of features to a React base. Next.JS is quickly becoming my default tool to use on new projects.
Firebase acts as a very simple Auth, Database and Functions provider for this project. It's a tool that I have become very comfortable with over the past few years.
Material UI is also a comfort pick for me, I love the customization of the pre-built components they offer and used a modified version of my existing theme, from my site upsocial.app
TypeScript is pretty under-utilized in this project as I did not enforce any type safety on the Firestore Document data that comes back from the cloud, still nice to have!
How The Web App Works
I'm going to break the system up into two sections to talk about how it all fits together:
- The Game and Game Creation System
- The Code Execution System
After we go through the design, I'll walk through the results of the first 50 players I had come through the games!
Let's continue!
The Game and Game Creation System
In the original version of Squid Game, there's one game every year.
While this would be awesome to have, I wanted to have a more available site where players could come and play the game whenever they wanted to.
The overall design choice I made was to host a new game every minute. All the players who were waiting for a game to start would be placed into the next squid game.
The way that I achieved this was using Firebase's Cloud Functions.
Before we dive into that, let's explore a brief overview of the database design and how the game system works under the hood.
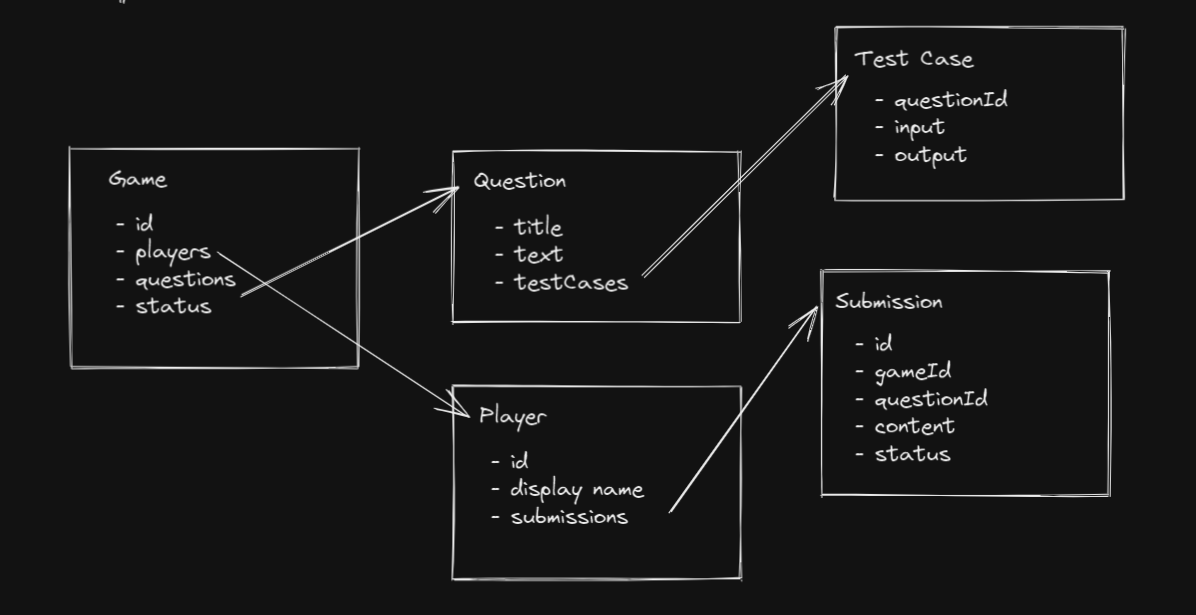
We have a connected structure of different entities, where a game contains many players and many questions, and each player can submit many submissions.
Although, a player can only make one submission, per question, per game.
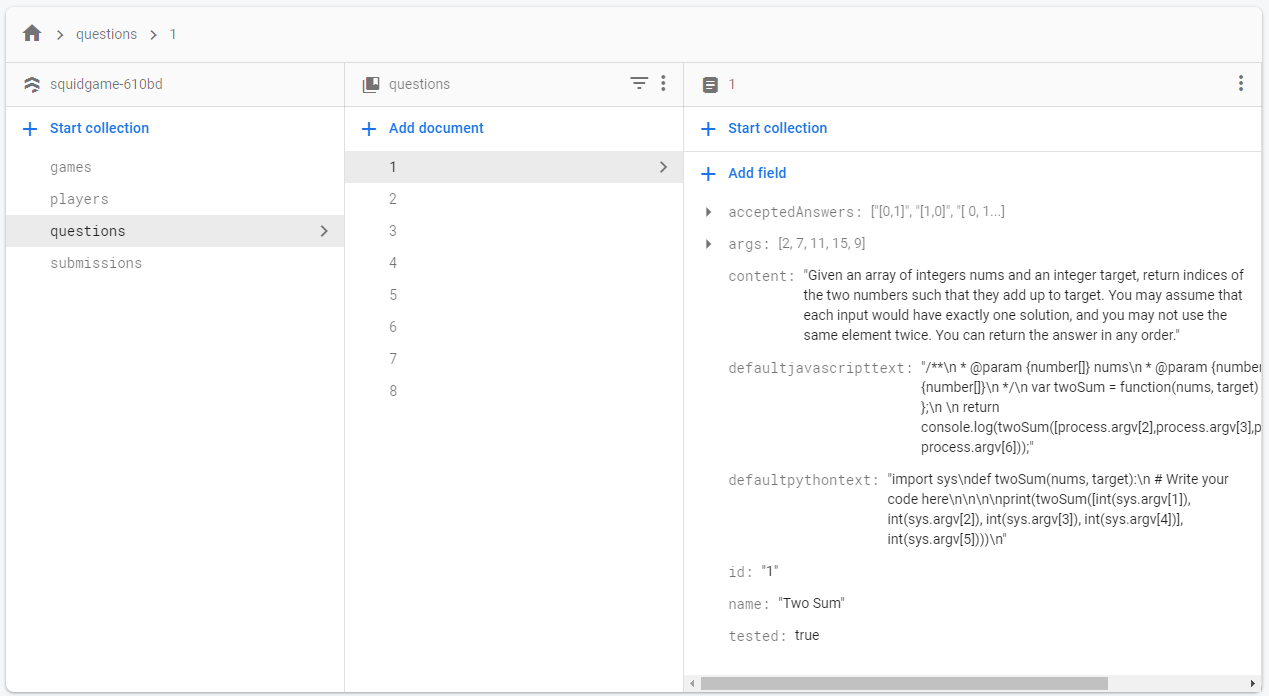
This lead me to create 4 tables in my Cloud Firestore database; which is a NoSQL database for those unfamiliar!
I ended up cutting the Test Case database due to the complications we'll talk about in the next section.
So, we have a database for:
- Games
- Players
- Questions
- Submissions
Cool!
In order for us to start a new game every minute, we need to:
- Create a new game in our database
- Add all the waiting players to the new game
The way that I achieved this was a little strange. What I actually did was give each game a state field, which could be waiting or inProgress.
I wrote a Scheduled Cloud Function that triggers every 1 minutes to:
- Change the state of the current
waitinggame toinProgress - Create a new game with a
waitingstate - Choose three random questions to add to the new game.
The code for that looks like this:
Change the state of the current waiting game to inProgress
const waitingGameQuery = await gamesRef
      .where("status", "==", "waiting")
      .get();
const waitingGameDoc = waitingGameQuery.docs[0].ref;
waitingGameDoc.update({ status: "inProgress" });
Create a new game with a
waitingstate
await db.collection("games").doc().set({
  startTime: admin.firestore.FieldValue.serverTimestamp(),
  status: "waiting",
  questionOneId,
  questionTwoId,
  questionThreeId,
});
Choose three random questions to add to the new game.
This is a code snippet that GitHub Copilot generated for me!
// A function that generates a new random number between 1 and 8
// (I only made 8 questions)
    const randomNumber = (): string => {
      return (Math.floor(Math.random() * 8) + 1).toString();
    };

// Generate three random numbers that are not the same
    while (
      questionOneId === questionTwoId || // Q1 = Q2
      questionOneId === questionThreeId || // Q1 = Q3
      questionTwoId === questionThreeId // Q2 = Q3
    ) {
      questionOneId = randomNumber();
      questionTwoId = randomNumber();
      questionThreeId = randomNumber();
    }
As you can see in the snippet above this one, we add these values into the game as it is created.
Alright so now every minute, the currently waiting game begins by setting the state to inProgress, and a new game is created with the waiting state.
Joining players to the game
When a user signs up to the website and lands on the homepage, they're greeted with a page like this:
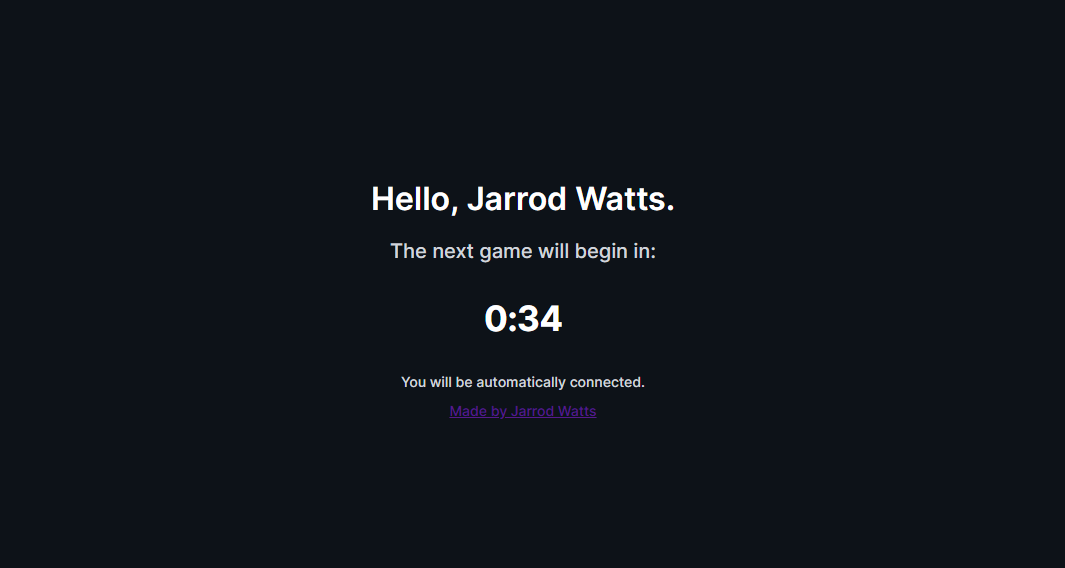
This is possible because they are immediately added as a document in the players subcollection of the currently waiting game.
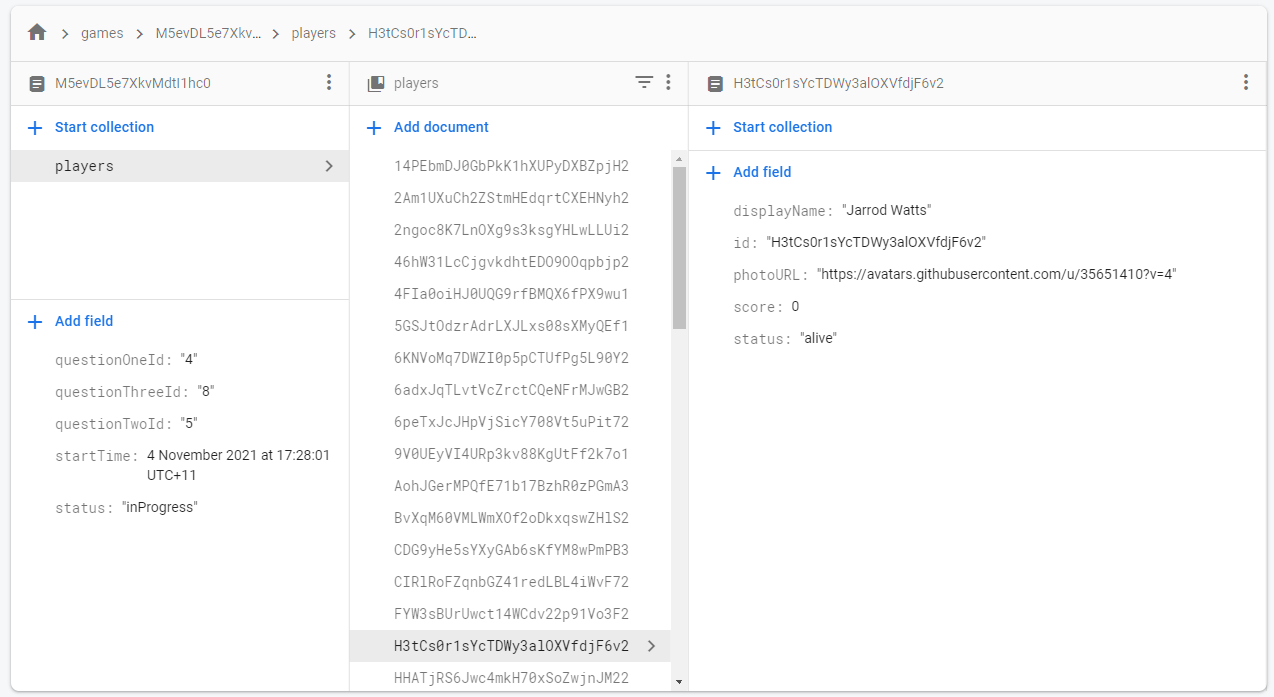
As you can see in this screenshot, the game has a players subcollection, which contains all of the players that have joined that specific game. Each player in the game is represented as a document in this subcollection.
We add the user to the currently waiting game if they are signed in, using the below code:
// Once the user is available, join them into the "waiting game"
  useEffect(() => {
    (async function addPlayer() {
      if (user && nextGameRef) {
        const db = getFirestore(app);
        await setDoc(doc(db, `games/${nextGameRef.id}/players/${user.uid}`), {
          id: user.uid,
          displayName: user.displayName,
          photoURL: user.photoURL,
          status: "alive",
          score: 0,
        });
      }
    })();
  }, [user, nextGameRef]);
The timer is made possible by adding the
startTime: admin.firestore.FieldValue.serverTimestamp(),
to the game document when it is created.
This field represents the time that the document was created.
If I've done a good job of explaining things so far, you can recognise that this isn't actually when the game starts.
It's 1 minute before the game starts... Since the document will be set to inProgress one minute after the document was created, because our cloud function runs once every minute.
With a little JavaScript magic on the front-end, we can calculate how long there is until the game will start.
To do that, I add one minute to the time the document was created, subtract the current time from that using Date.now(), and end up with how long we have until this game will be set to inProgress, by our scheduled cloud function:
// Calculate the time remaining before this game begins
useEffect(() => {
    if (nextGameRef) {
      const nextStartTime =
        nextGameRef.data()?.startTime.seconds * 1000 + 60 * 1000; // add a minute til game actually starts
      const timeTilStart = nextStartTime - Date.now(); // subtract current time in milliseconds
      setRemainingTime(timeTilStart);
    }
  }, [nextGameRef]);
Then I kick off a function that runs every second to subtract one second from the remaining time. Giving us the countdown timer effect we're looking for:
// Start removing a second from the remaining time with a setInterval every second
useEffect(() => {
    const interval = setInterval(() => {
      setRemainingTime((remainingTime) => remainingTime - 1000);
    }, 1000);
    return () => clearInterval(interval);a
  }, []);
Piecing it all together
With all of these code snippets, we are able to add all the players into the next game on the back end and use some trickery to display a countdown timer on the front end.
What does that all mean?
Now we can listen for live updates on the status of the game, so that when our scheduled cloud function changes the status from waiting to inProgress (meaning the game has begun), we can send all the users of this game to start playing.
Using the below code snippet, I was easily able to send user's to the game page once the game begun:
// In the client, listen for the update when the game goes to "inProgress"
// when it does, navigate user on the client to /game/[id]
if (nextGameRef?.data()?.status === "inProgress" && user) {
  router.push(`/game/${nextGameRef.id}`);
}
I achieved this by using Next JS's Dynamic Routes.
I created a dynamic /game/[id] page to capture all games, and use the id of the game document from Firestore as the unique page id.
So that when you go to the /game/123 route, the logic on this page says to grab the information of the game document with the id 123 from Firestore.
Now we've connected players to the game, started the game, and sent users to the game page. Let's talk about what the users do when they get there, and how it works behind the scenes.
The Code Execution System
If you've never used Leetcode or any site like it before, there's a pretty standard structure of these coding interview practice questions.
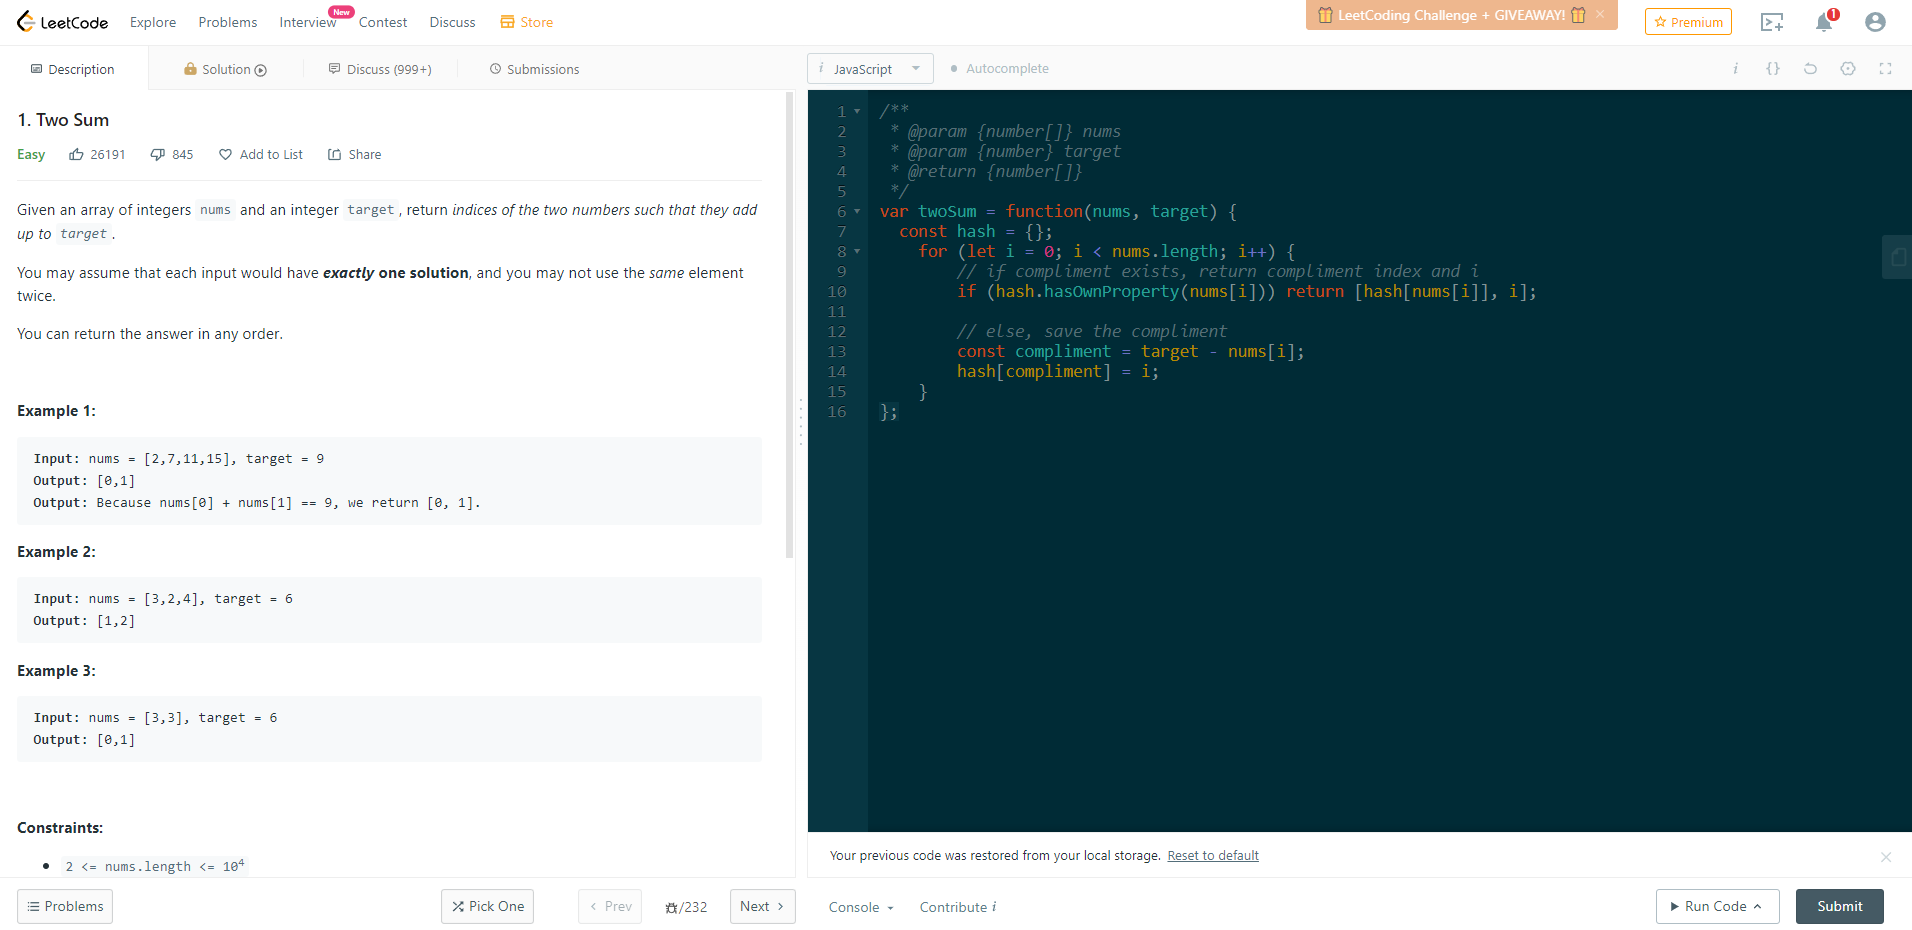
The elements of these websites can be broken down into:
- Question on the left-hand side
- Coding environment to answer the question on the right-hand side
- Language select dropdown and submit button on the right-hand side.
Displaying the question
Displaying the question on our Squid Game website is very simple. We query our database for the questions of the game we're in, and display them as text on the page.
Coding Environment
To have a simple code editor with syntax highlighting, I used a library called react-ace which can be found here: https://www.npmjs.com/package/react-ace
Language Select Dropdown
Initially, I was hoping to support a wide range of languages, but in the end, I only ended up supporting JavaScript, and Python. The main reason behind this was because I had to write the "shell" of the functions, where the users could write their code into, this will make a bit more sense shortly.
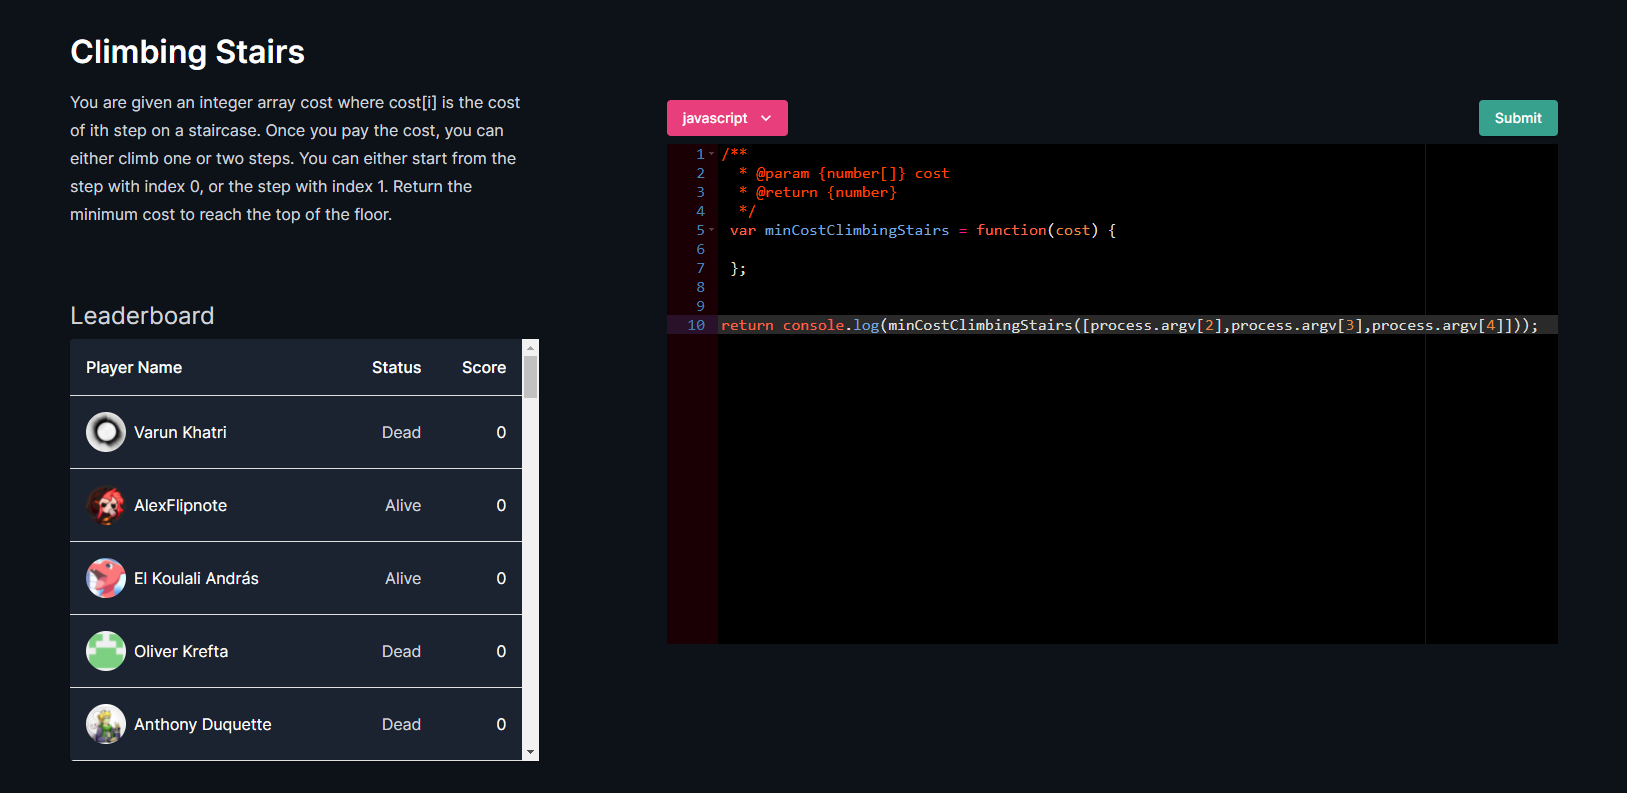
Now we have the basic structure of our site and it's looking pretty similar to the Leetcode screen, with the addition of our Leaderboard to display the scores and status of all the players in this game:
Running the Code
Okay, so here's where the real complexity of the project comes in, so buckle up!
If you were to think about running user code written in different languages with different arguments provided, how would you do it?
How are you going to run the functions the user wrote and check them against the expected results?
I'll tell you how I did it, and if you have any different opinions be sure to let me know!
Piston
After some solid research, the option of code execution I landed on was a library called Piston. https://github.com/engineer-man/piston
Written by a person much smarter than myself, Engineer Man...
Piston is a high-performance general-purpose code execution engine. It excels at running untrusted and possibly malicious code without fear of any harmful effects.
It has a public API endpoint to run code and return the results, supports just about every language, and allows you to pass in arguments to the code provided.
This was a massive lifesaver for the project, as it handles so much of the complexity behind the scenes, prevents the dangerous potential that user code can have, and is very easy to work with, using the community-made Node JS Wrapper.
How I used Piston
For each coding interview question that I added to the Squid Game, I essentially wrote one test case to run the function on, which obviously isn't perfect and can easily be manipulated.
I think this is the key flaw in the project; I have designed it in such a way that there is only one test case; which could lead to some code being accepted that wasn't correct for a variety of test cases.
This was the main area of the project I struggled with, as it would require a massive re-work of the back-end code execution in order to run multiple tests as you would expect from Leetcode.
However, this is what I settled on for my Squid Game project.
The questions therefore have:
- One set of arguments
- One set of accepted answers
- Default "boilerplate" text, for each language
The general flow of how it works is:
1. The code editor is provided with the default text for the selected language:
// change the current code to the default code for the new language whenever the language changes
  useEffect(() => {
    setCode(
      questions?.[activeQuestionIndex]?.[`default${language}text`]?.replace(
        /\\n/g,
        "\n"
      )
    );
  }, [language, questions, activeQuestionIndex]);
A littleeeee bit hacky... I know!
If you can't read that very strange looking code, (I don't blame you), it's taking the language the user selected, and forming a field to query our Firestore question document for.
So let's say they selected javascript as their language, we're then going and looking for defaultjavascripttext field in the question document.
Then we're using some hacky replacement logic to insert new lines to format the code nicely into the editor so that it's not all just on one line.
I know... I don't love it either! 😂 But it works!
2. The user writes their code inside the function
Let's take a look at what our code editor looks like, now that it's been populated with the default text for the language the user has selected:
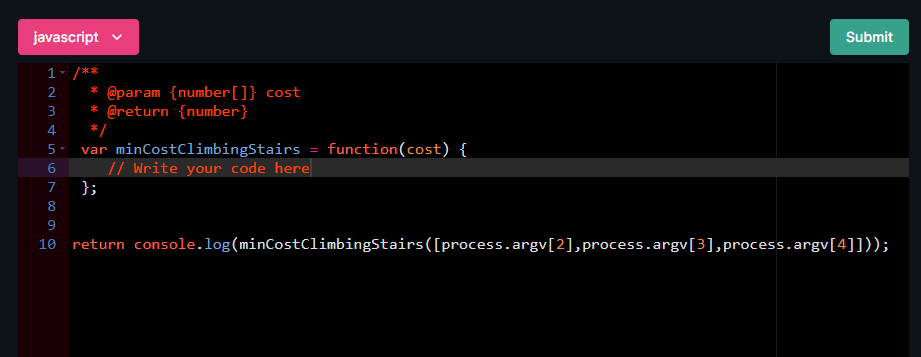
As you can see we have the function shell for the users to write their logic into on line 5 to line 7.
What on earth is that on line 10 you ask? Let me explain!
Remember how I was saying I had some criteria for this project?
- Accept arguments into the function
- Run the code against expected answers
Well, that's what line 10 is.
The way that piston works is that it returns any stdout that came from the code you executed. In JavaScript, we write to the stdout using console.log, in Python, we use print to write to the stdout.
What we're doing on line 10 is writing the result of the function to the stdout so that it gets returned to us, once it's been executed by Piston.
That way we can compare it to the set of accepted answers that we have for this question. If one of the accepted answers matches the output, the code this user wrote is correct.
But how do we pass arguments? This is a big problem that I had, so let's go down that rabbit hole as well.
3. Running Code And Reading the Result
The way that the Piston library works is that it runs your code from the command line.
Let's take JavaScript for example. Under the hood, Piston spins up some Docker magic and runs your code on the command line, using the Node.JS environment.
You can pass arguments to the function by simply adding values after the command to run the file, like so:
node .\helloworld.js arugment1 argument2 argument3
In each language the way of reading arguments from the function is different, in JavaScript we can access them by saying process.argv[i], where i is the i'th argument.
Side note: In Node.JS the first argument is always node and the second argument is always the path to the script you ran, so we start from the 2nd arg, starting from index 0 in order to read our arguments.
The arg values are stored in the database per question, so we can easily read them and pass them as arguments to the piston API request.
Here's what that code looks like:
  try {
    const client = piston({ server: "https://emkc.org" });

    const result = await client.execute(language, code, {
      args: [...args],
    });
Then we can easily check if the result was correct, by checking if the result is present in the accepted answers array:
const output = result.run.output;

// Trim output to exclude new lines and \n
const outputString = output.trim();

if (acceptedAnswers.includes(outputString)) {
      return {
        success: true,
      };
    }
else {
      return {
        success: false
      };
    }
Once this result get's returned to the client, we set the player's status to dead if they were incorrect, or move them onto the next question if they were correct:
if (result?.success === true) {
// If answer is correct then update player score by 1
        await updateDoc(playerRef, {
          score: increment(1),
        });
}
 else {
        // If answer is incorrect then set player status to dead
        await updateDoc(playerRef, {
          status: "dead",
        });
}
After all this is processed, we re-determine what to show the user, depending on if the user died or has won the game, or if they simply continue to the next question.
The Results
Overall the Squid Games so far have had:
58 playerssign up for the games45 submissionsmade for the questions7 correct submissionsmade out of 45 total, meaning there's around a15%success rate so far.
The best performing player at the time of writing this blog post is a user named AlexFlipnote with a success rate of 40% (2 successful out of 5 submissions).
At the time of writing this, 0 players have passed the first question of the biggest game yet (the Climbing Stairs question): Here
Conclusion
This was a super fun project to work on, and I am really happy with the results of the project and the laughs it has brought to myself and the community.
We've explored:
- The logic of game creation and code execution
- How the database is structured
- The usefulness of live updates to database queries on the frontend
- How we can use community tools to solve seriously complex problems
I hope you've enjoyed exploring how this fun project was built with me and enjoyed the hacky snippets of code I have written!
Support Me
If you enjoyed this kind of article and would like to support more free content like this, please consider supporting my work with a Hashnode Sponsor!
While you're here, consider checking out my YouTube Channel and Twitter as well!
Youtube 👉youtube.com/c/JarrodWatts
Twitter 👉twitter.com/jarrodwattsdev
Thank you so much!