Aybow Fitness - My entry to the AWS Amplify Hackathon!
#Amplifyhashnode @hashnode @AWSAmplify

A software engineer turned developer relations engineer in the web3 space, from Australia 🇦🇺.
Aybow Fitness
TLDR: What is Aybow Fitness? 💪🏼
Aybow Fitness is a web-application where you can easily create your own workout routines, or browse routines created by other users!
Aybow Fitness can be accessed via this link: https://aybow-fitness.vercel.app/
And the code can be found here: Aybow Fitness Repo
I hope you like it! 🥰
The inspiration behind Aybow is the frustration and clunkiness I find day-to-day when using tools like Google Sheets to track my progress in the gym, and having spreadsheets that look like this :
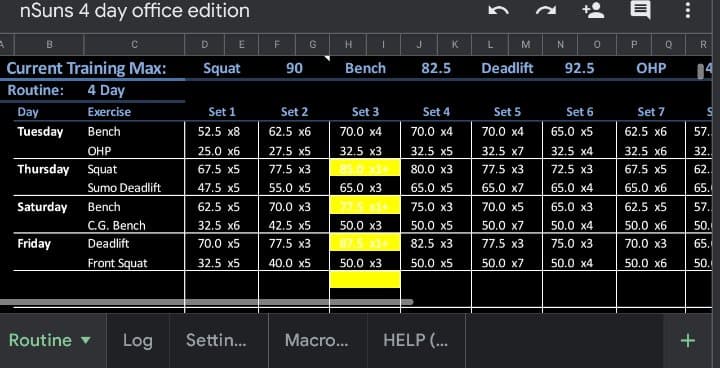
shudders
The goal is to step away from using tools like Google Sheets to track progress in the gym, and for people (including beginners), to find the perfect routine for them to use, even if they're not sure what to put in their own routine just yet.
A big thank you 🥳
I've wanted to create something like this for a long time, so I'd like to take this early opportunity to thank both Hashnode and the Amplify team for providing such a motivating opportunity with their AWS Amplify Hackathon on Hashnode, and for the amazing tools to create such a thing! 💖🥰
The technologies I used 🛠
Firstly, I signed up for Firebase 🔥! just kidding...
Here's the technology stack:
- AWS Amplify (obviously) for Authentication, Data and Serverless Functions 🧰
- React with Next.JS for the front-end framework 👨💻
- Material UI for the UI design 🔍
- Vercel for deployment and CI/CD 📁
oh, and we're using TypeScript of course!
That's actually all there is to it!
AWS Amplify covers so many areas of the application so seamlessly, and we'll get into the details of what exactly we are using it for later on.
The Implementation
Getting Started - Planning
“Success is not delivering a feature; success is learning how to solve the customer’s problem.” - Eric Ries
If there's one thing I have learned from my countless unfinished projects, it's that I need to plan before I jump right into coding.
Since I only had two weeks (I missed the first week of the hackathon 😭), one other thing needed to keep in mind was the scope of the project.
I wanted Aybow to have a set of features that were properly implemented, had a great user experience and left the initial users of the project wanting more.
I feel that I have a good understanding of the target market for the project, since I am essentially making an application that I would be using.
We can always add features later. It's important to release something, get feedback, and see if it's getting used by anyone, so let's get planning.
In one sentence, I want the user to be able to make custom workout routines, in an easy to use, visually appealing way. Let's explore what that looks like in a web-application.
The Mockups
I would not quite consider myself a designer at this point, I did study two UX courses at university though, so you could say I'm pretty much an expert. 🤷
The first thing I like to do is jump into some very low level mock ups of what the UI is going to look like. That way, I can visualize what data I'm going to need, and how the data is going to relate to each other.
I used a tool called draw.io to sketch up these diagrams very quickly, and they sort of resemble what the result ended up being.
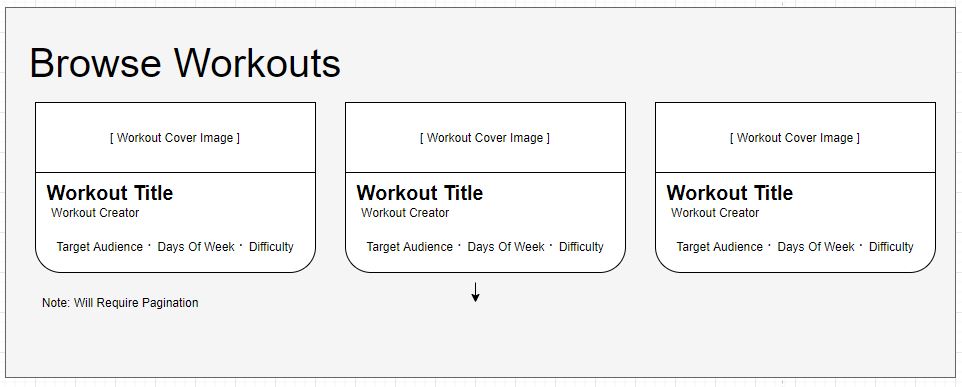
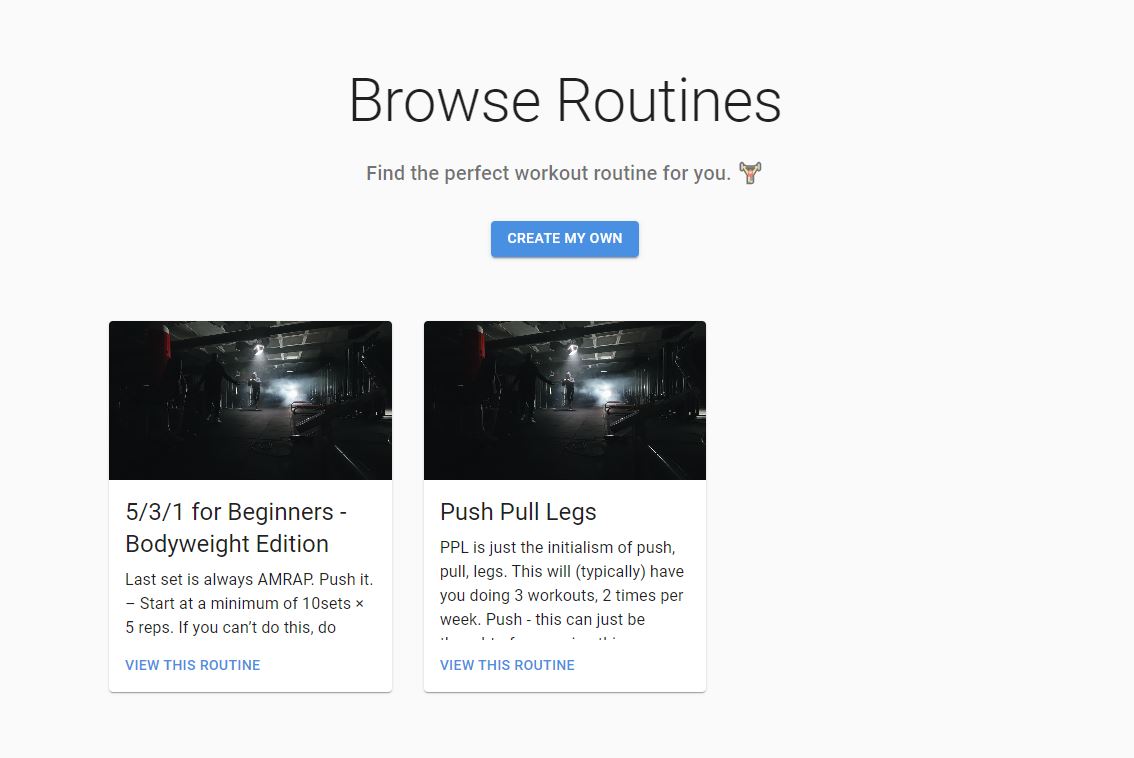
The Home Page
This is where users will land. They'll see all of the available workout routines that people have created, and be able to immediately see what the web app is about.
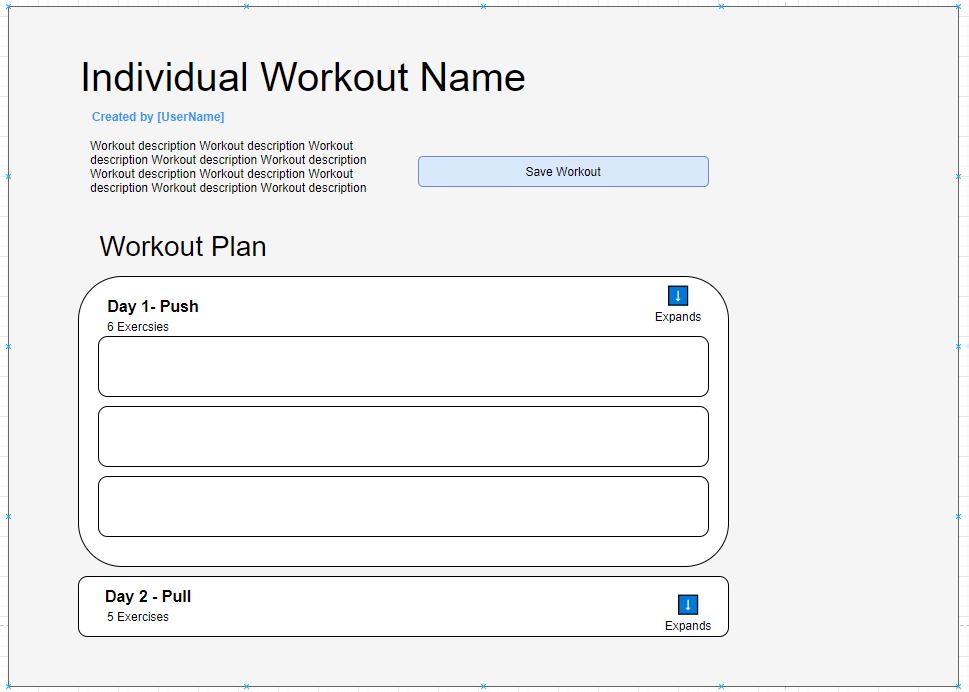
Individual Workout Page
This is what the user will see when they click to find out more about a specific workout routine. They can also save the workout if they want to use it later, but they'll need to be logged in for that.
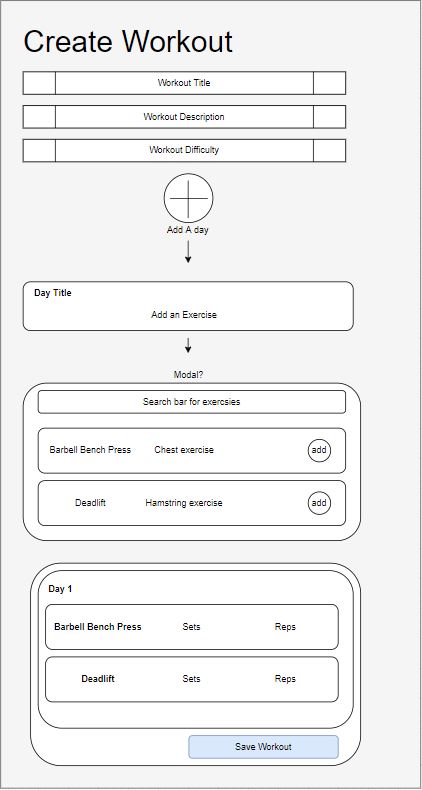
Create Routine Page
I want users to be able to create their own custom workouts and allow those workouts to be seen by others, so we'll need a form to create that.
Editing Note: This form ends up looking wildly different in the end result, wait and see 😛
Profile Page
Lastly, the classic profile page, where the user can access all of their saved and created workouts.
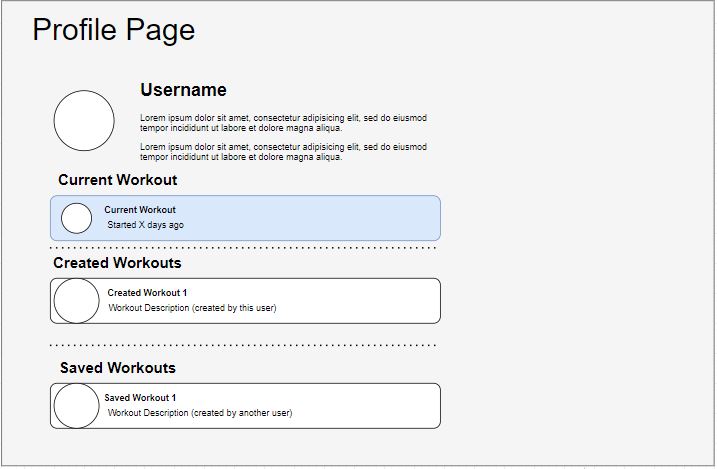
Cool! In the future, I'd like users to be able to enter the weights of each exercise they complete, but keeping scope achievable is going to play a key part in determining whether we are going to complete this thing!
Database Design
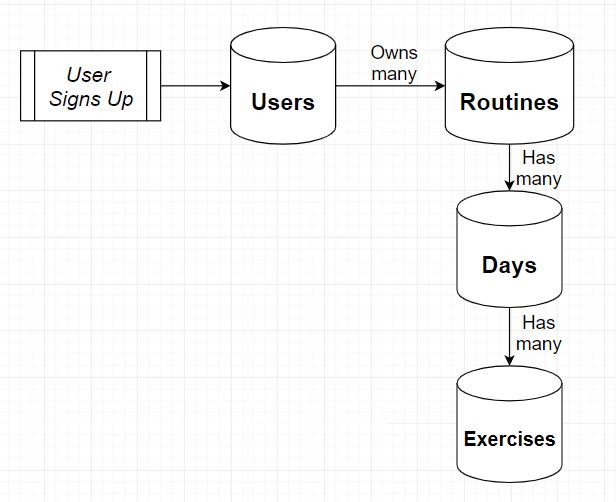
I'd like to keep my database design simple, let's summarise what we need based on our mock-ups.
Users: stores username, email, and the routines a user has saved. A user "document" will be created automatically when a user makes an account with us.
Routines: stores the routine name and description of a workout routine, the creator of the routine, and the days within the routine. One routine can have many days.
Days: A day contains a day name and the exercises within the day. One day can have many exercises.
Exercises: An exercise contains an exercise name, and how many sets and repetitions should be performed of the exercise.
Let's try and visualise that:
Database Design Mockup:
Starting To Code
I'm going to break down the coding journey into several stages.
- The Setup (Amplify & the Codebase)
- Viewing & Saving Routines (GraphQL Queries and frontend display)
- Creating a Routine (Frontend design and backend GraphQL mutations)
- The Deployment (And the bugs that came with it)
Starting with the stats
Total Commits: 32
First Commit: Feb 15, 2021
Last Commit: Feb 28, 2021
0 Commit messages contained curse words 🤬
Pushed 32 commits. 37 files have changed and there have been 1,654 additions and 758 deletions over 14 days.
Phase 1: The Setup
- Created the Next.JS app with the Typescript and Amplify template.
- Initialized the Amplify Project using the Amplify CLI.
- Added and configured Amplify Auth, Amplify API, and Amplify Functions.
- Created a Lambda Function, to create a user in the database when a user signs up via Amplify Authentication services.
- Designed the Schema for the Amplify GraphQL API.
Here's where I setup the core of the project, by installing all the required dependencies for the technology stack that we outlined earlier. Including Next.JS, Typescript, Amplify, and Material UI and many more!
Making them all work together was seamlessly done, and this phase was mostly smooth sailing with the help of the examples that Next.JS provides on GitHub .
Setting up Amplify Authentication was also very simple, one of the main reasons I have begun to fall in love with using Amplify was it's ability to combine security when communicating with my GraphQL API with user authentication.
I set up rules when users interact with our GraphQL endpoint, to say:
- All users including guests can read routines.
- All signed in users can create new routines.
- Only the creator of a routine can delete or update that routine.
- Only the owner of a user can modify that user details. i.e. A user can only modify themselves.
The main struggle I had in this early phase was understanding how the models and connections interact with one another in the GraphQL space.
This was my first real time using GraphQL and I had a very basic understanding, but as we discussed earlier, my types are directly related to one another. Just to recap:
- One User can have many Routines
- One Routine can have many Days
- One Day can have many Exercises.
So, naturally, I wrote something that looks like this:
The User
type User
  @model
  @auth(
    rules: [
      {
        allow: owner
        operations: [create, delete, update]
      }
      { allow: public, operations: [read] }
    ]
  ) {
  id: ID!
  username: String!
  email: String!
}
So far so good, (remember users get created an automatically triggered Lambda Function when users sign up), thanks to Nader Dabit's YouTube tutorial on how to do that!
The Routine
type Routine
  @model
  @auth(
    rules: [
      {
        allow: owner
        ownerField: "owner"
        operations: [create, delete, update]
      }
      { allow: public, operations: [read] }
    ]
  ) {
  id: ID!
  name: String!
  description: String
  days: [Day]! @connection(name: "RoutineDays")
}
The Day
type Day
  @model
  @auth(
    rules: [
      {
        allow: owner
        operations: [create, delete, update]
      }
      { allow: public, operations: [read] }
    ]
  ) {
  id: ID!
  name: String
  routine: Routine @connection(name: "RoutineDays")
  exercises: [Exercise] @connection(name: "DaysExercises")
}
The Exercise
type Exercise
  @model
  @auth(
    rules: [
      {
        allow: owner
        operations: [create, delete, update]
      }
      { allow: public, operations: [read] }
    ]
  ) {
  id: ID!
  name: String!
  description: String
  reps: String!
  sets: String!
  day: Day @connection(name: "DaysExercises")
}
This is what my schema looked like at the end of "phase 1", and I was happy with it! It might look solid at a distance, but there are some pretty clear problems with it, let's talk about what went wrong:
Why It didn't work
The thing is, I don't actually need to access Days or Exercises independently, they're not really their own things. I only ever need to access them in the context of a routine.
And a routine is always going to have days and exercises.
Not only that, I am duplicating the authentication rules three times across all three models. 🕵️
But... The key problem I had, was that I couldn't create a routine with nested days and nested exercises with one single mutation.
I'd have to create a routine, then create a day, then create an exercise, and combine them all together with the connections I had made, all to serve a use-case that I didn't need!
So I transformed my schema into only two models. A User and a Routine.
The Day and Exercise models just simply became Types!
Let's compare what my schema looks like now.
The new Types (Day & Exercise)
type Day {
  name: String
  description: String
  exercises: [Exercise]
}
type Exercise {
  name: String!
  description: String
  reps: String!
  sets: String!
}
The User and Routine mostly remained the same, only there was now no @ connections to join the nested models together.
At this point in time, using the amplify codegen command in the Amplify CLI, Amplify generates all possible queries, mutations, subscriptions, and types that I could imagine ever needing for my graphQL API.
Here's a snippet containing one of the generated queries called listRoutines:
export const listRoutines = /* GraphQL */
  query ListRoutines() {
    listRoutines() {
      items {
        id
        name
        description
        days {
          name
          description
          exercises {
            name
            description
            reps
            sets
          }
        }
        owner
      }
    }
  }
Then in my homepage, index.tsx, I can simply call my Amplify GraphQL endpoint and query for all created routines, with type safety and authentication/security rules built in. All while using queries and types that were generated for me! CRAZY! 🤯🤯🤯
Here's what that looks like in my index.tsx file:
export const getServerSideProps: GetServerSideProps = async (context) => {
  const result = (await API.graphql(graphqlOperation(listRoutines))) as {
    data: ListRoutinesQuery;
    errors: any[];
  };

  if (!result.errors) {
    return {
      props: {
        routinesList: result.data.listRoutines.items,
        errors: [],
      },
    };
  }

  return {
    props: {
      routinesList: [],
      errors: result.errors,
    },
  };
Side note: If you don't like trailing commas, please turn away when looking at any of the code! 😜😜
That's written in the
getServerSideProps method of my homepage, which in Non Next.JS terms just means that the code runs on the server-side. It get's run on each request for the page, and passes either errors and an empty list of routines, or a list of routine objects in an array to my front end.
Here's the end result, with a little bit of Material UI magic to make it look nicer:
The displaying and querying phase came more in phase 2, but I think outlining how the front-end and the serverless backend connect makes it a little bit nicer to follow.
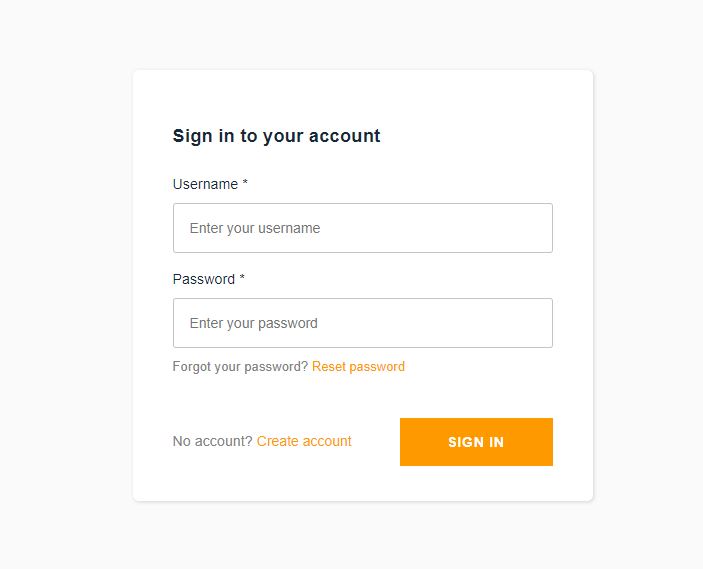
Authentication
For the Signing Up and Signing in of users for my application, I'm using the Prebuilt Amplify UI Components to access the withAuthenticator Higher Order Component.
What this means is, any page that I want to restrict access, and only allow signed in users to view, I can wrap the component in a withAuthenticator([component goes here]).
I can't believe how simple that is! 😲 Now, for users to access any restricted pages, such as the pages to create a routine, or to view their profile, the user is shown this pre-built authentication screen, no other effort required:
The User Context
It feels like there has been a constant debate over state management libraries in the React community over the last few years.
Luckily for me, I only started to learn React last year, so React Context is the only real exposure I've had to state management. (I think that comment is going to bother a few people)!
I used React Context to manage my user state and pass down information about the current user (or lack thereof), to all of my components.
This is so that I don't have to repeat myself across multiple components to retrieve the current user, and also so that I can avoid Prop Drilling of user states.
The Context that I made called userContext, achieves three main things:
- Exposes the current user's data to all of my components.
- Subscribes to live updates from Amplify
AuthStatechanges, and updates user state accordingly. - Exports a custom hook
useUserso that I can easily get the above information in one line no matter which component I'm in.
1. Exposing current user data
Storing the user data values in state:
  const [user, setUser] = useState<CognitoUser>(null);
  const [userAttributes, setUserAttributes] = useState(null);
  const [authState, setAuthState] = useState<AuthState>();
  const [loadingUser, setLoadingUser] = useState<boolean>(true);
Then wrapping every component in the Context Provider:
return (
    <UserContext.Provider
      value={{ user, userAttributes, setUser, setUserAttributes, loadingUser }}
    >
      {children}
    </UserContext.Provider>
  );
2. Listening for live updates
useEffect(() => {
    return onAuthUIStateChange(
      async (nextAuthState: AuthState, authData: CognitoUser) => {
        setAuthState(authState);
        setUser(authData as CognitoUser);
        try {
          const { attributes } = await Auth.currentAuthenticatedUser();
          setUserAttributes(attributes);
        } catch (err) {
          setUserAttributes(null);
        }
      }
    );
  }, []);
3. Exports a custom hook
export const useUser = () => useContext(UserContext);
Then I can call the hook like this from one of my components:
import { useUser } from "../context/userContext";
...
const { loadingUser, user, userAttributes } = useUser();
Phase 2: Viewing Routines
To view an individual routine, we can make another query to our GraphQL endpoint. Similarly to listing out all routines, Amplify has generated a query, (and the associated types) to request an individual routine's data back from our database.
Let's take a look what that looks like:
export const getRoutine = /* GraphQL */ `
  query GetRoutine($id: ID!) {
    getRoutine(id: $id) {
      id
      name
      description
      days {
        name
        description
        exercises {
          name
          description
          reps
          sets
        }
      }
      owner
      createdAt
      updatedAt
    }
  }
`;
The key difference between getRoutine and listRoutines (from earlier) is the id field that we have to provide, so that Amplify knows which routine we are wanting to see.
We can pass that into our graphqlOperation as the input parameter. Like so:
const routine = (await API.graphql({
    ...graphqlOperation(getRoutine),
    variables: { id },
  })) as { data: GetRoutineQuery; errors: any[] };

  if (routine.errors) {
    console.error("Failed to fetch routine.", routine.errors);
    throw new Error(routine.errors[0].message);
  }

  return {
    props: {
      routine: routine.data.getRoutine,
    },
  };
Note: id is coming from the params *value of a dynamic route in Next.JS. Since we've named the page /routine/[id].tsx, the params look like { id: ... } and contains the id of the routine we want to lookup, which is performed on the serverside.
This setup allows us to have one dynamic page that renders all of our different routines.
If you're not familiar with Next.JS and dynamic routing, Next.JS has great documentation about it here:
Super simple stuff! 👨🏫 Again, we are returning that as props to our functional component that renders the individual routine. Here's what that looks like in the front-end:
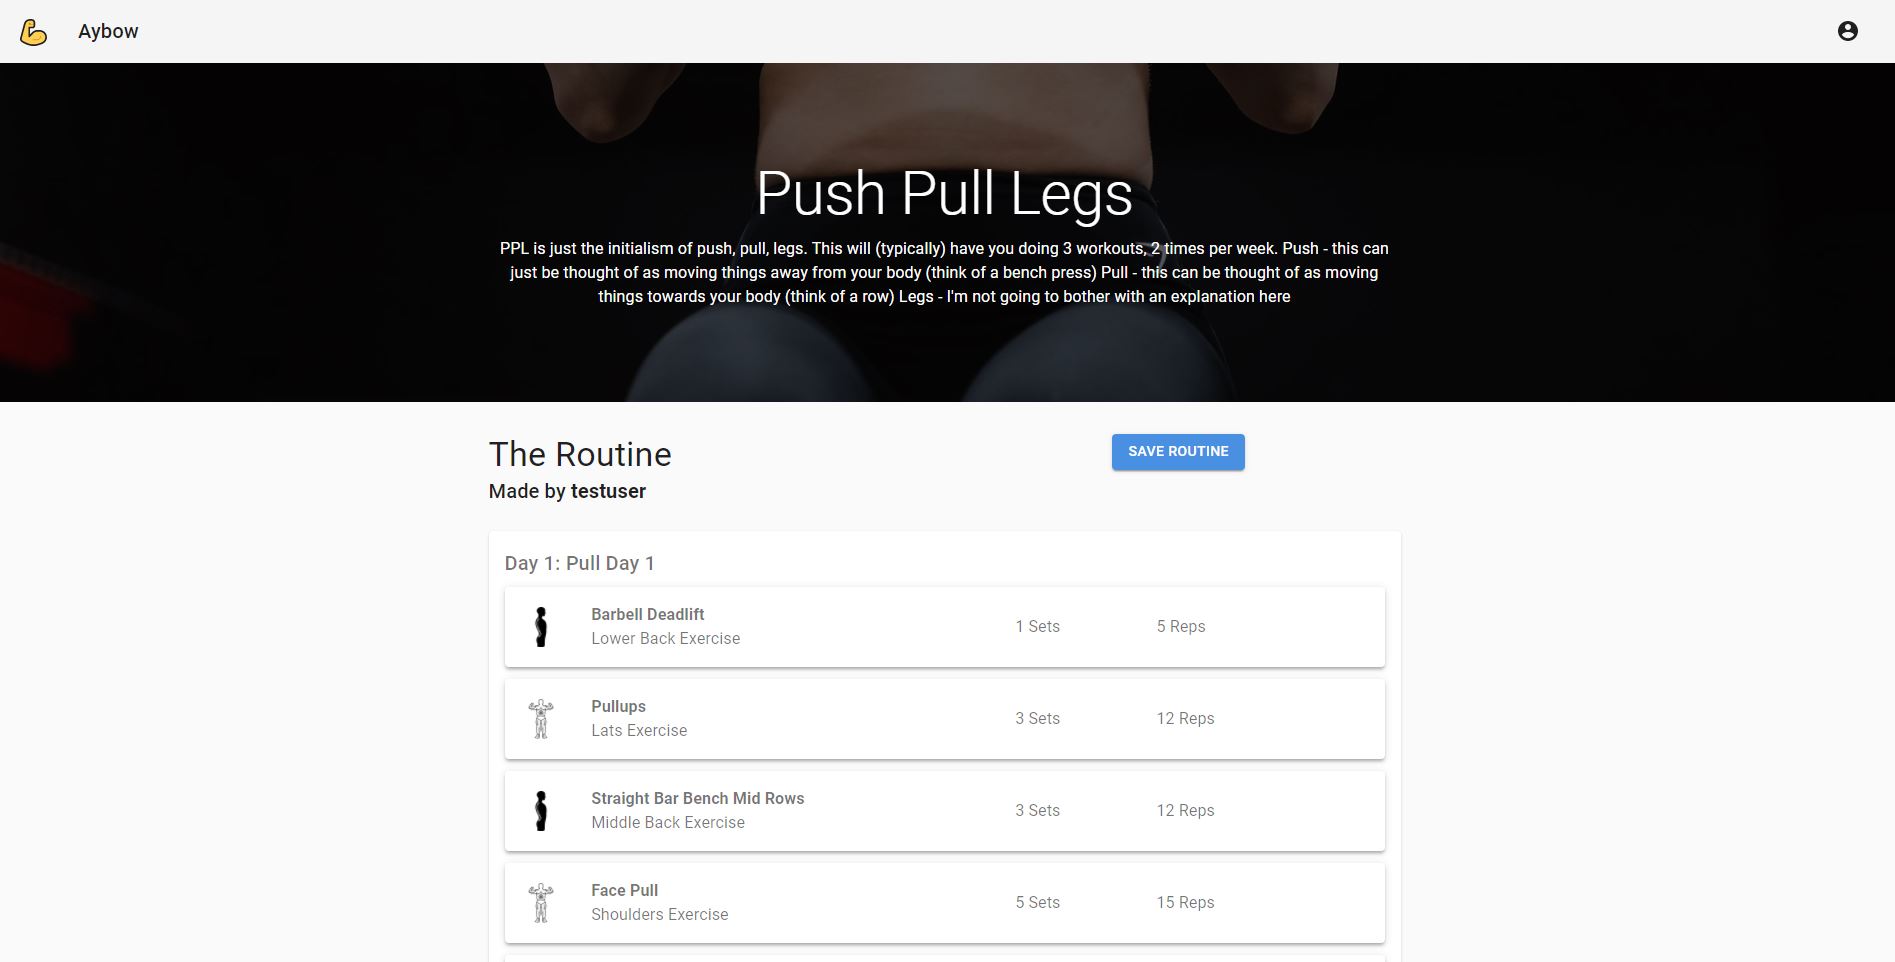
You can actually see for yourself what that page looks like here if you'd prefer:
Notice the URL is /routine/[the id here] which is the id that we are using to lookup in our GraphQL query.
Saving Routines
You might also notice the Save Routine button on that page, which allows any signed-in user to save this routine to look at later, on their profile page.
The button also dynamically changes to "Unsave" Routine if the user has already saved this specific routine to their profile.
Sounds pretty simple, but it turned out to be a little bit more complex; as it involved reading existing data, modifying the state and UI accordingly, then mutating the data to update the user's savedRoutines.
Something to keep in mind is, we've got a savedRoutines field on our User model in our schema, it's of type [ID] which stores an array of routine IDs.
I'm not sure if I should have used some sort of Connection between User and Routine models here, but this solution seems to work for now.
Alrighty, so we want to:
- Save a routine to the signed in user when they click the "Save Routine" button.
- Display a different, "Unsave Routine" button if they already have the routine saved.
- Unsave a routine from the signed in user when they click the "Unsave Routine" button.
Let's dive into how I achieved this.
Using useState and useEffect to check if a user has the routine saved already
We know who the current signed in user is (if there is one) from our UserContext we discussed previously.
Let's setup our custom hook to store those values.
const { userAttributes, user } = useUser();
So now we know who our user is, and what routine we are looking at. Let's make the check to see if the user's savedRoutines array contains the current routine we are looking at.
We'll do it in a useEffect function to perform the lookup as soon as the user data is ready to be queried.
useEffect(() => {
    async function getUserRoutineStatus(): Promise<boolean> {
      const currentUserData = (await API.graphql({
        query: getUser,
        variables: { id: userAttributes.sub },
        authMode: GRAPHQL_AUTH_MODE.AMAZON_COGNITO_USER_POOLS,
      })) as {
        data: GetUserQuery;
        errors: any[];
      };
...
So we've got the current signed in user's data from our User table. Let's check whether or not they've saved this routine already.
return currentUserData.data.getUser.savedRoutines.includes(routine.id);
And store it in state so we can refer back to it in our UI.
const [alreadySaved, setAlreadySaved] = useState<boolean>(false);

getUserRoutineStatus().then((res) => setAlreadySaved(res));
And in our UI...
<Button
    variant="contained"
    color={alreadySaved ? "secondary" : "primary"}
    onClick={handleSaveUnsave}
    >
    {alreadySaved ? "Unsave Routine" : "Save Routine"}
</Button>
Here we're using the ternary operator to change the text and color of our button!
You might notice in the onClick of the button, we're referencing a function called handleSaveUnsave.
Let's see what that does now.
Firstly, it flips the value of the alreadySaved variable we have in state.
const handleSaveUnsave = async () => {
    setAlreadySaved(!alreadySaved);
Then we define an inner function called generateNewSavedRoutines that handles both adding and removing routines from the user's savedRoutines.
First we handle the unsave capability, by filtering out this routine from the array and returning it immediately.
function generateNewSavedRoutines(): string[] {
      // if it already exists...
      if (
        currentUserData.data.getUser.savedRoutines &&
        currentUserData.data.getUser.savedRoutines.includes(routine.id)
      ) {
        const newArr = currentUserData.data.getUser.savedRoutines.filter(
          (rou) => routine.id != rou
        );
        return newArr;
      }
Now let's handle the save capability:
if (
        currentUserData.data.getUser.savedRoutines &&
        currentUserData.data.getUser.savedRoutines.length > 0
      ) {
        return [...currentUserData.data.getUser.savedRoutines, routine.id];
      }
else {
        return [routine.id];
      }
Looks a little strange but the user may or may not already have some other routines saved. So here we are checking whether to add it to the existing routines using the JS Spread operator , or to create a new array, which just contains this routine; in the case where it is the first routine this user has saved.
Now let's actually make the mutation required to update the data in our AWS DynamoDB.
if (!currentUserData.errors) {
      let updatedUserDetails: UpdateUserInput = {
        id: userAttributes.sub,
        savedRoutines: generateNewSavedRoutines(),
      };

      try {
        await API.graphql({
          query: updateUser,
          variables: { input: updatedUserDetails },
          authMode: GRAPHQL_AUTH_MODE.AMAZON_COGNITO_USER_POOLS,
        });
      } catch (err) {
        console.error("Err:", err);
      }
    } else {
      // error occurred getting current user
      console.error("Errors;", currentUserData.errors);
    }
Notice how we are using authMode: GRAPHQL_AUTH_MODE.AMAZON_COGNITO_USER_POOLS here. That's because we can only mutate the user if we are that user. No other users can modify a different user's data, that's protected by our auth settings defined on our schema.
type User
  @model
  @auth(
    rules: [
      # allow all authenticated users ability to create posts
      # allow owners ability to update and delete their posts
      {
        allow: owner
        ownerField: "username"
        operations: [create, delete, update]
        ...
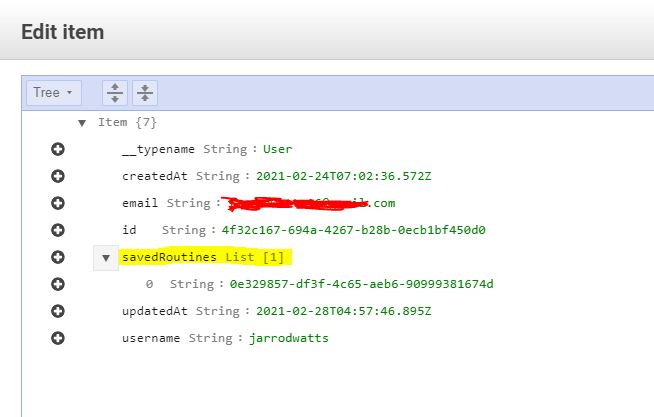
Now we have successfully saved a routine to a user! That user will be able to view that routine on their profile later.
We can also see that change in our DynamoDB:
Phase 3: Creating Routines
Creating a routine is currently the most complex part of the application, it involves the user dragging & dropping exercises from a searchable exercise list, into a multiple days on their routine.
By the way, the exercise list is loaded in from a local file that I sourced from here:
Here's what it looks like on the front-end:
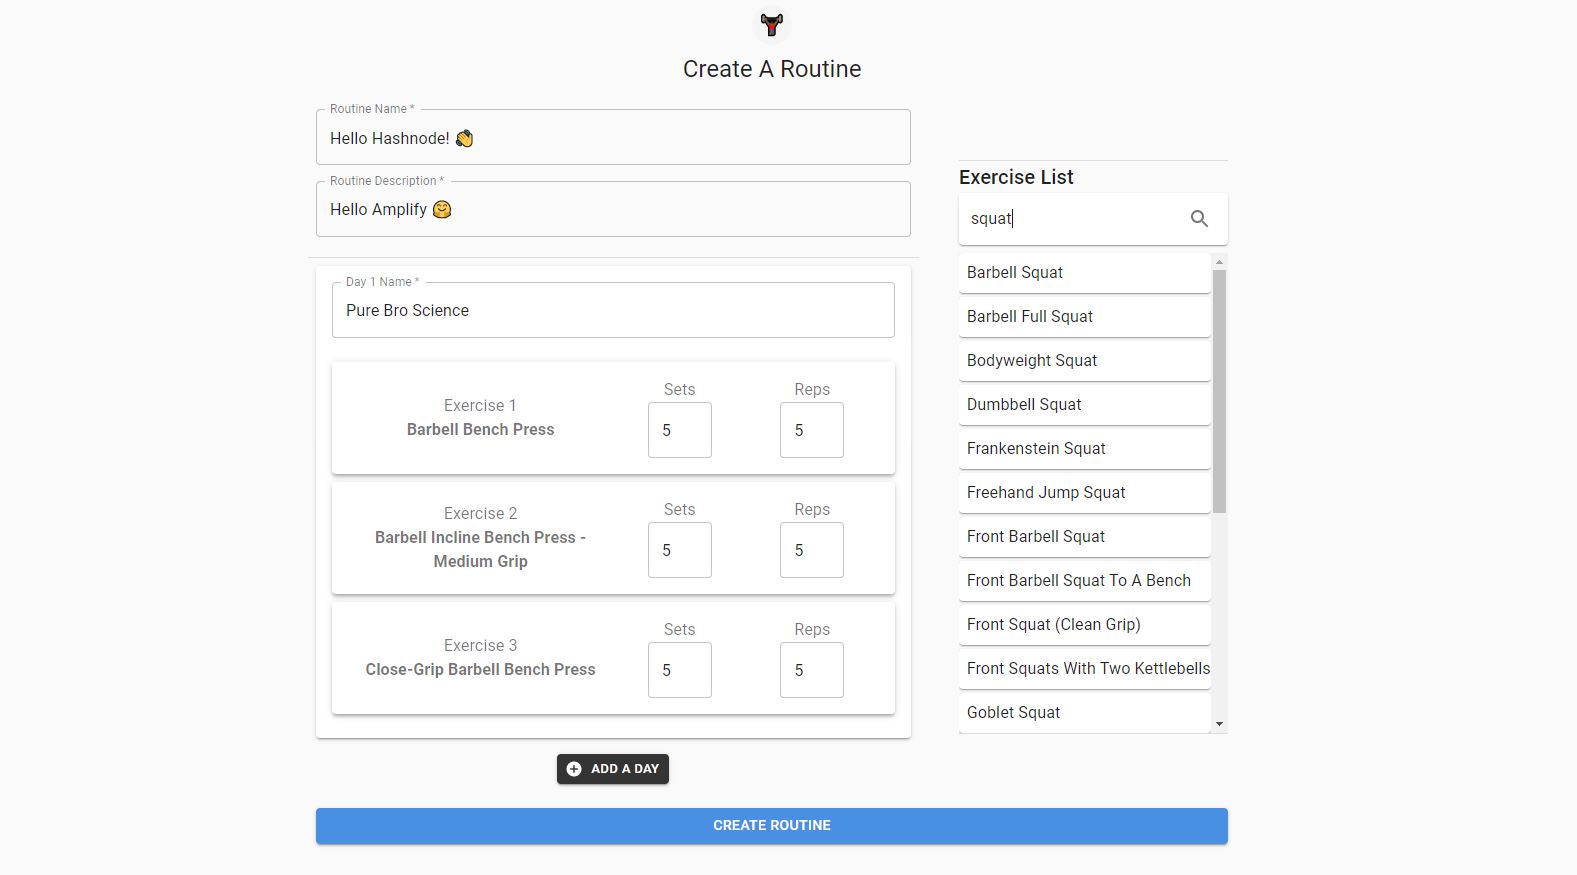
And Here's the link to that page on Aybow (You'll need an account to access it!)
The first functionality on this page that I created was the exercise list. It's a searchable list that live updates on every character that gets entered. So if a user types in "Bench Press" it will come up with all the relevant exercises related to bench press. Like "Barbell Bench Press", "Dumbbell Bench Press", etc.
Let's dive into how this searchable exercise list works.
Loading the local file of exercises into state
import exerciseData from "../lib/exerciseData";

type ExerciseNameBodyPart = {
  name: string;
  bodyPart: string;
};

 const [filteredExercises, setFilteredExercises] = useState<
    Array<ExerciseNameBodyPart>
  >(exerciseData as Array<ExerciseNameBodyPart>);
Mapping over the exercises to create one item in the list per exercise
 {filteredExercises.slice(0, exCap).map((exerc, key) => (
                          ... Render the component here
)}
exCap here is just to make sure we don't render the hundreds of exercises all at once for performance reasons.
The Search Bar
The search bar is responsible for filtering the results that get displayed to the user.
The input element:
<InputBase
    onChange={(event) =>
        handleSearchChange(event.target.value)
    }
/>
The function to filter the results shown:
function handleSearchChange(val: string): void {
    // Filter out the results from exerciseData
    setFilteredExercises(
      exerciseData.filter((ex) =>
        ex.name.toLowerCase().includes(val.toLowerCase())
      )
    );
  }
Great. So every time a user changes the value in the search bar, we render a Draggable that the user can drag into a day of their newly created routine.
I suppose I should explain what a draggable is.
On the create page, we are using a library called react-beatiful-dnd You can have a look at the repository here if you are interested.
In a nutshell, there are three key aspects to the library:
- The DragDropContext (the parent of all droppables)
- The Droppables (the areas you can drop draggables into)
- The Draggables (the items you can drag and drop)
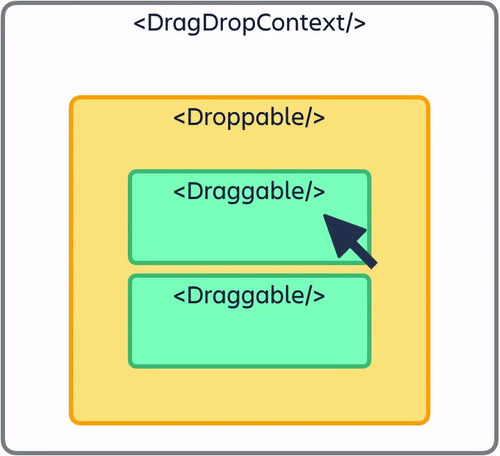
For us, the exercise list is a Droppable which contains a list of Draggables.
Each Day also contains a Droppable for the user to drop exercises into.
Let's examine all possible scenarios that could occur for a draggable:
- The draggable starts from the exercise list and moves places with the other draggables in the exercise list.
- The draggable starts from the exercise list and moves into a day (added to day)
- The draggable starts from a day and moves to back to the exerciseList (removed from day)
- The draggable starts from a day and moves to a different day (changes days)
- The draggable starts from a day and swaps places with another exercise in the same day
I don't believe it's very valuable to showcase the code for this logic, I think the key takeaway is that every time a change is made to a draggable, the onDragEnd function is called; which handles our state manipulation.
Every time that a draggable is dropped somewhere, the change has to be reflected in our state. Our state is responsible for replicating the structure of a routine in our Schema. (i.e. one routine can have many days which can have many exercises)
Once the user is ready to create a routine, we make a GraphQL mutation to perform the creation of the routine.
// Store a uuid value in state so that we can both:
// Create a routine with a unique id, and use that id to immediately redirect the user to their newly created routine.
const [id] = useState<string>(uuid());
try {
      await API.graphql({
        query: createRoutine,
        variables: { input: createRoutineInputValues },
        authMode: GRAPHQL_AUTH_MODE.AMAZON_COGNITO_USER_POOLS,
      });


      await router.push(`/routine/${id}`);
Notice how we are calling await router.push(`/routine/${id}`); immediately after the graphQL mutation is successful. This is so we can navigate the user to their newly created routine once it has been created in our database.
Now our users can create real workout routines by simply dragging and dropping exercises from a list! 🥳🎉🥳🎉
The Profile Page
To access all the care & hard work (hopefully) the user has been putting in throughout creating and saving routines, we need a central place they can access all this information! Enter the Profile Page 👼
There's only one new exciting thing to talk about on the profile page, so we summarise it pretty quickly before we get into that:
- GraphQL query to gather the user's saved routines
- Another GraphQL query to gather the user's created routines
- Wrapped in a
withAuthenticatorHOC so only the signed in user can access it.
The one shiny new thing - Adding a key to our schema Since I needed to gather all of the routines that the user created, we need a way of asking Amplify to filter the routines based on the owner.
By adding the @ key directive to our Routine model, we can specify another field that we want to filter and access data by; in our case we want to add owner as a key.
That looks like this in our schema:
type Routine
  @model
  @key(name: "routinesByOwner", fields: ["owner"])
  ...
Then we push the changes using amplify push and regenerate our queries and mutations.
Voilà!
Then we can filter out routines to see only the routines that the current user created:
const userCreatedRoutines = (await API.graphql({
        query: listRoutines,
        variables: {
          filter: {
            owner: {
              eq: user.getUsername(),
            },
          },
        },
Phase 4: The Deployment
The problem with almost never finishing my personal projects is that I have very little experience with deployment!
To get a properly working deployment took me about 1.5 days of blood sweat and tears. With a tight deadline approaching, things got heated! 🤪🔥
On the second last night before the hackathon ended, I went out to a nice Vietnamese dinner with my girlfriend 🍜.
I had just deployed my "working" version to AWS and I was feeling very satisfied with myself! "Maybe I could even fit in a few more features" I thought.
So I got her to try it out before we got our meals, and see what she thought of my hard work!
I loaded up the front page, and handed my phone over to her. I told her to put in her real email address when she signed up so she'll even get a real confirmation email, I was pretty stoked with what I had made.
Immediately my first "test user" goes to login, she enters her username and password, creates an account and gets an email with her confirmation code! All going smoothly so far.
Except when she entered the confirmation code, she wasn't signed in, and the screen was blank.
"Hmm, alright well that's a bug 🤔", "try refreshing"...
Phew, refreshing logs her in - I can go back and fix that later.
Next, she clicks the big blue button on the front page, just as I planned. She's navigated to the create a routine page. All the hard work I put in is finally getting a test!
She skips the routine name and description entirely! "Okay, well I don't have any form validation yet so that's not ideal", I thought to myself, but I stayed silently observing.
She adds a day to the routine and drags the first exercise she sees into the day! Success! 😄
Our food is coming over at this point, so I rush her to just to create the routine and see what happens...
So she does...
... and she gets a 404 Page!

WHAT?! 🤯 That shouldn't happen!!! It worked fine on my local environment!
Little did I know what I was in for. A solid Saturday morning, afternoon and evening of deployment after deployment after deployment:

You can see my sanity dwindling in the commit messages!
What went wrong? 🕵️
As part of my dynamic routing on the individual routine pages, I was using a tehcnique called static site generation & incremental static regeneration to generate the static html for all of the individual routine pages. I was doing this by using Next.JS's getStaticProps and getStaticPaths.
The getStaticPaths method defines a list of all the pre-defined pages that the build should render; and statically generate html to serve for.
But, it turns out, this actually didn't work with what my application wanted to achieve. When I was usinggetStaticProps and getStaticPaths, the pages were being generated at build time.
Meaning whenever a new routine gets created by a user, the page isn't actually made, until the next time my project is built! So Next.JS was redirecting the user to a page that doesn't exist, hence the 404!
The reason I didn't pick this up in development was due to a small little hint in the Next.JS docs that says:
In development (next dev), getStaticProps will be called on every request.
Meaning that I'd never encountered the issue before, since it had been building my pages whenever I requested to see them, not every time I built.
How do I fix it?
Luckily for me, Next.JS offers getServerSideProps which:
pre-renders the dynamic page on each request, using the data returned by
getServerSideProps.
The key difference being that getServerSideProps evaluates the page on each request rather than at build time
Crisis averted! 🚨🚨
And with a few more bug fixes my web-app was successfully deployed using Vercel!
Final Thoughts
I am incredibly proud of how much I have learnt over the past two weeks.
This was my first project with AWS Amplify and I am incredibly thankful that Hashnode and the Amplify team motivated me so much to create a project I have wanted to make for such a long time!
Without a doubt, AWS Amplify will be my go-to for creating web applications in the future, and I am still amazed by the speed at which I was able to develop and the complexity of the application I was able to create in only a two week period (working after hours in my spare time)!
If you are looking for the next skill to learn in 2021 in the web-dev or full-stack development space, I would highly recommend AWS Amplify, it has been a blast to learn and is an amazing set of tools for rapid development.
Thank you for the opportunity to participate in the hackathon, and I think everyone involved can proudly say they have learnt at an extremely accelerated pace thanks to you!
And a very special thank you to Nader Dabit for his amazingly helpful YouTube tutorials and the Amplify Discord for answering my questions!
I'm very excited to continue developing on Aybow and get feedback from the fitness community.
About Me
Please feel free to reach out to me if you are interested in learning more about the project or would like to chat!
LinkedIn: https://www.linkedin.com/in/jarrodwatts/
Discord: jarrod#4331
Thank you so much for reading!
Jarrod.