Build a chat app in 9 minutes with AWS Amplify & Next JS
Learn how to use AWS Amplify Subscriptions with Next.JS Server-side rendering to create a

A software engineer turned developer relations engineer in the web3 space, from Australia 🇦🇺.
Hello Friends! 👋
My name is Jarrod Watts, I'd like to share with you the magic of Next JS and AWS Amplify!
We're going to be going through how to build a live chat app in 7 minutes, using AWS Amplify and Next JS.
Here's a quick little preview of what we'll be building:
- AWS Amplify's User Authentication to Sign Up & Log In Users. 🥳
- Authenticated requests & Server-side rendering using Next.JS. 🤠
- Live Updates using AWS Amplify's Subscriptions. 🤯
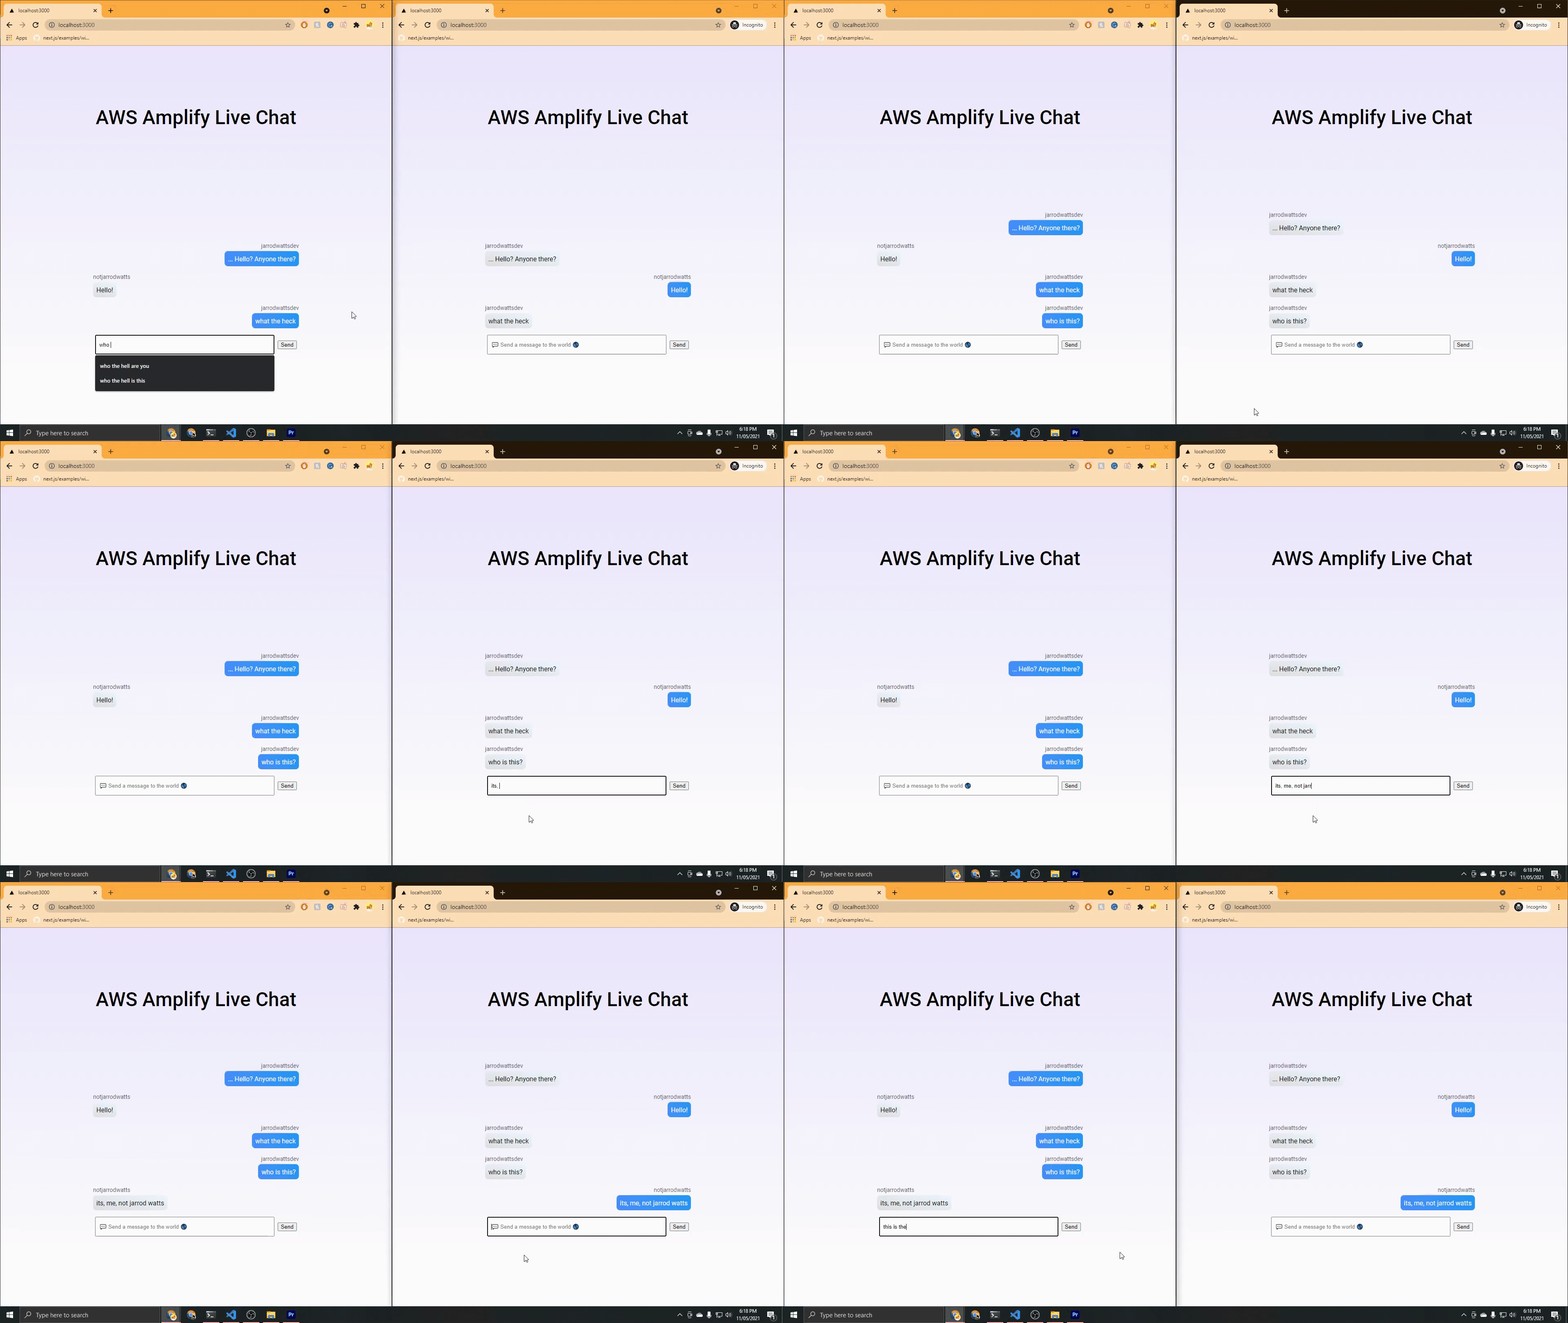
If this sounds like something interesting to you, please do continue! 👇
For those who prefer to consume video content, I have also made a YouTube video to guide you through how to create this app too. Say hello if you're from Hashnode! 👋
If you'd like to browse the source code, you can always check that out here too:
Setup
There are two pre-requisites you'll need in order to get started.
- An AWS Account
- The AWS Amplify CLI installed.
If you already have those, you are good to go! If not, not to worry! Go make an AWS Account and come back here :-)
Install AWS Amplify CLI
If you haven't already done so, you can install the AWS Amplify CLI by running:
npm install -g @aws-amplify/cli
And link it to your AWS Account with:
amplify configure
Cool. Let's get into the guide 😎. The timer starts now! 🕒
Creating the project
To create and open a new Next JS Project (in Visual Studio Code), run:
npx create-next-app live-chat
cd live-chat
code .
Cleaning up the starter code
For our application, we won't be needing Next JS's API routes so we can go ahead and delete the /api folder and it's contents.
Then we can also go into index.js and just replace all of the return to say:
return (
      <div>Hello world!</div>
)
Styles
Since this guide is meant to be focused on AWS Amplify and Next JS, I'm not going to be explaining the CSS of our code. I'd recommend you create these three files with the contents I've provided below (within the styles folder):
globals.cssHome.module.cssMessage.module.css
We are using Next JS's built-in Global Stylesheet and CSS modules in this project, but in a real project, you can use whatever you like!
styles/global.css:
html,
body {
  padding: 0;
  margin: 0;
  font-family: -apple-system, BlinkMacSystemFont, Segoe UI, Roboto, Oxygen,
    Ubuntu, Cantarell, Fira Sans, Droid Sans, Helvetica Neue, sans-serif;
}

a {
  color: inherit;
  text-decoration: none;
}

* {
  box-sizing: border-box;
  margin: 0;
}
styles/Home.module.css:
.background {
  max-height: 100%;
  height: 98vh;
  background: linear-gradient(0deg, #fff, #eae6ff 100%);
  display: flex;
  justify-content: center;
}

.container {
  display: flex;
  height: 100%;
  width: 100%;
  flex-direction: column;
  align-items: center;
  justify-content: center;
  text-align: center;
  max-width: 520px;
}

.title {
  font-size: 3rem;
  line-height: 1.25;
  margin-bottom: 1rem;
  font-family: roboto;
  font-weight: 500;
}

.chatbox {
  min-width: 100%;
  height: 480px;
  display: flex;
  overflow-y: auto;
  flex-direction: column-reverse;
  text-align: center;
}

.formContainer {
  width: 98%;
  min-height: 48px;
}

.formBase {
  display: flex;
  flex-direction: row;
  justify-content: space-between;
  align-items: center;
  margin-top: "16px";
  height: 100%;
  width: 100%;
  padding: 8px;
}

.textBox {
  min-height: 48px;
  width: 100%;
  padding-left: 8px;
  padding-right: 8px;
}
Message.module.css
.sentMessageContainer {
  display: flex;
  flex-direction: column;
  float: right;
  align-items: flex-end;
  justify-content: flex-end;
  margin: 8px;
}

.sentMessage {
  text-align: left;
  padding: 8px;
  font-family: "roboto";
  color: #fff;
  background: linear-gradient(243deg, #2397f5, #498efc 100%);
  border-radius: 8px;
}

.receivedMessageContainer {
  display: flex;
  flex-direction: column;
  float: right;
  align-items: flex-start;
  justify-content: flex-start;
  margin: 8px;
}

.receivedMessage {
  text-align: left;
  padding: 8px;
  font-family: "roboto";
  color: #000;
  background: linear-gradient(
    193deg,
    rgba(237, 247, 255, 1) 0%,
    rgba(223, 223, 223, 1) 100%
  );
  border-radius: 8px;
}

.senderText {
  font-family: "roboto";
  font-size: 14px;
  color: rgba(0, 0, 0, 0.7);
  margin-bottom: 4px;
}
Getting Started with AWS Amplify
To use AWS Amplify, we'll need two packages:
We can install these packages by running:
npm install aws-amplify @aws-amplify/ui-react
Now run:
amplify init
This command is going to kick-start a new Amplify project in your directory, go ahead and configure it like this:
? Enter a name for the project: livechat
? Initialize the project with the above configuration: No
? Enter a name for the environment: dev
? Choose your default editor: Visual Studio Code
? Choose the type of app that you're building: javascript
? What javascript framework are you using: react
? Source Directory Path:  .
? Distribution Directory Path: build
? Build Command:  npm run build
? Start Command: npm run start
? Select the authentication method you want to use: AWS profile
Great! Now we are ready to add some Amplify features to our application.
We are going to be using AWS Amplify's Authentication and GraphQL API .
Since we'll be using authentication to make verified requests to our GraphQL API, we'll configure them both at the same time, by running:
amplify add api
Follow along with the below configuration settings:
? Please select from one of the below mentioned services: GraphQL
? Provide API name: livechat
? Choose the default authorization type for the API: Amazon Cognito User Pool
Using service: Cognito, provided by: awscloudformation

 The current configured provider is Amazon Cognito.

 Do you want to use the default authentication and security configuration: Default configuration
 Warning: you will not be able to edit these selections.
 How do you want users to be able to sign in? Username
 Do you want to configure advanced settings? No, I am done.

? Do you want to configure advanced settings for the GraphQL API No, I am done.
? Do you have an annotated GraphQL schema: No
? Choose a schema template: Single object with fields (e.g., “Todo” with ID, name, description)
? Do you want to edit the schema now: Yes
Here's what we've just done: (once we've deployed it)
- Configured a GraphQL API hosted on AWS AppSync .
- Set up Amazon Cognito to allow users to create and sign in to accounts, as well as to make authenticated requests to our GraphQL API.
- Created a dummy Todo GraphQL Schema which we can edit and upload to AWS Amplify.
Once you've done that, Amplify should have opened up schema.graphql in your text editor. Let's edit that to match our live chat application's schema.
Since this is a very simple application, it's quite a simple schema. There's only one model; a Message. Set your schema.graphql to be:
type Message
  @model
  @auth(
    rules: [
      # Allow signed in users to perform all actions
      { allow: private }
    ]
  ) {
  id: ID!
  owner: String!
  message: String!
}
By setting @model, we are telling AWS Amplify to create a table for Messages in a new DynamoDB Database. We are also telling AWS Amplify that we want an entry for each Message that exists in the Messages table.
By setting @auth and defining {allow: private}, we are saying that the ONLY people that can access these messages are people who have signed in to our app.
This also means that signed-in users can perform any action on messages: (Create, read, update, delete).
Ideally, we would have multiple auth rules, (i.e. only the owner of a message should be able to edit their own messages, but AWS Amplify doesn't yet support multiple authorization rules on Subscriptions
To deploy all of this infrastructure to the cloud, run:
amplify push
Use these settings to generate all of the possible Queries, Mutations and Subscriptions from our GraphQL API.
? Are you sure you want to continue: Yes
? Do you want to generate code for your newly created GraphQL API: Yes
? Choose the code generation language target: javascript
? Enter the file name pattern of graphql queries, mutations and subscriptions: src\graphql\**\*.js
? Do you want to generate/update all possible GraphQL operations - queries, mutations and subscriptions: Yes
? Enter maximum statement depth [increase from default if your schema is deeply nested]: 1
I personally like to move the subscriptions.js, mutations.js, and queries.js into the root graphql folder, and delete the now empty src/graphql and src/ folders.
Connecting our front-end
Next JS Custom App
We'll be using Next JS's Custom App in _app.js to configure our global CSS and also to configure AWS Amplify everywhere in our application.
You can think of _app.js as a wrapper around every page. So with this setup below, Amplify will be initialized and configured with ssr support enabled on every page of our application.
Let's set our _app.js to look like this:
import "../styles/globals.css";
import Amplify from "aws-amplify";
import awsconfig from "../aws-exports";
Amplify.configure({ ...awsconfig, ssr: true });

function MyApp({ Component, pageProps }) {
  return <Component {...pageProps} />;
}

export default MyApp;
Home Page (index.js)
Authentication - Sign Up & Sign In
Let's begin connecting our front-end by creating a form for users to sign up and sign in. To do that, we can use @aws-amplify/ui-react's Higher-order component withAuthenticator.
- Import
withAuthenticatorimport { withAuthenticator } from "@aws-amplify/ui-react"; Change our
export default function Home()to justfunction Home()Down the very bottom of the file, add:
export default withAuthenticator(Home);
Now to run our application, run:
npm run dev
and visit localhost:3000/
You should be faced with a sign up / sign in pre-built UI from AWS Amplify. Create and verify your account through this form.
Once you've done that head back to our index.js file!
Setting up the chatbox
Next step, we'll create a form that sends mutations to our GraphQL API.
I've put my code below, since we aren't here to learn how to write HTML / CSS, feel free to copy and paste what we have so far. We'll be diving into some more AWS Amplify right after.
index.js
import React, { useEffect, useState } from "react";
import styles from "../styles/Home.module.css";
import { withAuthenticator } from "@aws-amplify/ui-react";
import { listMessages } from "../graphql/queries";
import { createMessage } from "../graphql/mutations";
import { onCreateMessage } from "../graphql/subscriptions";

function Home() {

  const handleSubmit = (event) => {
    event.preventDefault();
    console.log(event.target[0].value);
  };

  return (
    <div className={styles.background}>
      <div className={styles.container}>
        <h1 className={styles.title}> AWS Amplify Live Chat</h1>

        <div className={styles.chatbox}>
          <div className={styles.formContainer}>
            <form onSubmit={handleSubmit} className={styles.formBase}>
              <input
                type="text"
                id="message"
                name="message"
                autoFocus
                required
                placeholder="💬 Send a message to the world 🌎"
                className={styles.textBox}
              />
              <button style={{ marginLeft: "8px" }}>Send</button>
            </form>
          </div>
        </div>
      </div>
    </div>
  );
}

export default withAuthenticator(Home);
Now we have a very over-engineered form that console.logs whatever we typed when we hit submit! We'll come back and add some functionality to this form shortly.
Fetching existing messages serverside
We're going to be using Next JS's getServerSideProps to:
- Make an authenticated GraphQL request server-side for a list of existing messages.
- Pass the list of messages as props to our main component
The getServersideProps function lives in the same file as our Home function, in index.js
To make an authenticated (on the signed-in user's behalf), server-side request to our GraphQL API, we can use this code:
export async function getServerSideProps({ req }) {
  // wrap the request in a withSSRContext to use Amplify functionality serverside.
  const SSR = withSSRContext({ req });

  try {
    // currentAuthenticatedUser() will throw an error if the user is not signed in.
    const user = await SSR.Auth.currentAuthenticatedUser();

    // If we make it passed the above line, that means the user is signed in.
    const response = await SSR.API.graphql({
      query: listMessages,
      // use authMode: AMAZON_COGNITO_USER_POOLS to make a request on the current user's behalf
      authMode: "AMAZON_COGNITO_USER_POOLS",
    });

    // return all the messages from the dynamoDB
    return {
      props: {
        messages: response.data.listMessages.items,
      },
    };
  } catch (error) {
    // We will end up here if there is no user signed in.
    // We'll just return a list of empty messages.
    return {
      props: {
        messages: [],
      },
    };
  }
}
The above code:
- Tries to return a list of messages retrieved from the GraphQL API
- If there is no current signed-in user, the function just returns an empty
[]
To read the result of getServersideProps in our Home function, we'll need to destructure the messages out of the props we returned.
Modify the Home function to look like this:
function Home({ messages }) {
Let's also check for the user when the page first loads, and store the user in state:
// this code goes right beneath the line written just above ^^
const [user, setUser] = useState(null);

  useEffect(() => {
    const fetchUser = async () => {
      try {
        const amplifyUser = await Auth.currentAuthenticatedUser();
        setUser(amplifyUser);
      } catch (err) {
        setUser(null);
      }
    };

    fetchUser();
}, [])
Let's also store the messages passed through props from getServersideProps in state, since we'll be updating them in real-time with Amplify Subscriptions soon.
// Sets the stateMessages value to be initialized with whatever messages we
// returned from getServersideProps
const [stateMessages, setStateMessages] = useState([...messages]);
We'll also need to import a bunch of stuff we just used:
import React, { useEffect, useState } from "react";
import styles from "../styles/Home.module.css";
import { withAuthenticator } from "@aws-amplify/ui-react";
import { API, Auth, withSSRContext, graphqlOperation } from "aws-amplify";
import { listMessages } from "../graphql/queries";
import { createMessage } from "../graphql/mutations";
import { onCreateMessage } from "../graphql/subscriptions";
Creating new messages
To create a new message in our database every time a user submits a message through our form, we'll need to add a small bit of logic to the onSubmit of our form.
Firstly, we'll store whatever the user is typing in state.
const [messageText, setMessageText] = useState("");
Then we'll modify our form to look like this, so the
onChangeof our input updates state every time the user changes their message.onSubmittriggers a function we are going to create calledhandleSubmit
<form onSubmit={handleSubmit} className={styles.formBase}>
  <input
    type="text"
    id="message"
    name="message"
    autoFocus
    required
    value={messageText}
    onChange={(e) => setMessageText(e.target.value)}
    placeholder="💬 Send a message to the world 🌎"
    className={styles.textBox}
  />
  <button style={{ marginLeft: "8px" }}>Send</button>
</form>
Let's create that handleSubmit function now (this goes anywhere inside the Home function)
const handleSubmit = async (event) => {
    // Prevent the page from reloading
    event.preventDefault();

    // clear the textbox
    setMessageText("");

    const input = {
      // id is auto populated by AWS Amplify
      message: messageText, // the message content the user submitted (from state)
      owner: user.username, // this is the username of the current user
    };

    // Try make the mutation to graphql API
    try {
      await API.graphql({
        authMode: "AMAZON_COGNITO_USER_POOLS",
        query: createMessage,
        variables: {
          input: input,
        },
      });
    } catch (err) {
      console.error(err);
    }
  };
Displaying our messages
We'll need to display all of our messages in the chatbox, so let's:
- Map over each message (ordered by date)
- Create a new
Messagecomponent for each message.
Modify our index.js return to look like this:
if (user) {
    return (
      <div className={styles.background}>
        <div className={styles.container}>
          <h1 className={styles.title}> AWS Amplify Live Chat</h1>
          <div className={styles.chatbox}>
            {stateMessages
              // sort messages oldest to newest client-side
              .sort((a, b) => b.createdAt.localeCompare(a.createdAt))
              .map((message) => (
                // map each message into the message component with message as props
                <Message
                  message={message}
                  user={user}
                  isMe={user.username === message.owner}
                  key={message.id}
                />
              ))}
          </div>
          <div className={styles.formContainer}>
            <form onSubmit={handleSubmit} className={styles.formBase}>
              <input
                type="text"
                id="message"
                name="message"
                autoFocus
                required
                value={messageText}
                onChange={(e) => setMessageText(e.target.value)}
                placeholder="💬 Send a message to the world 🌎"
                className={styles.textBox}
              />
              <button style={{ marginLeft: "8px" }}>Send</button>
            </form>
          </div>
        </div>
      </div>
    );
  } else {
    return <p>Loading...</p>;
  }
In the above code, we've added a map over each of our messages to return a Message component. We haven't made that so let's make it now.
Create a new folder called components at the root of your project. Within the components folder, create a new file called message.js.
Set the code of message.js to be:
import React from "react";
import styles from "../styles/Message.module.css";

export default function Message({ message, isMe }) {
  if (user) {
    return (
      <div
        className={
          isMe ? styles.sentMessageContainer : styles.receivedMessageContainer
        }
      >
        <p className={styles.senderText}>{message.owner}</p>
        <div className={isMe ? styles.sentMessage : styles.receivedMessage}>
          <p>{message.message}</p>
        </div>
      </div>
    );
  } else {
    return <p>Loading...</p>;
  }
}
And within index.js we'll need to import our new component:
import Message from "../components/message";
This component takes two props:
- message: The message item returned from our GraphQL API
- isMe: A boolean (true/false) to say whether the message owner equals our (the current signed in user)'s id. Basically, a flag to say if this is our message or another person's message.
We are simply returning a div that has different styles depending on whether or not we are the creator of the message. Then, we are populating the text fields of the message with the actual contents of that message.
Live Updates with Subscriptions
Now for the really exciting part!
We can use our auto-generated graphQL subscriptions, to listen to live updates to our messages table in our DynamoDB database.
Let's go back to index.js and add a few small changes.
First let's modify our existing useEffect we created.
We'll add the AWS Amplify subscription code here.
Now it should look like this:
  useEffect(() => {
    const fetchUser = async () => {
      try {
        const amplifyUser = await Auth.currentAuthenticatedUser();
        setUser(amplifyUser);
      } catch (err) {
        setUser(null);
      }
    };

    fetchUser();

    // Subscribe to creation of message
    const subscription = API.graphql(
      graphqlOperation(onCreateMessage)
    ).subscribe({
      next: ({ provider, value }) => {
        setStateMessages((stateMessages) => [
          ...stateMessages,
          value.data.onCreateMessage,
        ]);
      },
      error: (error) => console.warn(error),
    });
  }, []);
What happened?
- We created a
subscriptionvariable that listens for to ouronCreateMessageevents. - Every time a
createMessageevent is detected (when we create a message via our form), thenext:code is called. - The
next:code passes the values of the newly created message invaluevariable. - in the
setStateMessagescall, we are adding the new message to our existing messages in state.
One small little problem remains!
Since we are only returning existing messages if the user was signed in during our getServersideProps, new users won't see any existing messages.
So, right below our above useEffect, we'll add a little code block to fetch existing messages when the user variable gets changed. A.K.A. when a user changes from a guest, to a user.
  useEffect(() => {
    async function getMessages() {
      try {
        const messagesReq = await API.graphql({
          query: listMessages,
          authMode: "AMAZON_COGNITO_USER_POOLS",
        });
        setStateMessages([...messagesReq.data.listMessages.items]);
      } catch (error) {
        console.error(error);
      }
    }
    getMessages();
  }, [user]);
Conclusion
That's it! We have a live chat application 🥳.
This pattern of pre-rendering content on the server, then listening for updates to the data client-side is something I have been using a lot recently.
Not only that, the authentication is handled server-side with minimal effort required. This means the data is only ever available to those who are authorised to access it.
It is crazy powerful, and I hope you are as excited as I am about it!
If you love serverless tech like me, I would encourage you to follow me to see more.
Thanks for reading!
Find me at:
YouTube: youtube.com/channel/UCJae_agpt9S3qwWNED0KHcQ
Twitter: twitter.com/JarrodWattsDev
GitHub: github.com/jarrodwatts
LinkedIn: linkedin.com/in/jarrodwatts
Website: jarrodwatts.com