I Built A SaaS Startup In 2 Months, Here's What I Learned.

J
A software engineer turned developer relations engineer in the web3 space, from Australia 🇦🇺.
Search for a command to run...
A software engineer turned developer relations engineer in the web3 space, from Australia 🇦🇺.
Great post, thanks for sharing!
This is so amazing learned a ton lot ;). Amazing man.
Thank you so much for sharing all this wonderful info. It is so appreciated!!! “You always have good humor o in your posts/blogs. So much fun and easy to read!
Thank you! That is amazing feedback :)
Really really awesome job on this product Jarrod Watts! I'm a big fan of Firebase myself and so I love reading about how you built this with so much Firebase products~
Upsocial is an amazing product! You clearly begin with an end in mind for it! Great job! Kudos 👍 👍
Thank you Victoria! Hopefully I'll be able to write some more about Firebase soon too!
this is so relevant. I too get suckered into scrolling or watching crap when I visit a social network "for important reasons" such as monitoring content performance
Hahaha yeap me too! I can't resist clicking that juicy notifications button, and then - instantly distracted!
Really glad to hear that resonated with you too Arthur, thanks for reading!
"I also find it super cool that I can pass a function that returns a function as a parameter to another function!"
This is why JavaScript is so hard to maintain. I can't even imagine how long that will take for another guy (even a JavaScript guru) to understand your code. It's very fun when you write it, it's hell when you have to maintain such code. And when you did not write this, you juste hate the developer who wrote this. So, no, IMHO, it's not super cool to be able to write complex things that will take hours for others to understand and debug when needed.
Definitely some valid feedback Olivier. I'm working on this solo at the moment, but I can imagine it could potentially be confusing to work on for someone else.
Although, this pattern isn't necessarily something unique to JavaScript (or Typescript in this scenario), this treatment of functions as first class entities is one of the principles of functional programming in general.
For some more information, this sentence refers to a function I wrote, which is meant to write data to Firestore for a social media profile. In a function called writeSocialProfile, which accepts a function socialApiRequestFunction as a parameter.
This enables me to run different functions depending on the social media platform I'm looking at.
Essentially it just says "run getYoutubeProfile if socialName is youtube", and repeat that for each social media in a switch statement.
It definitely might not be as clean to read for new devs to the project, but it has a few benefits that IMO make it worthwhile.
It sped up my workflow of adding new social media platforms to the app, as my workflow could simply be:
xyz to get a user's profile from a new social media platform abc.xyz to be returned when the value of socialName is abcDefinitely agree it might not be pretty to look at for people new to the codebase, but it made the flow a lot easier for me, with some added benefits of easy testing.
Jarrod Watts With adequate comments this should be ok ;)
And you're right, all other languages I've used allow such things: C, C++, C#, Go, Java, Php and Python.
The problem is always: the limits of maintainability vs fast coding.
Because you always end up with debugging someone else's code, I've chosen Python as my language for my job: it's much harder (still possible unfortunately...) to write "hard-to-understand" code.
This is exactly what I was thinking of building myself because I found myself always opening a ton of browser tabs to check on every social media number.
Awesome job 👌
Will surely be a user!
Haha that is awesome to hear Igor!
That's pretty much the exact situation that lead me to create this too, 😂 opening up so many tabs and then getting distracted!
Let me know how you find it! Open to any suggestions you might find.
I have checked the product on Product Hunt ;) You have done an amazing work 🤝
Thanks a tonne Eleftheria! It's my first time posting on Product Hunt, so that really helps me out :)
You've literally made a great product Jarrod Watts! I really loved it and I ain't gonna use YT Studio anymore 😅!
There are a few suggestions I would like to give though 😊
Adding a progress bar on the app, like this while navigating through pages, you can use this package for that as you're using Next.js.
Add a page for feedback where users can send you feedback to improve the app
Thank you so much Usman!
Those are some great ideas, I'll definitely add a progress bar for page changes and some way of sending feedback too.
Will let you know when they get added!
Thanks! Waiting for those ✌️! Jarrod Watts! You can take inspiration from this feedback box

“What does dev rel do?” I see this question get asked surprisingly often. Recently, I was given the opportunity to build a developer relations program from scratch and reflect on my 3 years of experience in this role to create a strategy. I decided t...
Ever wanted to store a piece of information on-chain but keep it a secret until later? In this quick post, we'll explore the commit-reveal scheme and provide an example of how you can implement it within a smart contract using Solidity. What is the C...
In this tutorial, I'll walk you through the process of setting up Coinbase Smart Wallet inside a front-end application. By the end of the tutorial, we'll build a simple Next.js application where users can: Connect to your application via Coinbase Sm...

As part of Ethereum's rollup-centric roadmap, rollups are taking away the heavy lifting from Ethereum and scaling its throughput by orders of magnitude, reflected in the $20B+ TVL stored in L2 chains today. But, with great power, comes great respons...

This guide will show you how to build your own indexer for an EVM-compatible blockchain such as Ethereum, Polygon Proof of Stake, and more! By the end, you'll have a Docker container running Kafka that captures all blockchain events that you specify,...
Over the past two months I have been chipping away at my favourite project to date... Upsocial! If you're interested, you can check it out at https://upsocial.app/
I've also posted it on Product Hunt - would love for you to check it out!
Upsocial is a project that I created when I found myself becoming super distracted every time I wanted to view the performance of the content I was putting out.
I'd hop onto YouTube, just to innocently check how my recent video was performing in the Analytics tab, but two hours later I'd find myself watching Ben Awad videos about Dogehouse.
You've probably experienced a similar feeling as a content creator, and countless hours have been wasted due to the addictive nature of social media platforms.
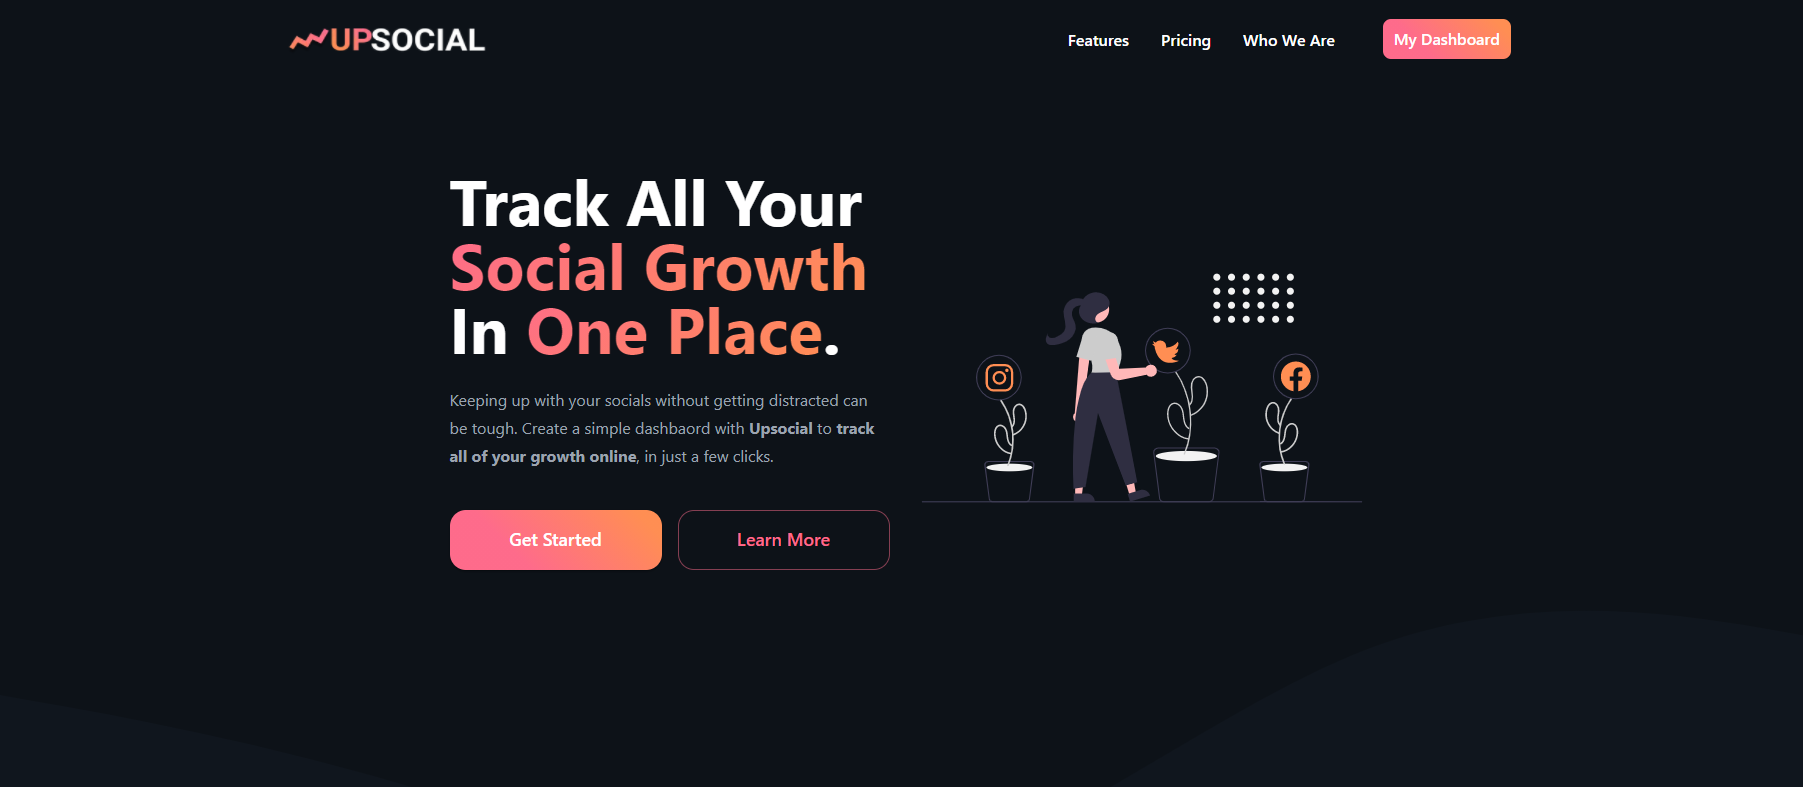
The reality is, it's hard to stay focussed on a platform that is designed to keep you on there as long as possible! This is exactly what I attempted to solve with my most recent project; Upsocial.
Upsocial aims to be an all-in-one social media dashboard built for content creators. It uses social media API's to track and store your profile and content growth over time, and display that information in a simple dashboard to quickly understand how your content is performing.
Currently, Upsocial supports five social media platforms:
I've had a lot of fun building it, learning a lot of new things along the way. I'd like to share the tech stack behind Upsocial, and all the lessons I learned while building out a complex web application.
Upsocial uses all of my favourite technologies, and is 100% serverless. It takes advantage of some of the same technologies that Hashnode utilizes too! 😉
A quick summary of all the core technologies I am using:
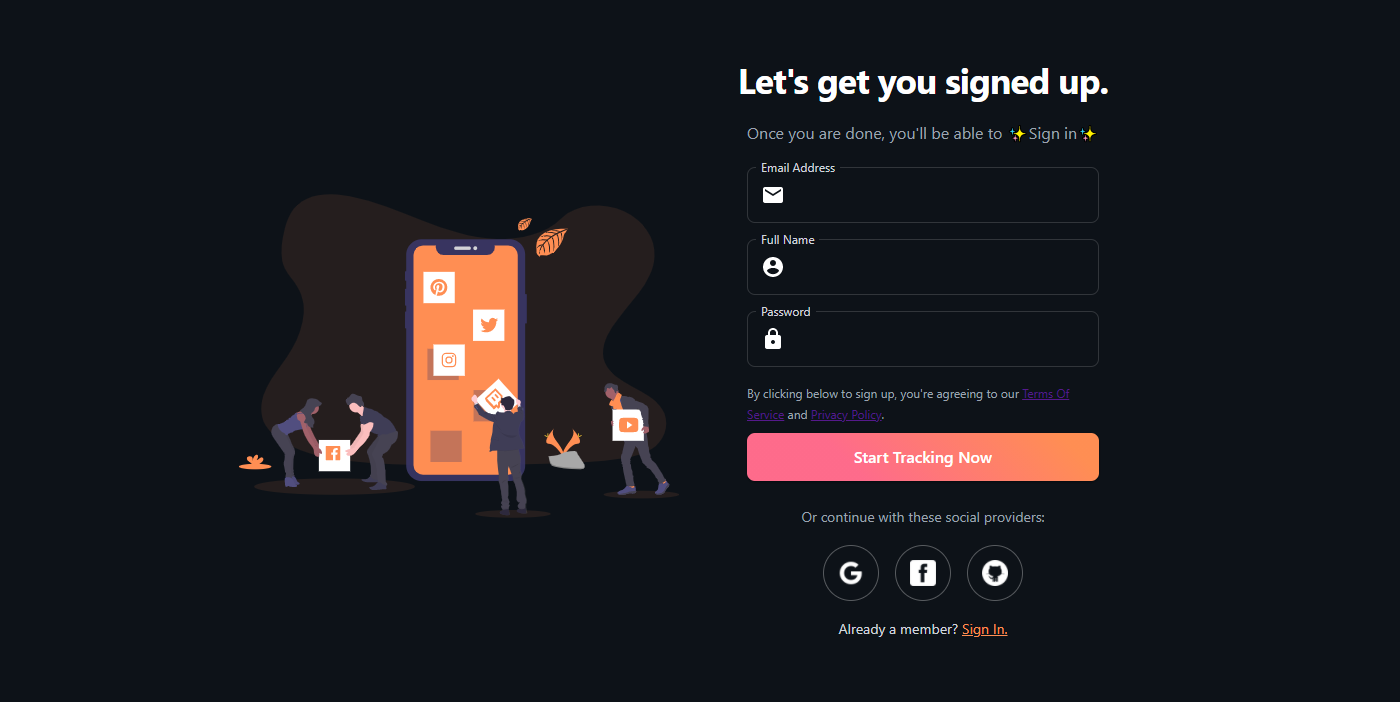
From a user perspective, Upsocial is designed to be very, very easy. Just create an account, type in your usernames of the social media platforms you want to track, and well... that's it!
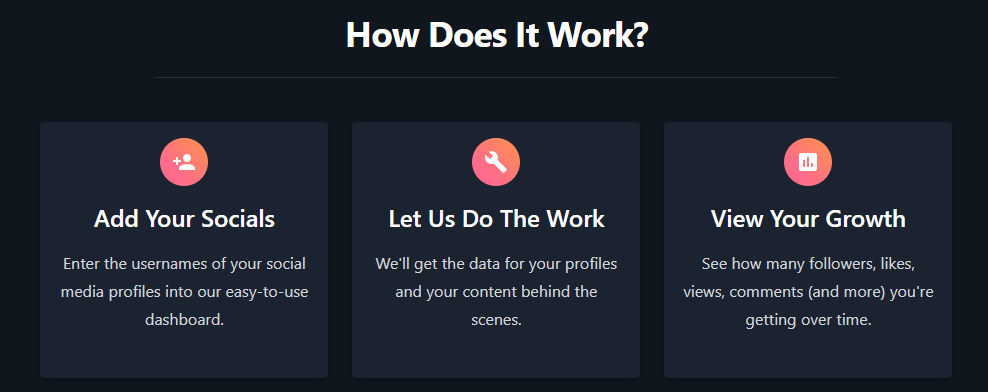
Behind the scenes, there is a lot more going on; let's dive into how everything from the user entering their username, to how we create a dashboard for them works, below.
The architecture of Upsocial can essentially be broken up into Four pieces:
I'm using Firebase Authentication for authentication and a combination of Firestore Security Rules, and Firebase Custom Claims to manage authorization.
When a user signs up via the signup page, there are a few things happening behind the scenes.
Firstly, a Firebase Cloud Function is triggered to create a document for this user inside the users collection, in our Firestore Database. We'll talk a little more about the structure of the database shortly.
Next, a Firebase Cloud Function is triggered to create a customer in Stripe for us; so that we can potentially upgrade this user to a premium user later on; if they choose to upgrade from the free plan.
Once these two steps are completed in the background, we can show the user a fresh dashboard, and allow them to add their social profiles.
If a user chooses to upgrade to the premium plan, a custom claim is added to that user to indicate they are a premium member. I've created a custom react hook to detect if the currently signed in user is a free user or a premium user:
This hook checks whether or not the custom stripeRole claim has been assigned to the user, with a simple function seen below:
export default async function isUserPremium(): Promise<boolean> {
  await firebase.auth().currentUser?.getIdToken(true);
  const decodedToken = await firebase.auth().currentUser?.getIdTokenResult();

  return decodedToken?.claims?.stripeRole ? true : false;
}
If you're interested in learning more about getting started with Firebase, Next.JS and Stripe; I have made a video about setting up this exact stack recently!
The core functionality of Upsocial is powered by Firebase Cloud Functions.
I'll let the documentation describe how Firebase Cloud functions work:
Cloud Functions for Firebase is a serverless framework that lets you automatically run backend code in response to events triggered by Firebase features and HTTPS requests. Your JavaScript or TypeScript code is stored in Google's cloud and runs in a managed environment. There's no need to manage and scale your own servers.
Essentially Firebase Cloud Functions enabled me to focus on writing code; not spinning up or scaling infrastructure and servers. I can simply write TypeScript code in a Node.js environment on my local computer, and push them up to my Firebase project, using the Firebase CLI.
A Firebase function gets triggered every time a user:
users collection)I have two main generic cloud functions that accept both a socialName parameter and a profileId; representing the name of the social media, and the username of the user, respectively.
These two cloud functions are:
getSocialProfilegetContentHopefully I've named my functions well and you can understand what their purpose is, but just in case I haven't...
getSocialProfile gets the statistics of a social media PROFILE. (E.g. This users number of followers, number of total posts, etc.)getContent gets the statistics of a user's CONTENT. (E.g. This users latest content for their profile, statistics about each video, such as views, likes, comments, etc.)The basic purpose of these two cloud functions are to run when a user adds a social media profile to their dashboard.
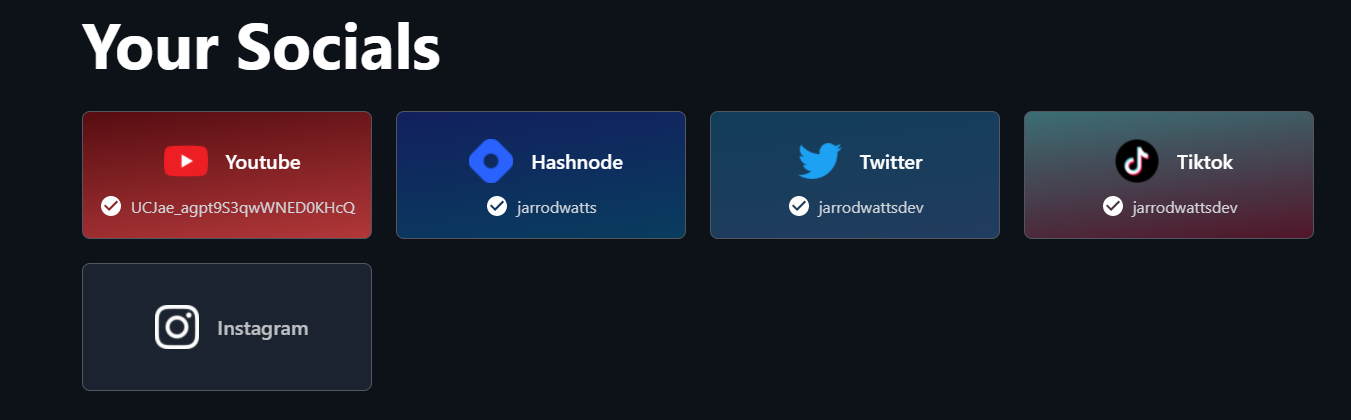
Let's say I wanted to add my Instagram profile to my dashboard. I'd click the empty Instagram button in the picture above, and be prompted to add my username for Instagram.
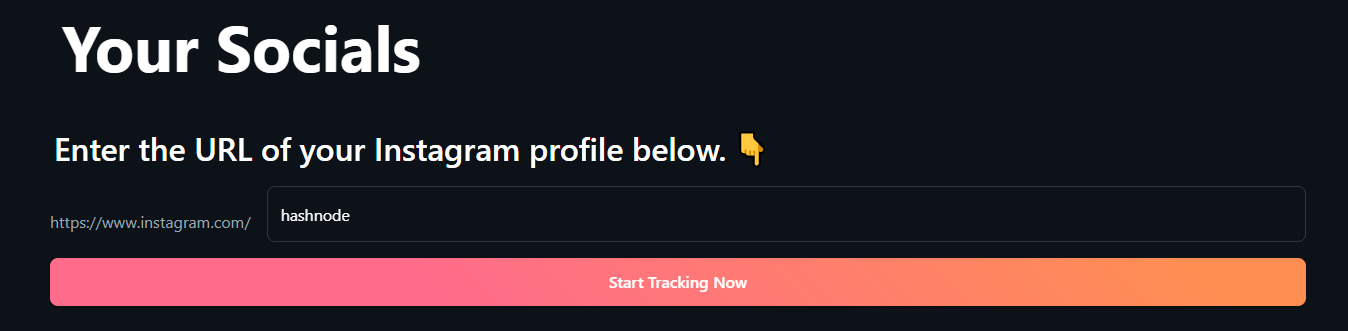
So I add my username, (I've added hashnode here) and click Start Tracking Now. This button fires off both of our functions living in the cloud, letting them know we want to find information about hashnode on instagram as parameters.
The two cloud functions we've discussed so far call each different social media API and request both the profile and content data for a user.
I have written individual TypeScript functions (not cloud functions) to request the data I want from each social media API. I.e. I have one function to request a user's profile data and another function to request a users content data from each social media API.
The cloud functions we've talked about so far are responsible for determining which one of these function to run, depending on the value of the socialName passed in. In this case, it's instagram, so we run instagram through a switch case; that returns the corresponding functions to run for Instagram.
In this case, the function would let us know that we need to run getInstagramProfile, and getInstagramContent. Whereas if we had run it with youtube as a parameter, the function would let us know that we need to run getYoutubeProfile and getYoutubeContent.
Each of these individual functions operate a little differently, and different API's require different queries and different authentication alongside those queries. At the end of the day, these functions have the same objective; get data about the user for this social platform.
Once this data comes back from the social platform's API, we format it to our liking, and also write it to the database, inside the user's {socialName} (e.g. youtube) subcollection.
Since we are hooked up to live-updates from our database on the front-end, the success status comes through from the cloud function (hopefully) and the data is instantly available on the user's dashboard.
I'm very proud of the way I made these cloud functions so generic, as it allows any social media platform to be added to Upsocial with ease.
I also find it super cool that I can pass a function that returns a function as a parameter to another function!

The two generic functions that we discussed above only work for getting that instant satisfaction for the user, to immediately see their data on the dashboard.
But there's more to it! As we'll discuss below, in the Firestore Database section, we want to show how a user is growing over time, and also show a user how their individual pieces of content are also growing over time.
In order to do that, I implemented additional scheduled cloud functions to update the data for users daily, so that it's fresh every time they come back to the dashboard.
In addition to that, these snapshots are written as historic documents so that we can show the user graphs and tables of their growth over time; let's see how this works in our database now.

The Firestore Database is really the piece of the puzzle that brings the whole application together. By utilizing React hooks for Firestore, made available by the react-firebase-hooks package, I was able to utilize a crazy powerful database that satisfies all of my use-cases.
There are a number of objectives that I wanted my database to fulfil, specifically, I want my database to:
These criteria introduced a significant level of complexity in the design of the database, shown below:
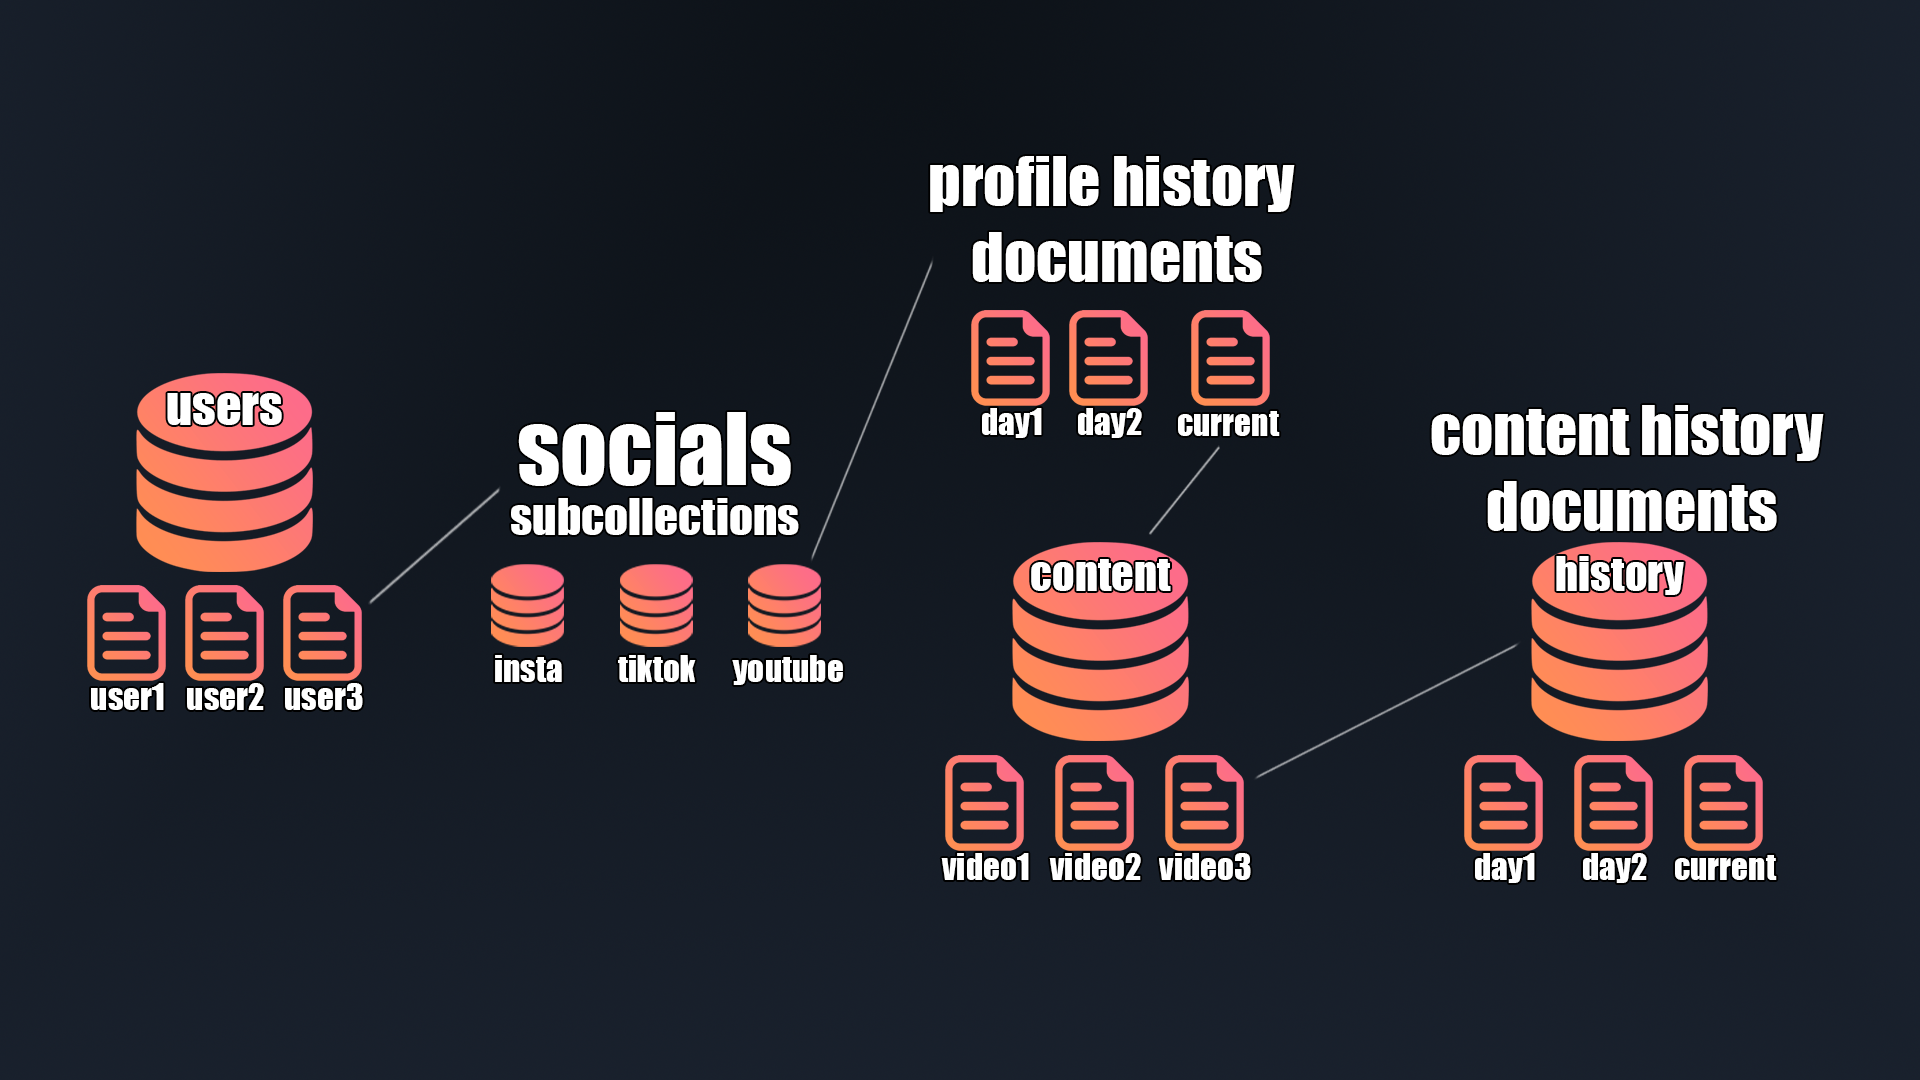
A simpler way that I like to imagine my database structure is by thinking of it like this:
This database structure suits all of the needs of my application, and since it is a NoSQL database, it is generic enough to fit the different types of data that I needed in different subcollections.
The main benefit of Firebase allowing this flexibility, is that it enables me to account for the differences in data availability between social media platforms.
When querying Firestore, queries are said to be "shallow". This means the subcollections of a document are not available when you query that document.
For example, if I queried for my Youtube Profile Overview document, I wouldn't get back all of the nested subcollections and documents; I'd simply just get the document I asked for.
This works really well for me, as we can have different levels of depth to our dashboard, without having massive amounts of unnecessary data coming back to the user.
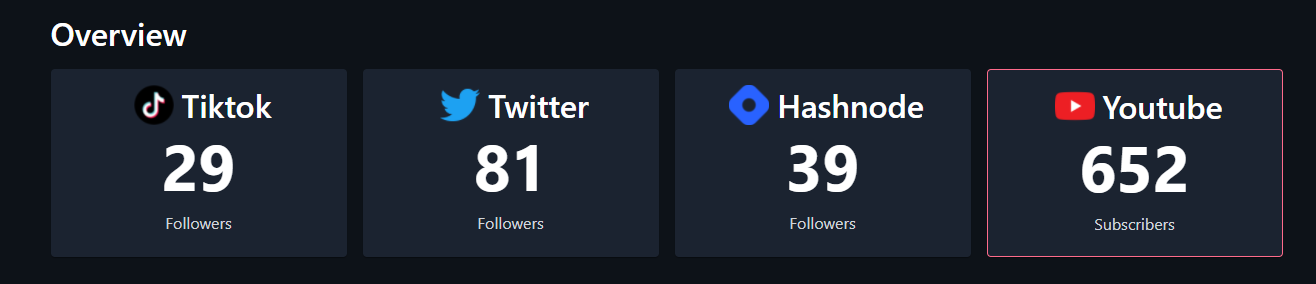
For example, on the home page of the dashboard, I just want the overview document - to show the user their current social profile snapshot.
To do that, we can simply query the user/{userId}/{socialName}/overview document. This will just retrieve the overview document for the given social media, for the currently signed in user; effectively showing the user the most up-to-date data that we have for that social media profile inside our database.
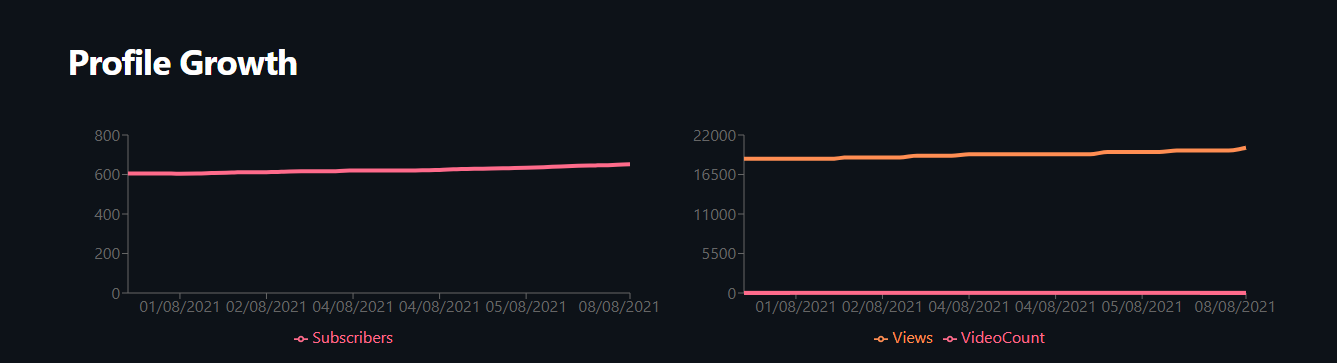
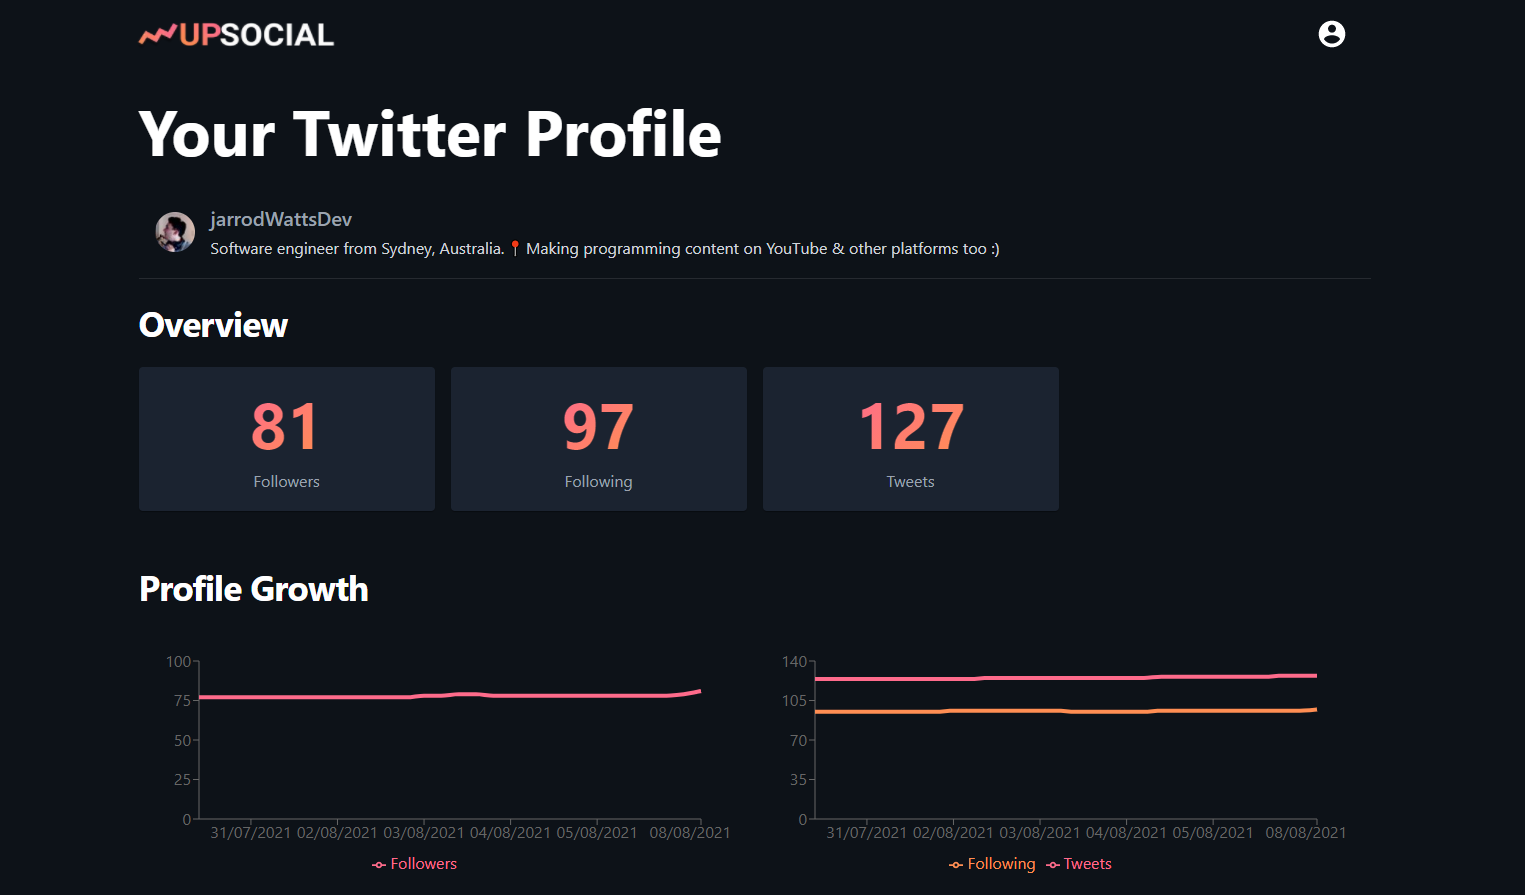
Whereas, if we wanted to go more in depth and show them a chart or a table of their growth for that social media profile, we can send them to our dynamic route page, /dashboard/[socialName]. On this page, we query for the collection of that social media profile; gathering many historic snapshot documents at once; so that we can show the user growth metrics.
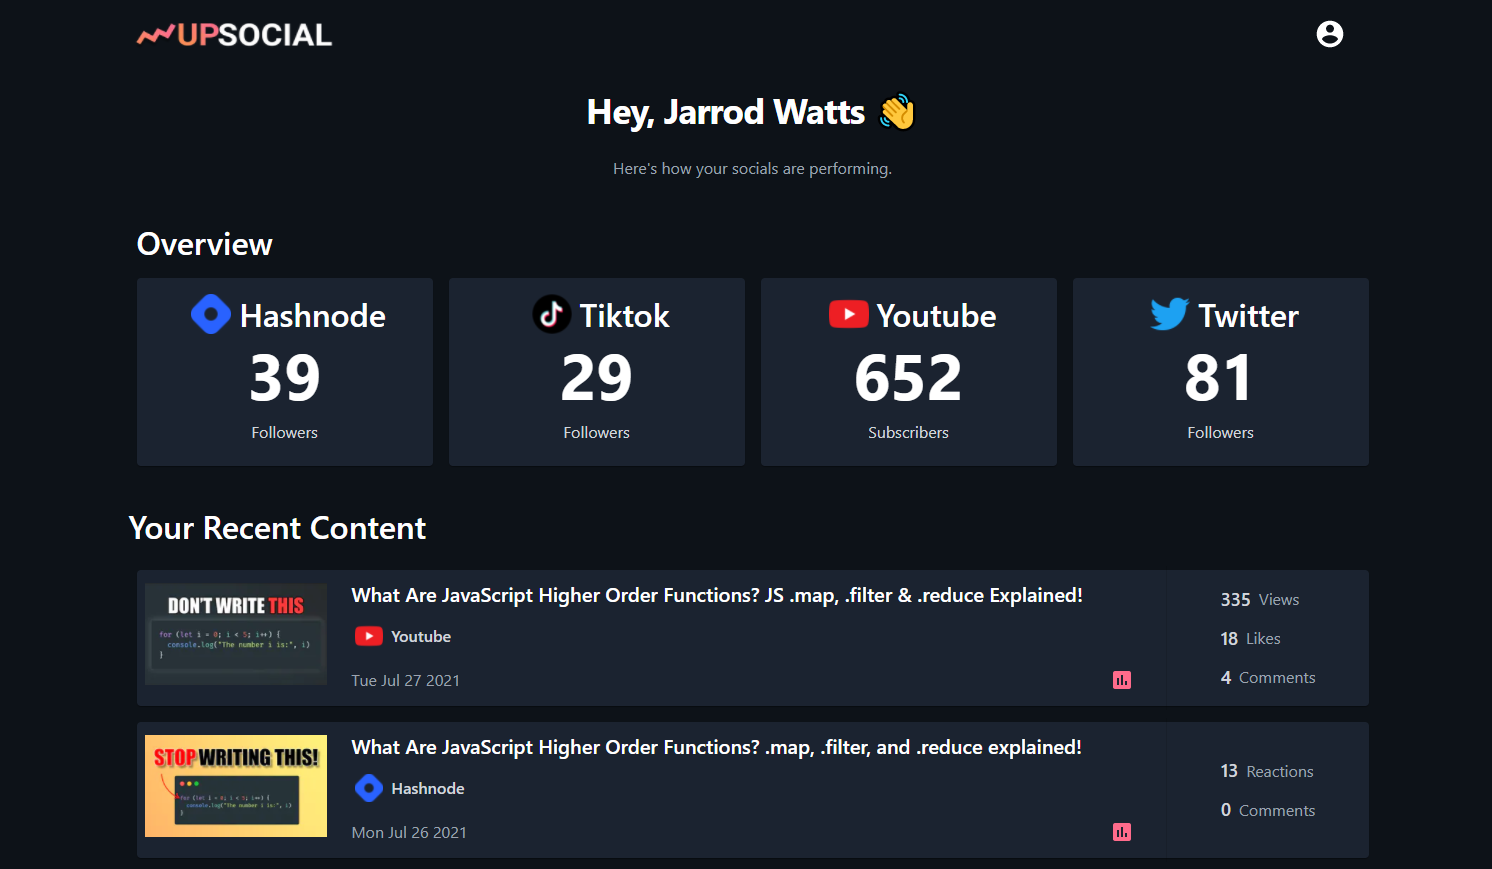
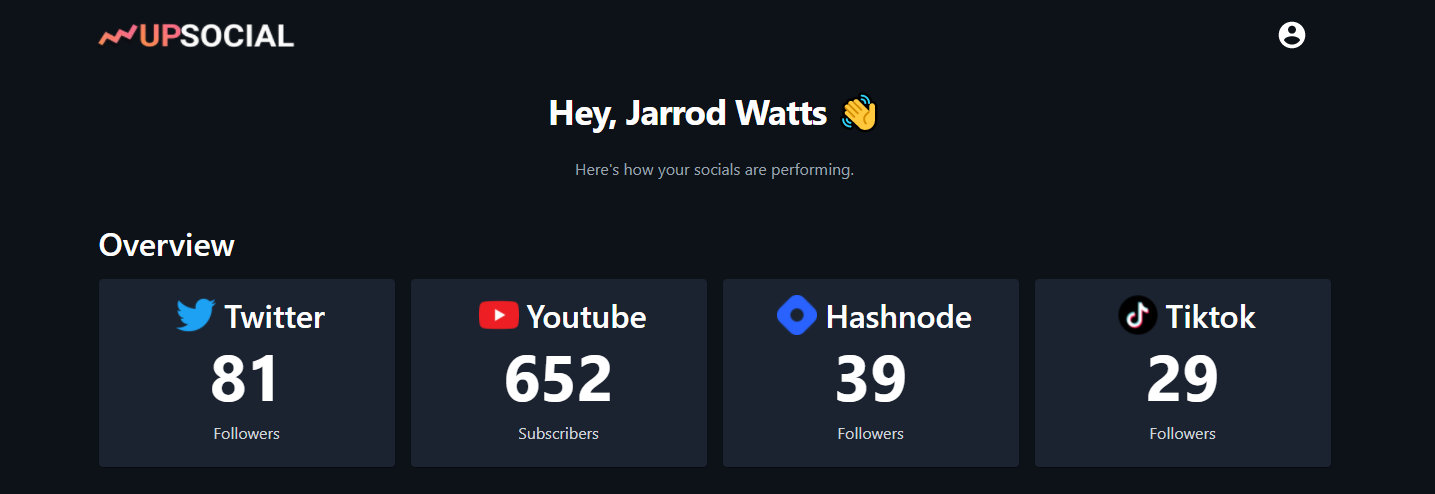
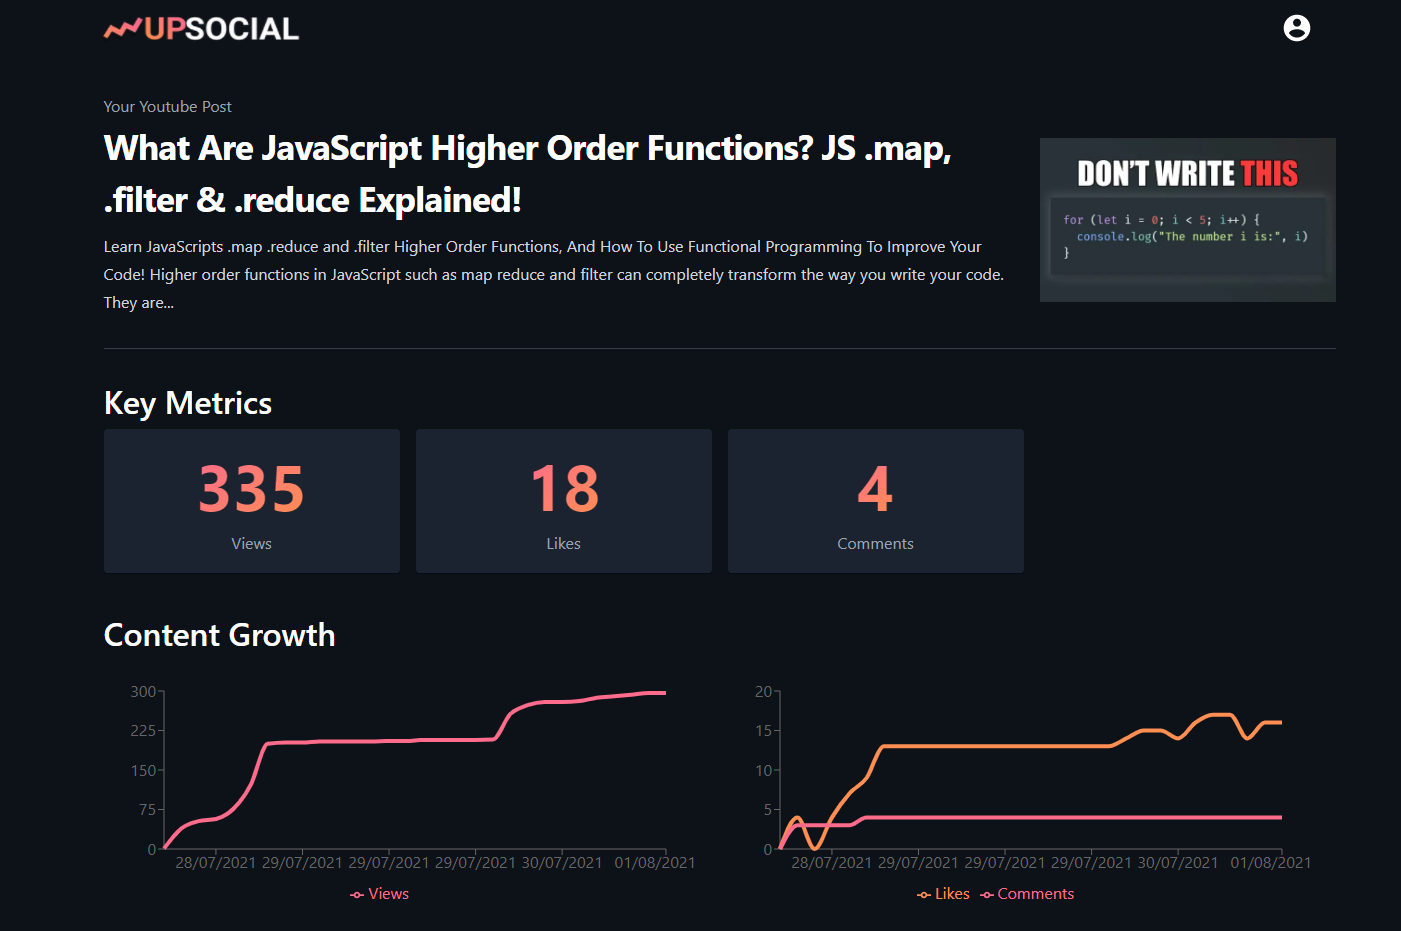
To tie it all together, and display a beautiful dashboard to our users, we're using a combination of Next.JS for functionality, and Material UI for styling; to display all the data points that content creators care about.
There's nothing too special going on here, just simply pulling data from our Firestore database, and passing it as props into some nicely styled React components!
Here we are pulling from our overview documents from each social subcollection that the user has inside their main user document. We are passing down the value for the "primary metric" (typically followers) and the number down as props to a component called SocialOverviewPanel as you see here:
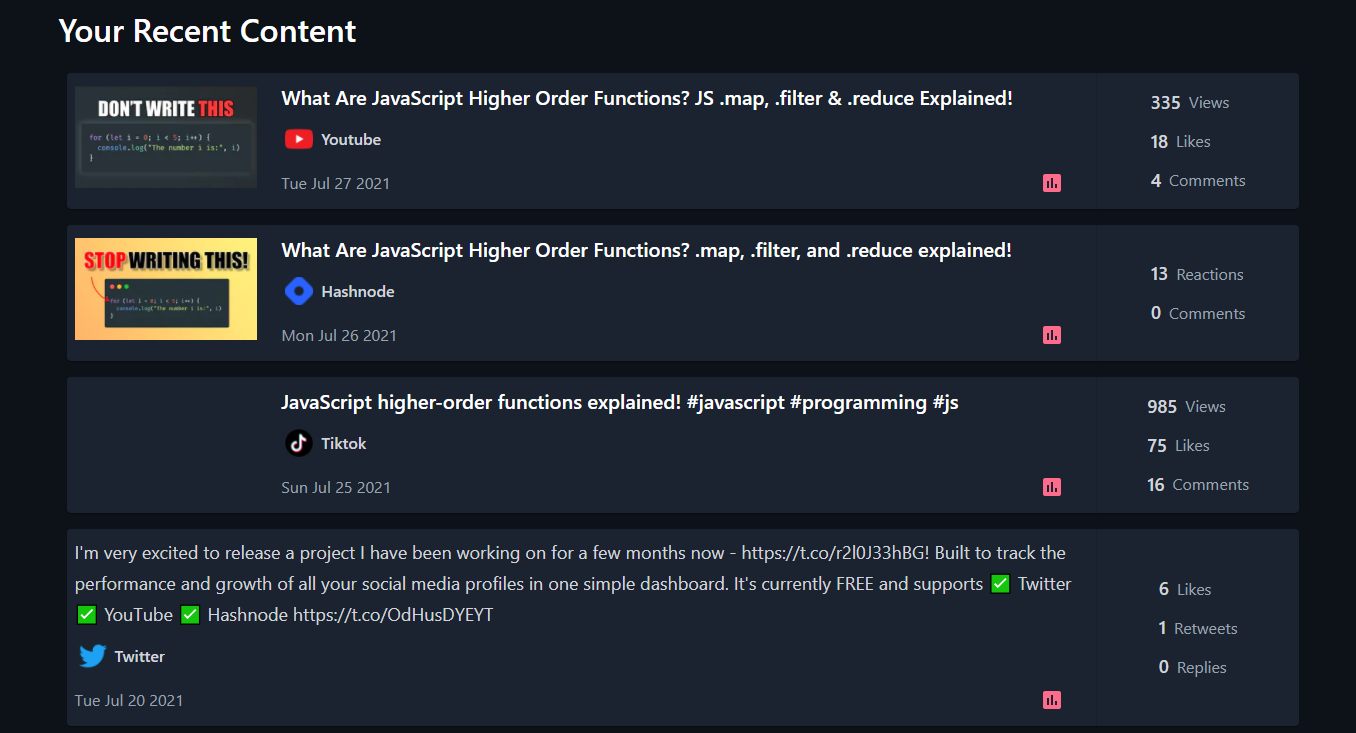
Here we have a ContentDetailPanel component, where we are fetching the most recent content from the user's {socialName}/content subcollection and mapping each document we find into one of these React components.
We have a createdAt field on each piece of content across all platforms in the database, which allows us to show the user the latest content they have put out across all platforms, in chronological order!
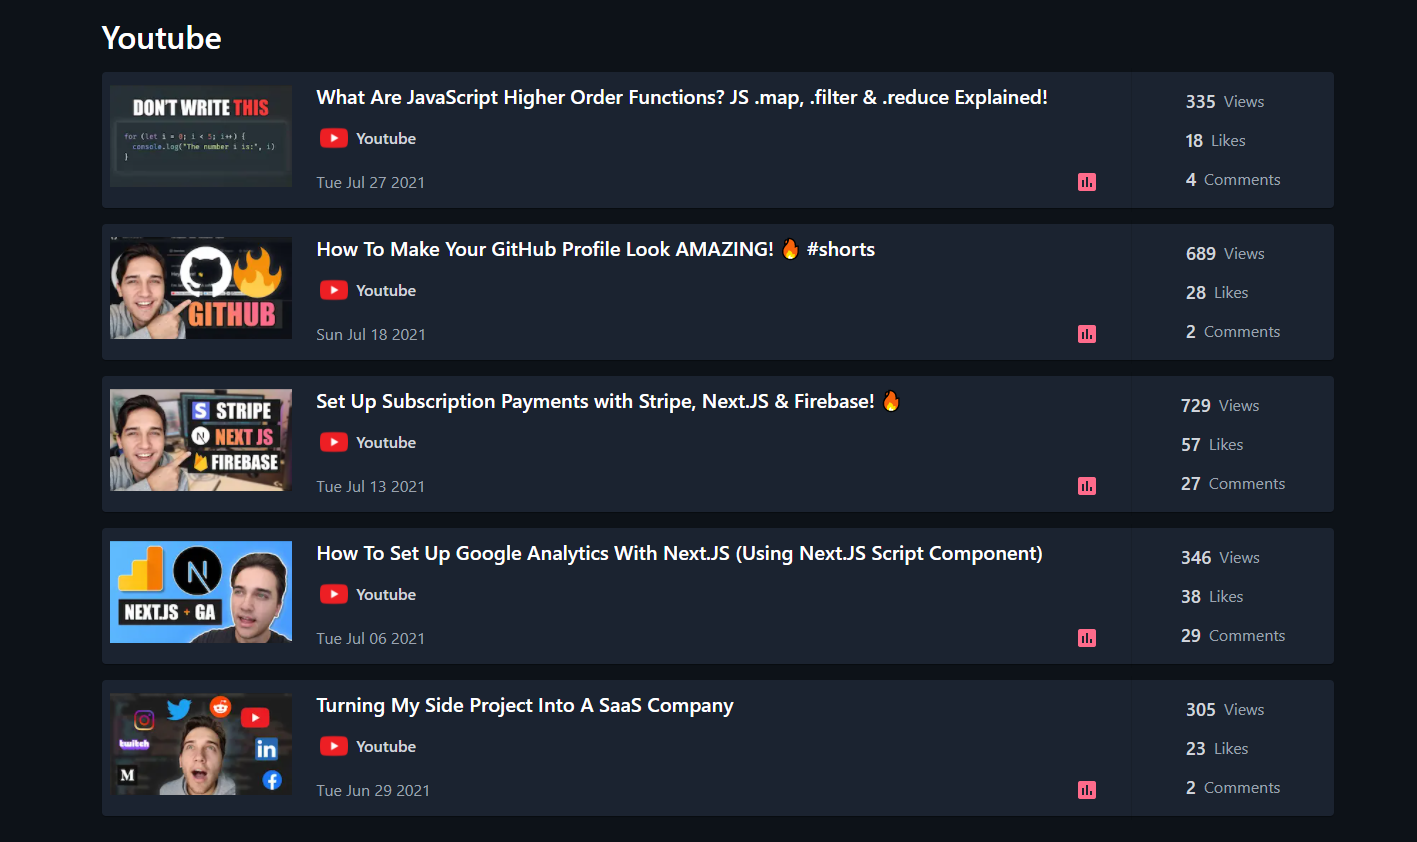
Very similar to the above section! However we are simply just displaying the latest content from one platform!
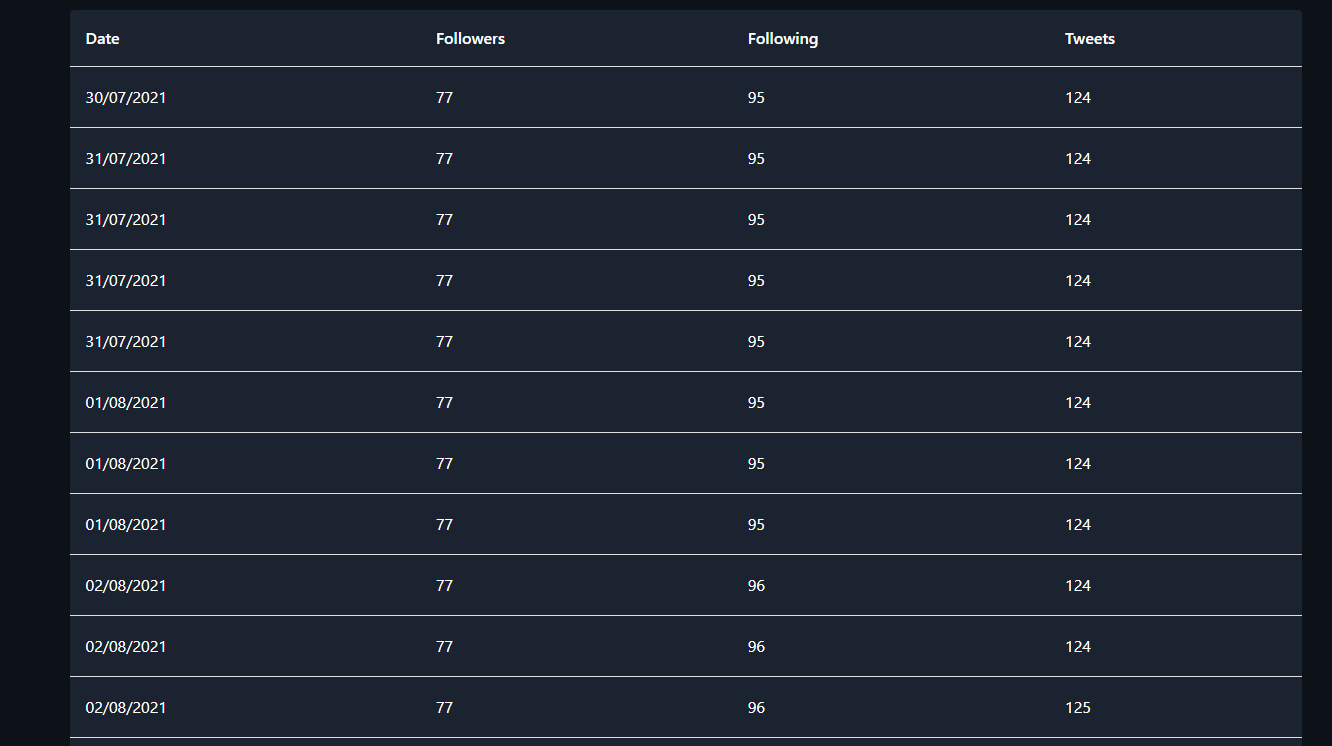
Here we utilise the historic documents that we discussed in the section above; we use a very nice reduce function to get the right key value pairs out of the documents coming down from Firebase, so that this page's code is generic across all social platforms.
  const cleanedData = historicData.map((entry) => {
    const metrics = getMetricNames(socialName);
    const res = metrics.reduce(
      (acc: { [key: string]: number | string }, curr: string) => (
        ((acc[curr] = parseInt(entry?.data?.[curr])),
        (acc['date'] = new Date(parseInt(entry.date)).toLocaleDateString())),
        acc
      ),
      {}
    );
If you'd like to learn more about JavaScript's reduce function, I have a recent blog post about that too!
This page is for premium users only! We track each of the recent pieces of content the user has for a social platform and take historic snapshots of all of them over time too. (It's a little buggy sometimes...)
The reality of this project is that it is entirely dependent on other API's! Using such a large number of externally managed API's, (YouTube API, Hashnode API, Twitter API, and other third-party packages) is going to be troublesome.
To try and combat this as best as possible, I have written a number of unit/integration tests, using Jest, to ensure that my functions are able to properly return data from each of these API's consistently.
However, I am quite worried that errors will arise in the future where I am running failing functions in production due to changing or failing API requests.
One of the primary risks associated with using these third party API's on such a large scale is the risk of being rate limited! As my application scales up to more and more users, these external APIs are going to be hit more and more frequently, which could potentially lead to me being rate limited, or even worse; cut off completely!
This is the main reason I have set the functions to run once every 24 hours rather than much more frequently; to try avoid being rate limited (initially I was running them once an hour). In addition, this is a driving factor of the introduction of the Premium plan for Upsocial. By limiting the amount of API requests being made by adding some restrictions to free users, I am able to slightly reduce the risk of being rate limited by the APIs.
Firebase functions are not designed to be long-running functions. They're meant to quickly execute one small specific task; which is just about the exact opposite of what my scheduled functions do.
My scheduled functions run for quite a lengthy period of time; as they are collecting data about all users in one run. This is obviously a design flaw on my behalf, and I am going to have to change the way these scheduled functions work in the future.
My plan is likely to explore the wonderous world of containers, and run scheduled CRON jobs which utilize the Firebase Admin SDK to refresh my Firestore database on a schedule.
I am not too worried about this for the time being, as it will not become a relevant problem until my application scales up to at least a few hundred or a few thousand users.
When I had the thought for this project, it sounded very simple...

It sounded so simple in my head! But here I am, 2 months, 91 commits, and many new skills under my belt later, once again thinking to myself... "That was a lot harder than I thought it was going to be!" And it's not even completely finished!
I made this conclusion from a previous project I made called Aybow Fitness.
Design first. Code second. I know it is so tempting for us to jump right into the code when we are exciting about something! But seriously, take a solid amount of time to think about how the UX and the UI of your application will work.
It doesn't have to be a professional mock-up, it can even just be a drawing on a notepad (which is what I did). It'll save you so much refactoring and make your website or app so much more intuitive to use, and much more pleasant to look at!
The thought process I went through every time I added new features to Upsocial was something along the lines of:
This process allowed me to get into the flow state of coding out features more frequently, and lead to my best designed website to date. I am so proud of how the application looks (except on Safari... please don't view it on Safari), and the time spent on colour, typography and a proper system has me feeling very satisfied with the look and feel of the application.
I've attached two pictures of my early-stage research and design drafts that I made for Upsocial to give an example of what this looks like:
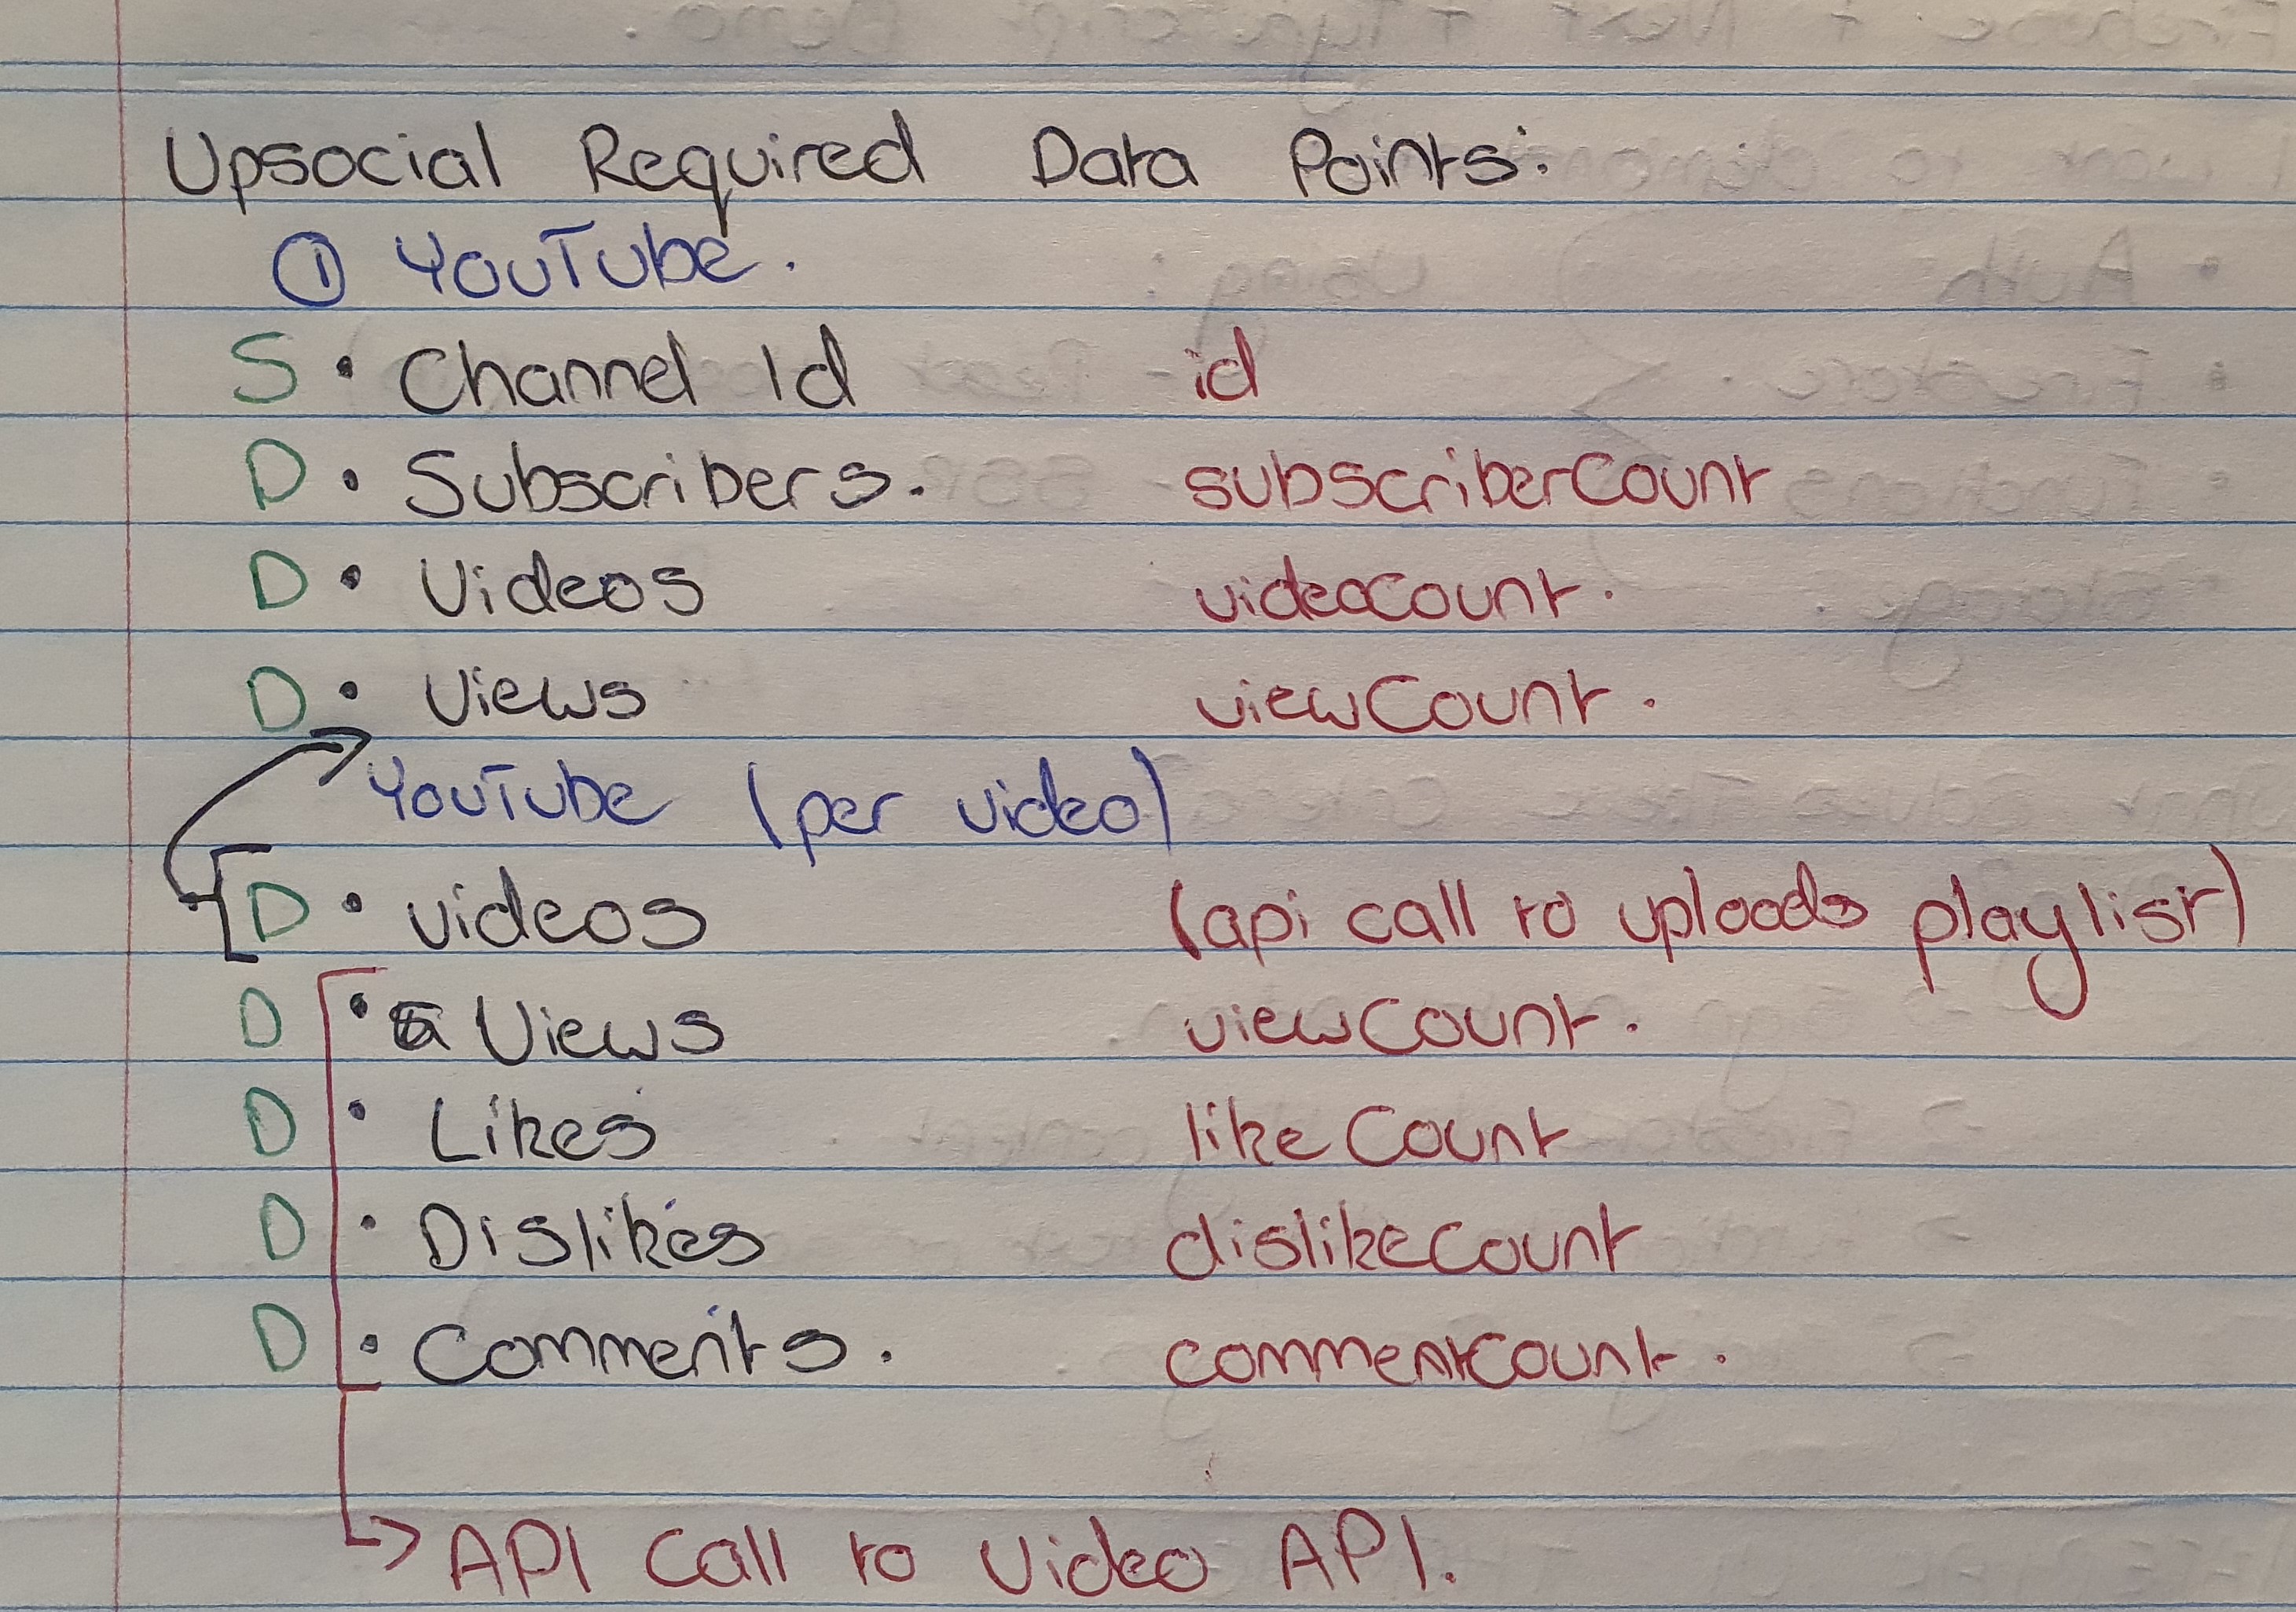
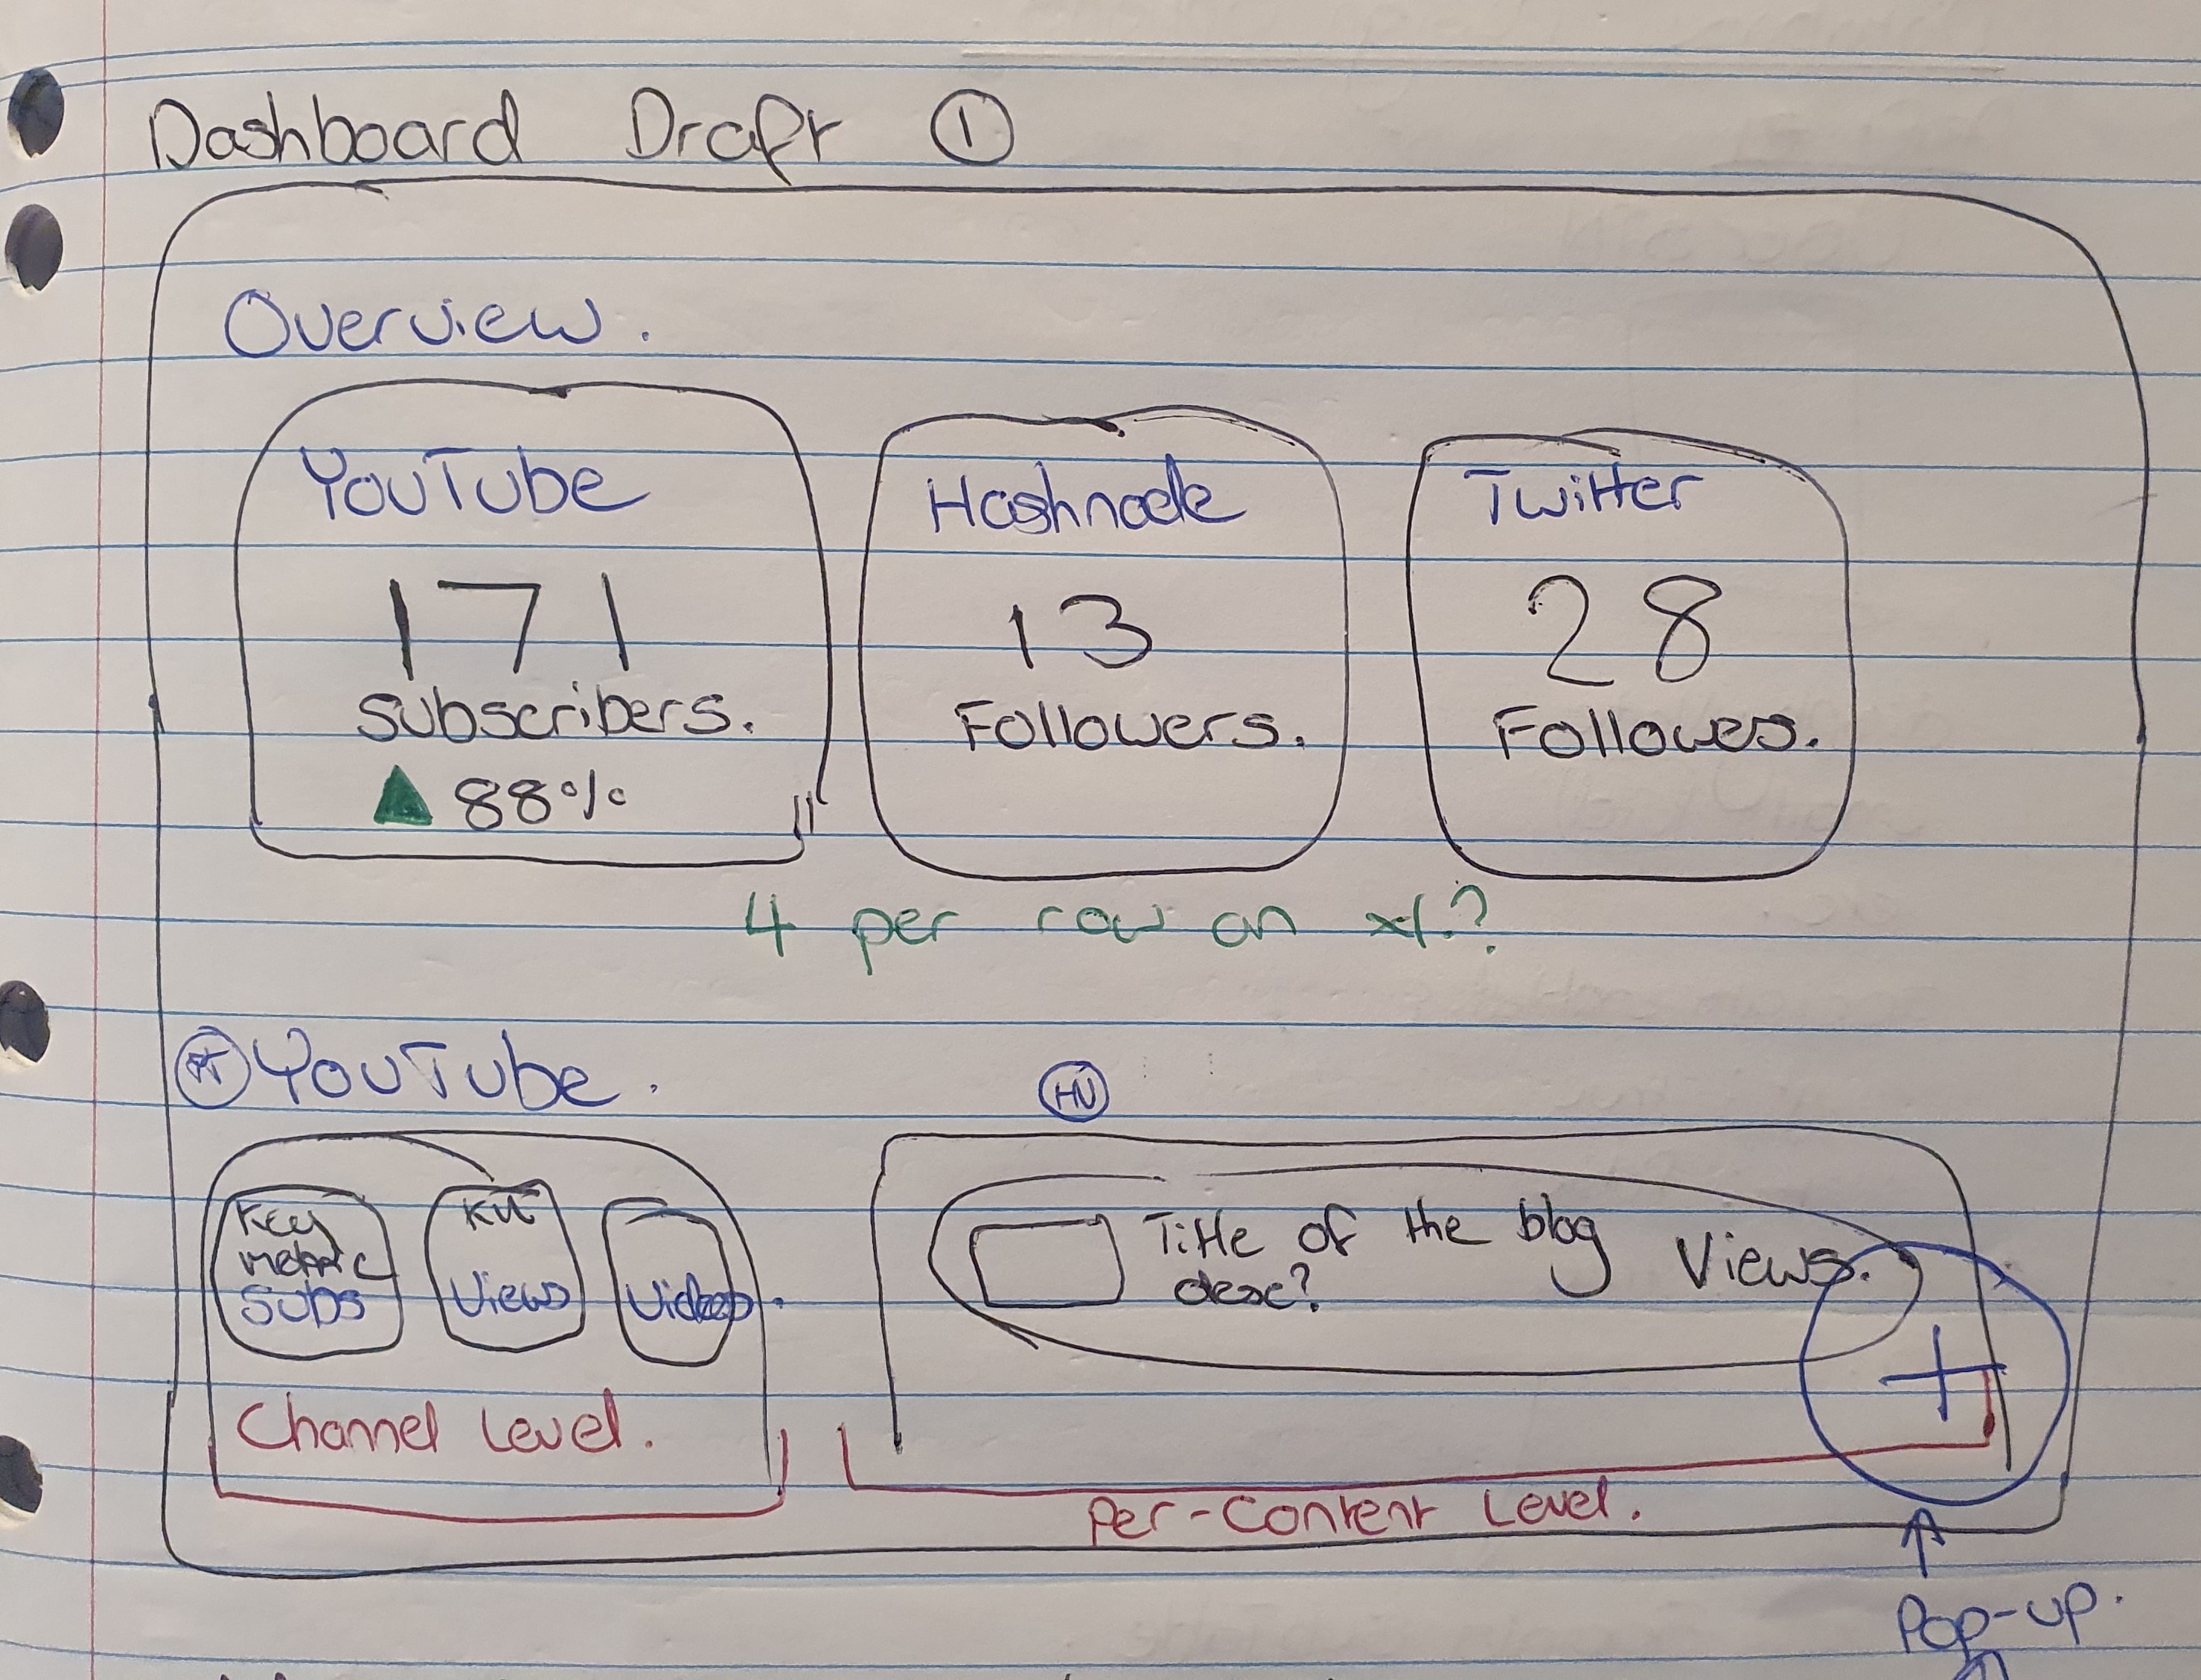
As you can see it's quite similar to the end result, with a few changes to the layout of the dashboard.
You might notice that there is no draft of the "Recent Content" section, as I decided to implement this later in the process. This cost me a little bit of refactoring time and a strange implementation of this section; where the individual sections feed back content to the dashboard which then feeds that content to the Recent Content section.
I've had a tonne of fun developing Upsocial over the past two months, learned a number of new skills and tried to document my journey along the way as best as possible.
I hope that by outlining my tech stack of choice, and documenting how a big project like this works behind the scenes has helped you out, or maybe even inspired you to continue working on your passion projects! 💕
If you enjoyed this kind of content, consider giving me a follow on Hashnode!
I also am active on a number of other social platforms, posting content just like this! I'd love for you to check them out:
If you're feeling really generous, you can support me with Hashnode's Sponsor feature - which all goes directly to me, and then invested back into more content like this!
Sponsor Me 👉 blog.jarrodwatts.com/sponsor ❤️
Thanks for reading!