


Set Up Subscription Payments With Stripe using Firebase and Next.JS


Introduction
Accepting payments online can seem like a daunting task, with considerations such as security, conversion rates and tax, there is a lot to consider.
In this blog post, we'll explore how we can simplify the process of taking subscription payments online and how we can exclusively provide paying customers access to premium content.
We'll be using three key technologies to build out a full-stack website where customers can pay a monthly subscription fee to access our site's premium features:

What are these tools?
Next.JS is a framework built on top of React that has a focus on having the best developer experience possible.
Firebase is a set of tools supported by Google that provide amazing features out of the box, including authentication, as well as a cloud database.
Stripe is a solution which brings all the elements of taking payment online together, and allows you to stay focussed on building out your website or app.
Quick Note
Before we jump right into the step-by-step guide, remember you can always access the source code inside this repository:
If you have any questions you can always tweet at me at @jarrodwattsdev
Video Lovers
Guide
Let's jump right into it. This guide is going to assume you already have Node JS and NPM installed.
Step 1: Creating A Next JS Project
To initialize a new Next.JS project, we'll run the following commands from a terminal:
npx create-next-app next-firebase-stripe
cd next-firebase-stripe
code .
The last command we typed will open up your newly created project inside Visual Studio Code.
[Optional] Setup TypeScript
I'll be using TypeScript in this guide to additionally show how to integrate Stripe with TypeScript, however, you don't have to if you choose not to :-)
To setup TypeScript with Next.JS, create a tsconfig.json file at the root of your project's directory.
Then run these commands inside your terminal:
npm install --save-dev @types/react
npm run dev
Our tsconfig.json file is now automatically populated with the best settings to work with Next.JS and TypeScript.
Now we can go ahead and change the .js files inside our pages directory to be .tsx files.

Cleaning Up The Starter Project
As we won't be using API Routes in this project, I'll delete the api directory, including the hello.js file.
Step 2: Creating A Firebase Project
To get started with Firebase, navigate to The Firebase Console and sign in with your Google Account.
To create a new project, click Add project and enter a project name, and configure the simple project settings to your liking. It'll only take around one minute to set-up.
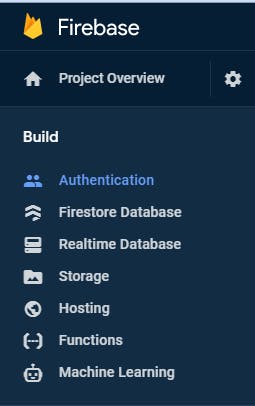
Firebase Authentication
To set-up Firebase Authentication, let's click Authentication in the left-side menu:
For this project, we'll use GitHub to sign up users. To enable GitHub Authentication, we'll scroll down to GitHub and toggle it to Enabled.
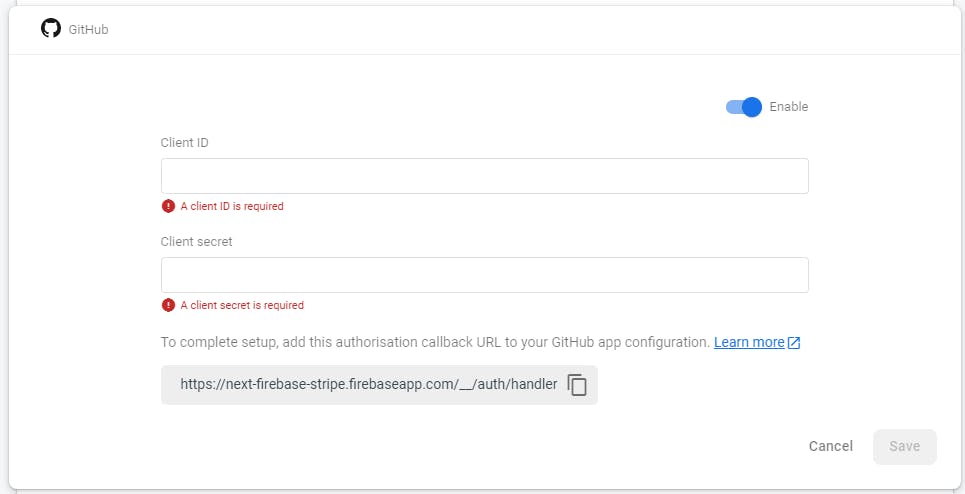
You'll notice we need to provide a Client ID and a Client secret in order for us to enable GitHub authentication. To retrieve those values, we'll need to create a GitHub Application.
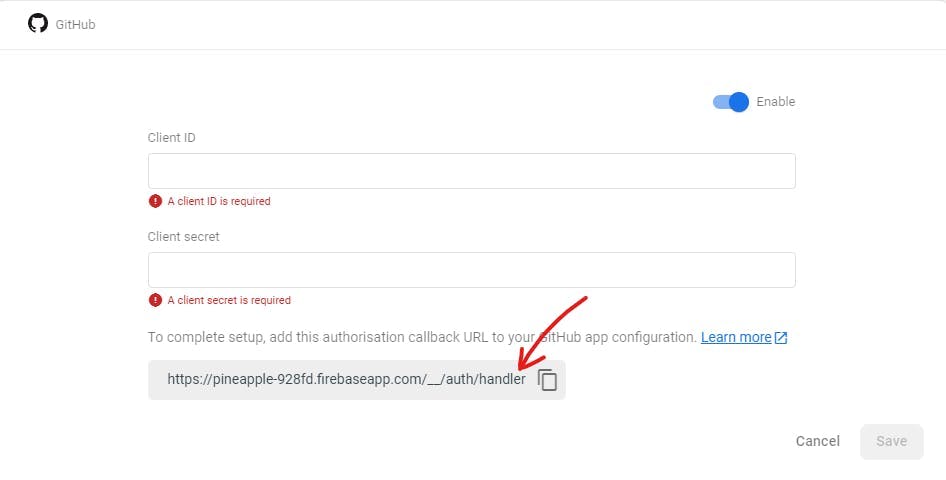
First, lets copy the authorisation callback URL (as seen below), as we will use this to send users back to our site once they have successfully signed up with GitHub.
GitHub Auth Application
To create a GitHub application, navigate to the GitHub Homepage, click your profile icon in the top right corner > Settings > Developer Settings > OAuth Apps > Register a new Application
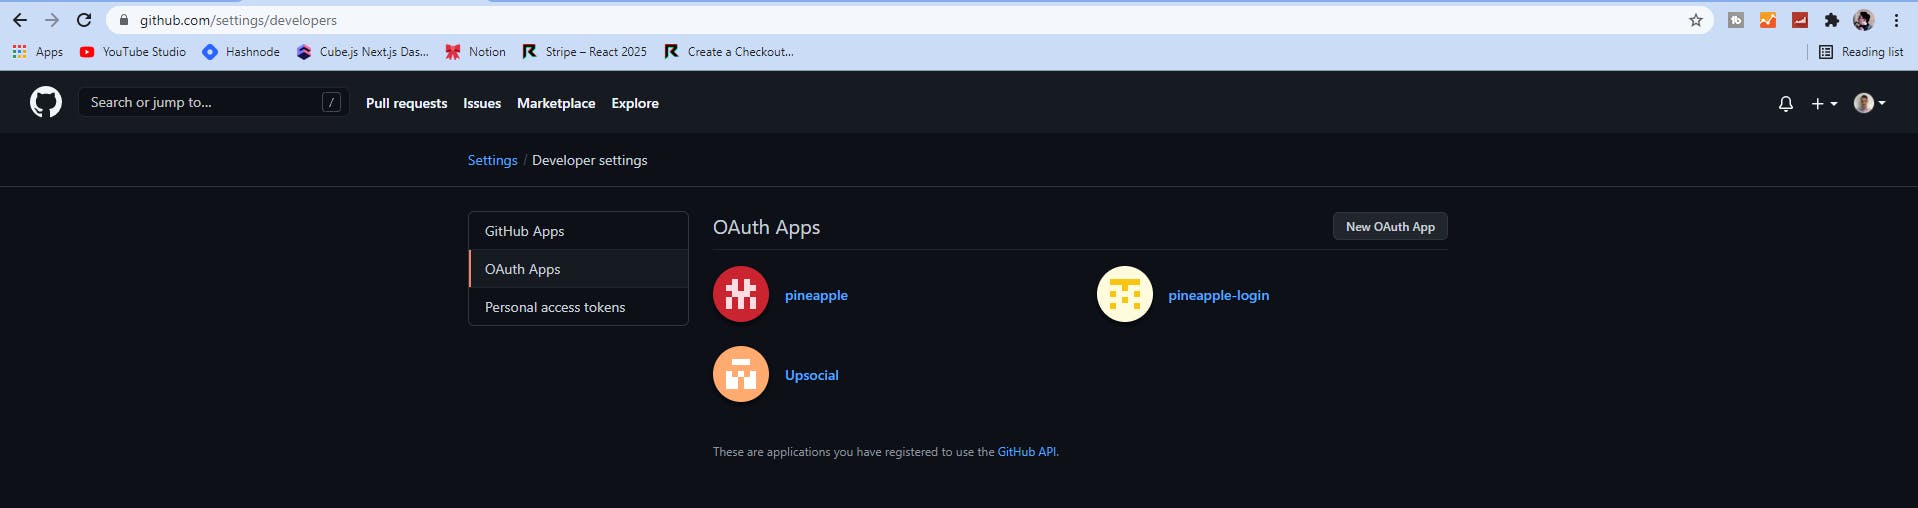
Now click on New OAuth App.
Pick a name for your GitHub OAuth Application, set http://localhost:3000/ as the Homepage URL, and use the URL we copied from Firebase in the step above as the Authorization callback URL.
Generate a Client Secret for your GitHub OAuth app, and copy both the Client ID
Client Secret from the GitHub application to the Firebase Authentication configuration window that we had open previously.
Once you've done that, hit Save and we are all set-up for users to sign up to our website with GitHub Authentication.
Create a Web App within Firebase Project
To create a web application for us to communicate to our Firebase project's resources, click the Gear icon from the menu, then click Project Settings.
We'll need to add a Web App to this project since we'll be using Next.JS. Click the third icon from these options.
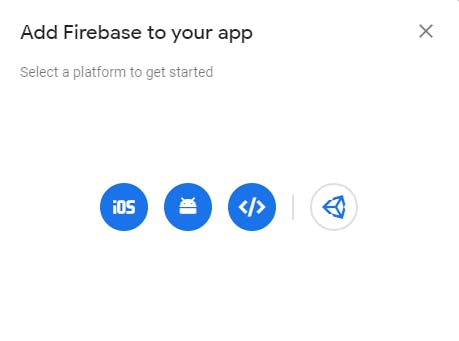
Give your web application a name, and leave the configuration window open; we'll set these variables up in our Next.JS project now.
To do that, go back to your Visual Studio Code window, and create a file at the root of your project's directory called .env.local.
Copy and paste your configuration variables from firebase into the .env.local file, so that it ends up looking like this:
NEXT_PUBLIC_FIREBASE_API_KEY=<your-api-key>
NEXT_PUBLIC_FIREBASE_AUTH_DOMAIN=<your-auth-domain>
NEXT_PUBLIC_FIREBASE_PROJECT_ID=<your-project-id>
NEXT_PUBLIC_FIREBASE_STORAGE_BUCKET=<your-storage-bucket>
NEXT_PUBLIC_FIREBASE_MESSAGING_SENDER_ID=<your-sender-id>
NEXT_PUBLIC_FIREBASE_APP_ID=<your-firebase-app-id>
Awesome, now we have all of our configuration values stored in Environment Variables - this means we don't expose our private configuration values in our source code!
Cloud Firestore
Now we've set up authentication and also got our configuration variables inside our codebase, lets go ahead and create a Firestore Database in our Firebase project.
To do that, click Firestore Database from the Firebase console menu, choose a region, and start the database in Test Mode.
Connecting The Client
To connect our code on the frontend, we'll need to install a few packages in our project, by running:
npm install firebase react-firebase-hooks
we can install the following two packages:
firebase: The Official Firebase Package.react-firebase-hooks: Helpful React hooks to interact with Firebase.
Next up, let's initialize Firebase inside our client-side code.
Create a firebase folder at the root of your project, and create a firebaseClient.tsx within your newly created folder.
The contents of that firebaseClient.tsx file should be the following:
import firebase from "firebase/app";
import "firebase/auth";
import "firebase/firestore";

// Firebase configuration variables loaded from environment variables
const clientCredentials = {
  apiKey: process.env.NEXT_PUBLIC_FIREBASE_API_KEY,
  authDomain: process.env.NEXT_PUBLIC_FIREBASE_AUTH_DOMAIN,
  projectId: process.env.NEXT_PUBLIC_FIREBASE_PROJECT_ID,
  storageBucket: process.env.NEXT_PUBLIC_FIREBASE_STORAGE_BUCKET,
  messagingSenderId: process.env.NEXT_PUBLIC_FIREBASE_MESSAGING_SENDER_ID,
  appId: process.env.NEXT_PUBLIC_FIREBASE_APP_ID,
};

// If Firebase isn't already initialized, initialize it using the above credentials.
if (!firebase.apps.length) {
  firebase.initializeApp(clientCredentials);
}

export default firebase;
Sweet! Now we can interact with the resources we created in the cloud via the Firebase Console inside our client-side application.

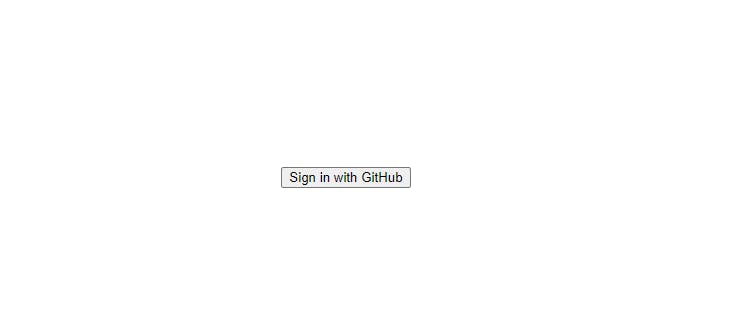
Let's write some code to a sign a user up with GitHub now.
To do that, we'll create a folder called components at the root of our project. Within that folder, lets create a file called Login.tsx.
The contents of that file should look like this:
// Login.tsx
import React, { ReactElement } from "react";
import firebase from "../firebase/firebaseClient";

export default function Login(): ReactElement {
  async function signInWithGithub() {
    return await firebase
      .auth()
      .signInWithPopup(new firebase.auth.GithubAuthProvider());
  }

  return (
    <div>
      <button onClick={() => signInWithGithub()}>Sign in with GitHub</button>
    </div>
  );
}
Let's now replace the contents of our home page (index.tsx) to show the Login component:
// index.tsx
import React from "react";
import Login from "../components/Login";
import styles from "../styles/Home.module.css";

export default function Home() {
  return (
    <div className={styles.container}>
      <Login />
    </div>
  );
}-
To preview our changes, run npm run dev on the terminal to start up the development server, and navigate to http://localhost:3000.
If we click on that beautiful looking button, we're shown a pop-up to sign in with GitHub into our application. Go ahead and sign in with your GitHub account.
If we take a look at the Authentication tab in our Firebase Console now, we've successfully signed up with GitHub into our Firebase project.

BUT, lets actually delete this user inside Firebase for now.
Why? Because we want to store user information inside our database too, so that when they sign up, a document gets created for them inside our users collection.
Let's implement some logic that does that now.
// Login.tsx (modifying existing function)
async function signInWithGithub() {
    const userCredentials = await firebase
      .auth()
      .signInWithPopup(new firebase.auth.GithubAuthProvider());

    // Create a document inside the users collection with the name of the uid of the user
    firebase.firestore().collection("users").doc(userCredentials.user.uid).set({
      uid: userCredentials.user.uid,
      email: userCredentials.user.email,
      name: userCredentials.user.displayName,
      provider: userCredentials.user.providerData[0].providerId,
      photoUrl: userCredentials.user.photoURL,
    });
  }
Now let's try and sign in again!
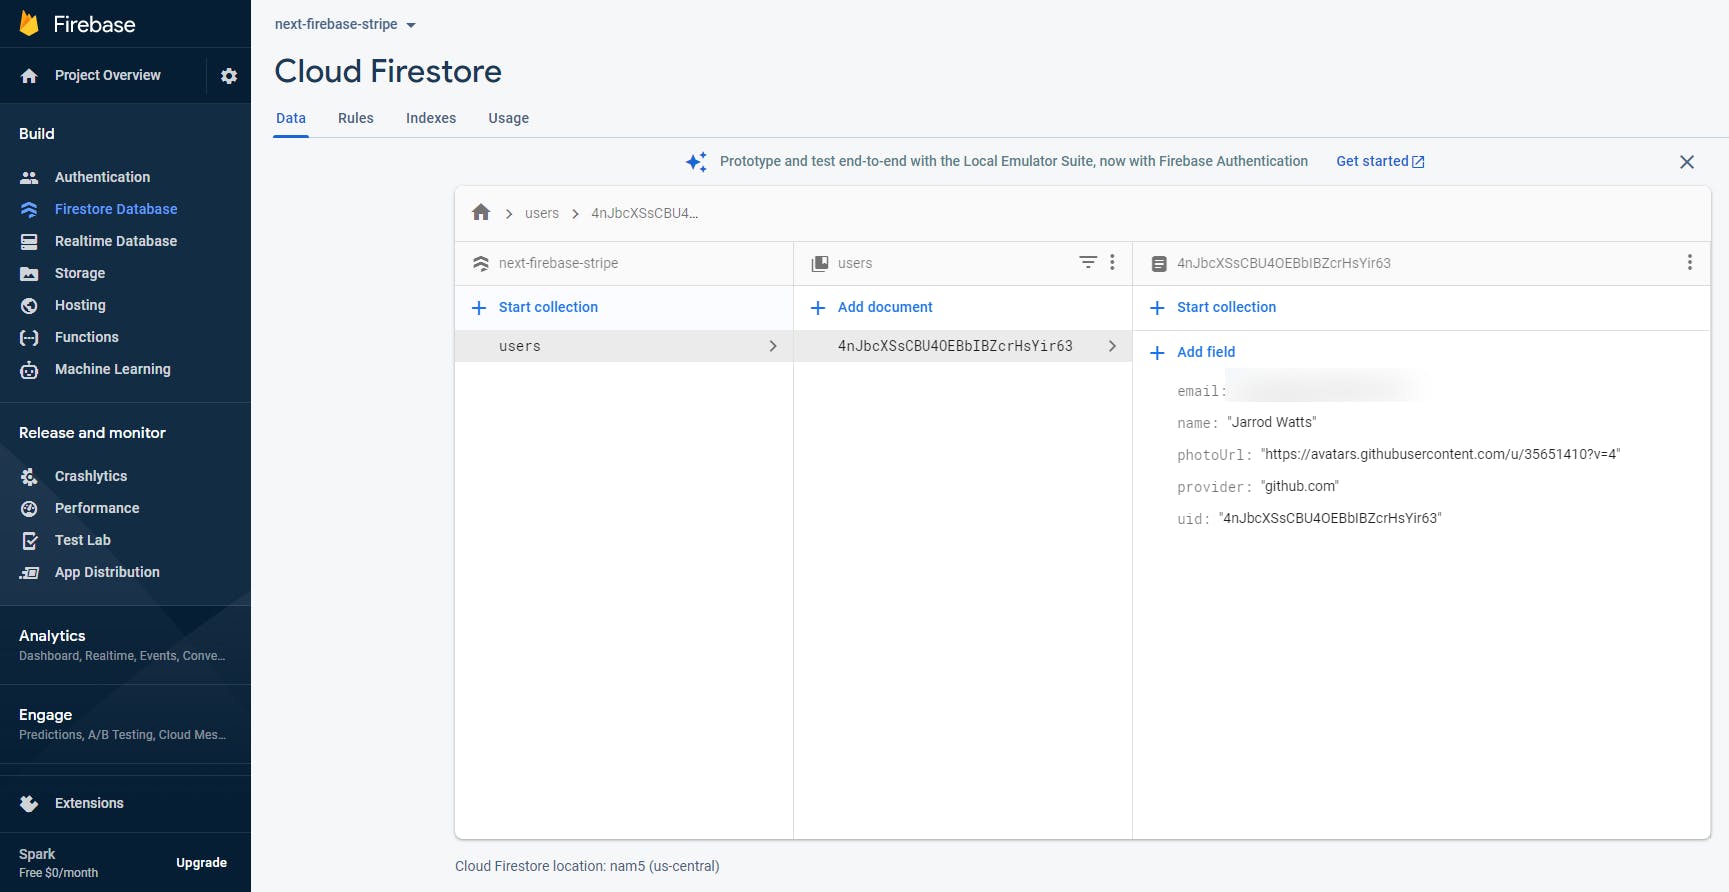
Now all of our information is saved straight to a firestore document inside our users collection every time a user signs up.
Spoiler: This will come in handy when we are using Stripe, as we need a collection of customers 😉
The Firebase Stripe Extension
Before we get started integrating Stripe into our application, you'll need to set up a Stripe account for yourself and set up your stripe business with valid information including a business name, if you don't have one already.
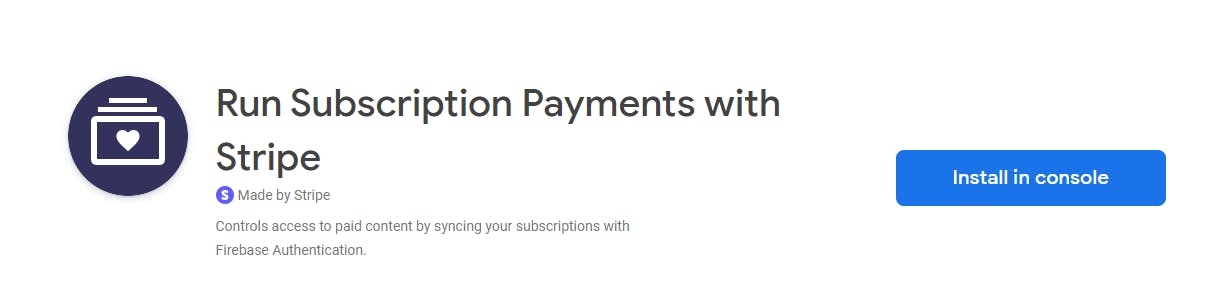
Once you've done that, we'll navigate to the Run Subscription Payments With Stripe Firebase Extension page.
Firebase Extensions are pre-packaged solutions that help you implement specific features within Firebase much more quickly and easily.
This extension syncs customers' subscription status with your Cloud Firestore, and adds metadata to users inside your Firebase Authentication, so that you can easily tell who is a paying customer and who is still on the free tier; all within Firebase.
This way, we'll be able to show premium content exclusively to our paying customers.
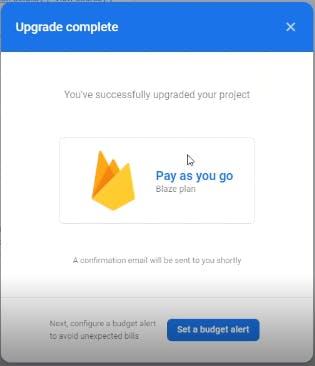
One thing to note before we install this extension: To use Cloud functions (which are part of this extension), requires the Blaze plan, which is the pay-as-you-go plan of Firebase.
It's unlikely that you'll incur any cost more than a few cents (or maybe dollars) unless you have a significant user base, but you should always set-up budgets and budget alerts to make sure you don't blow the bank.
To install the extension, click the Install In Console button.
Now select your Firebase project, for me that's next-firebase-stripe.
Here's what this extension will build out for us when we install it:
| Cloud Function | Purpose |
| createCustomer | Creates a Stripe customer object when a new user signs up |
| createCheckoutSession | Creates a Checkout session to collect the customer's payment details |
| createPortalLink | Creates links to the customer portal for the user to manage their payment & subscription details |
| handleWebhookEvents | Handles Stripe webhook events to keep subscription statuses in sync and update custom claims |
| onUserDeleted | Deletes the Stripe customer object and cancels all their subscriptions when the user is deleted in Firebase Authentication |
| onCustomerDataDeleted | Deletes the Stripe customer object and cancels all their subscriptions when the customer document in Cloud Firestore is delteted |
The next step is to upgrade your project to the Blaze Pay as you go plan, and set up a quick budget alert.
Configure the extension with these settings:
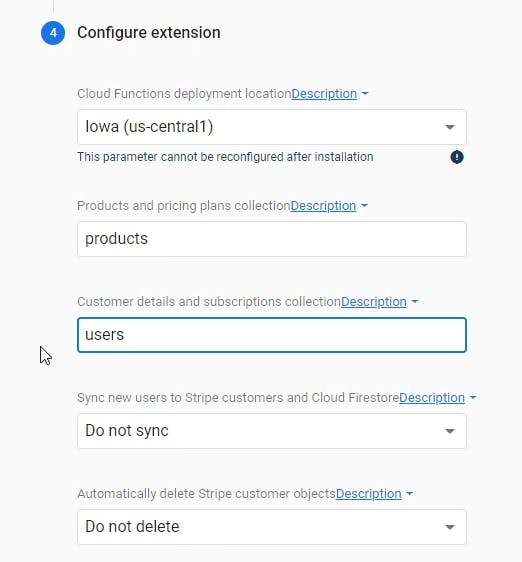
Ensuring you're using the users collection that we set-up earlier for the Customer Details and subscriptions collcetion option, where users that sign up are automatically created a document within this collection.
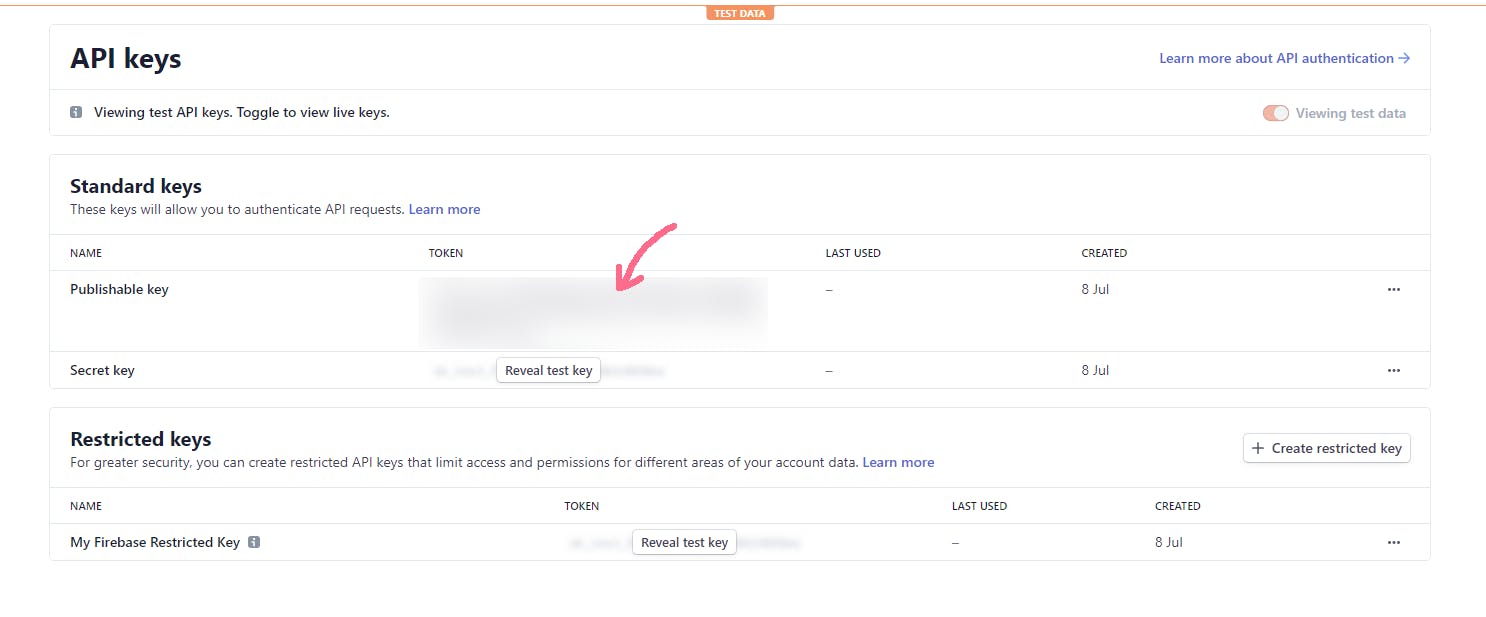
While viewing test data in your stripe dashboard, navigate to Developers > API Keys
Generate a new Restricted Key with the following permissions:
- Write access to Customers,
- Write access to Checkout Sessions
- Write access to Customer portal
- Read access to Subscriptions
- Read access to Plans
Give your new restricted key a name, and copy the key into the Stripe API Key with Restricted Access field in the Firebase Extension Configuration form.
Now hit Install Extension.

Phew! That was a big block of text, hopefully you're still with me! 😅
The extension will take a few minutes to install, once you're done, you'll need to view the additional Stripe setup required, by viewing the documentation for this extension found within the Firebase Console, at Extensions > Run Subscription Payments with Stripe (Manage) > How This Extension Works
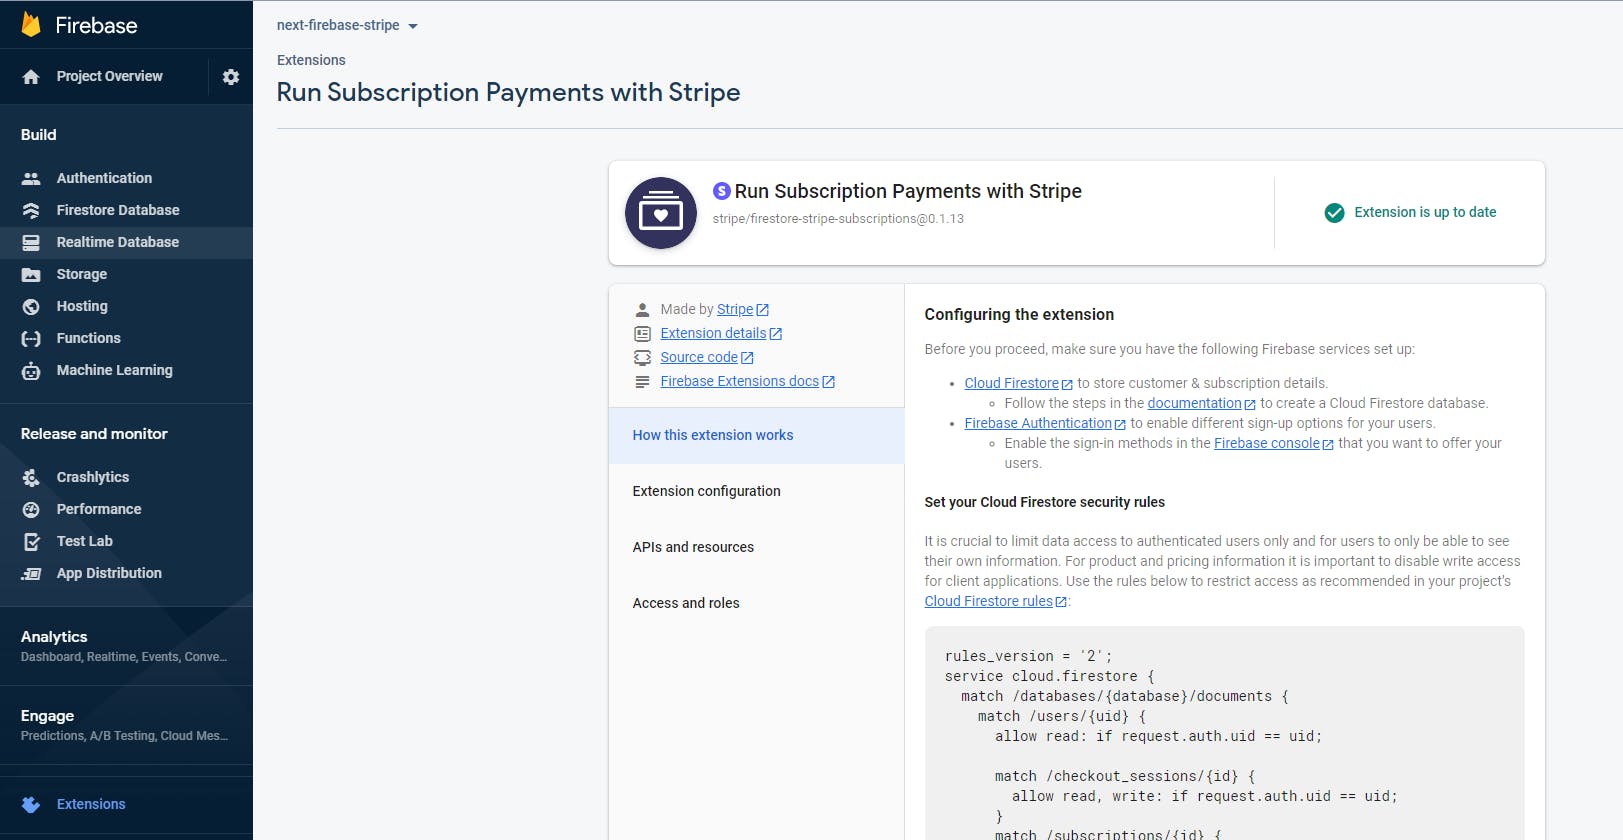
Firestore Security Rules
Below are the recommended Firestore Security Rules for using this extension:
rules_version = '2';
service cloud.firestore {
  match /databases/{database}/documents {
    match /users/{uid} {
      allow read, write: if request.auth.uid == uid;

      match /checkout_sessions/{id} {
        allow read, write: if request.auth.uid == uid;
      }
      match /subscriptions/{id} {
        allow read: if request.auth.uid == uid;
      }
    }

    match /products/{id} {
      allow read: if true;

      match /prices/{id} {
        allow read: if true;
      }

      match /tax_rates/{id} {
        allow read: if true;
      }
    }
  }
}
NOTE: I have modified this line:
allow read, write: if request.auth.uid == uid;
As our function to write users to the users collection when they sign up will break without write permission.
You can configure these rules by going to Firestore Database > Rules, and pasting the rules in there.
Configure Stripe Webhooks
You need to set up a webhook that synchronizes relevant details from Stripe with your Cloud Firestore. This includes product and pricing data from the Stripe Dashboard, as well as customer’s subscription details.
To do that, we'll go back to our Stripe Dashboard, and click Developers > Webhooks.
Copy the url from the Firebase Extension "How this extension works" tab, and paste it as a new Endpoint in Stripe webhooks.
Select the following events to send to that endpoint:
product.createdproduct.updatedproduct.deletedprice.createdprice.updatedprice.deletedcheckout.session.completedcustomer.subscription.createdcustomer.subscription.updatedcustomer.subscription.deletedtax_rate.created(optional)tax_rate.updated(optional)invoice.paid(optional, will sync invoices to Cloud Firestore)invoice.payment_succeeded(optional, will sync invoices to Cloud Firestore)invoice.payment_failed(optional, will sync invoices to Cloud Firestore)invoice.upcoming(optional, will sync invoices to Cloud Firestore)invoice.marked_uncollectible(optional, will sync invoices to Cloud Firestore)invoice.payment_action_required(optional, will sync invoices to Cloud Firestore)
Your webhook should look like this:

Once you've done that, copy the webhook's signing secret, found here:
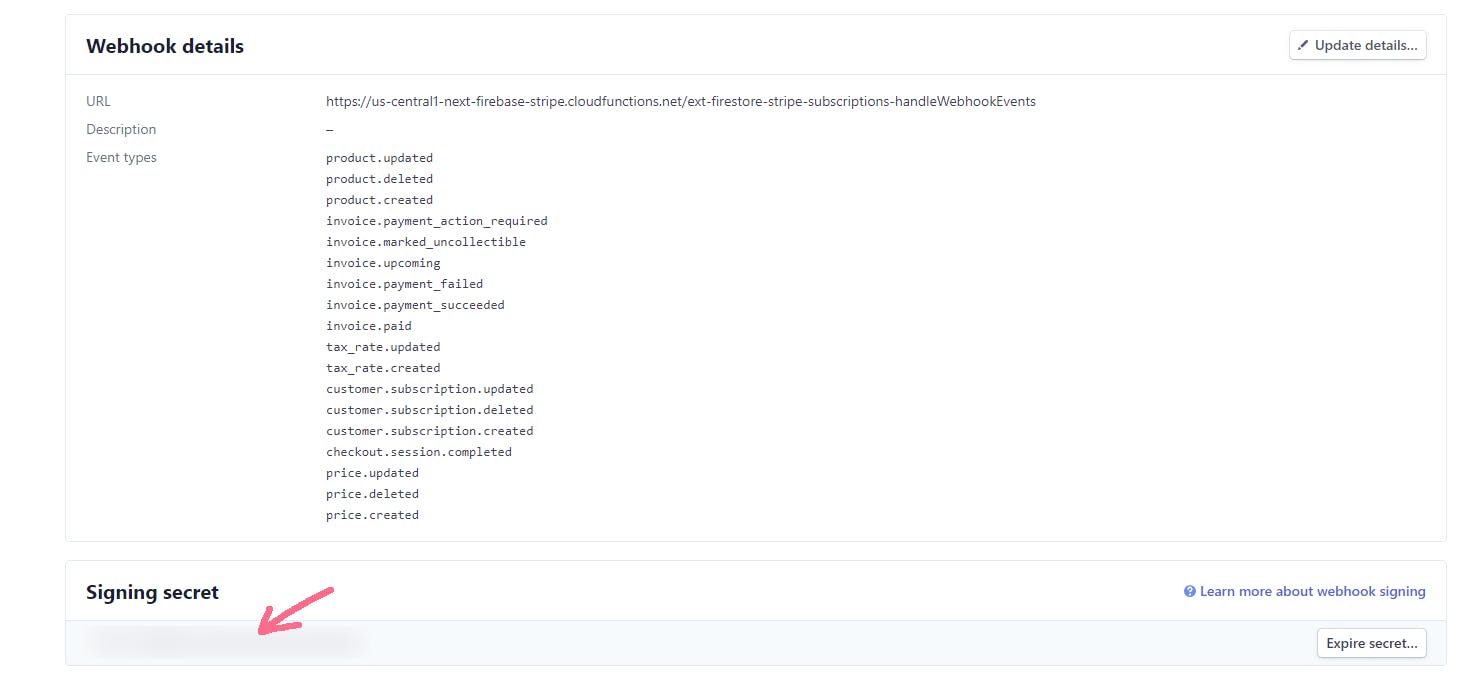
Then Reconfigure your Extension, replacing the existing placeholder value within Stripe webhook secret to the webhook signing secret you just copied from the Stripe Dashboard.
Creating A Stripe Product
For customers to buy something from us, we need to create what we are selling inside Stripe; enter Stripe Products.
The extension currently supports pricing plans that bill a predefined amount at a specific interval.
Let's create a product inside Stripe, so that our users can upgrade their accounts to become Premium Users.
Back at the Stripe Dashboard, click on Products, and Add Product.
Enter the name of your product (something like "Premium Plan") and an optional description of the product.
Beneath that, open up the additional options section, and add a metadata field called firebaseRole with the value of premium.

This value will be attached to the user inside Firebase as a custom claim on the user.
This allows us to quickly see if a user is a premium customer or a free customer within the Firebase User itself. You can also extend your firebase rules to restrict access on the server-side, based on this custom claim.
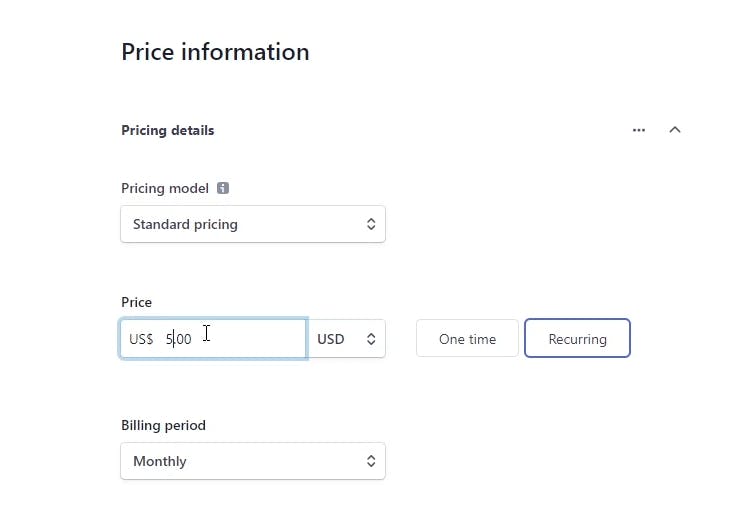
Next set your monthly price for being a premium member, I'm setting my price at $5.00 USD.
Implementing Stripe Payments In Code
It's been a long journey of setup and configuration so far! If you're still chugging along; great work! Let's get into some more exciting stuff now - like actually coding 😅!
The first thing we'll need to do is install the @stripe/stripe-js package, by running:
npm install @stripe/stripe-js
Next up, we'll create a new folder at the root of our project, called stripe.
Within that folder, create a new file called initializeStripe.ts, which will be the function that ... loads stripe!
We need to do this because:
To be PCI compliant, you must load Stripe.js directly from js.stripe.com. You cannot include it in a bundle or host it yourself. This package wraps the global Stripe function provided by the Stripe.js script as an ES module.
The code for our initializeStripe.ts file will look like this:
import { Stripe, loadStripe } from "@stripe/stripe-js";

let stripePromise: Stripe | null;

const initializeStripe = async () => {
  if (!stripePromise) {
    stripePromise = await loadStripe(
      "<your-test-publishable-key-here>"
    );
  }
  return stripePromise;
};
export default initializeStripe;
Note: You can get your publishable key here:
Great, now we've loaded Stripe directly from js.stripe.com and we'll hopefully return a Stripe instance.
Next step, is to navigate users to a valid Checkout Session of stripe. There are a few parts to that, lets quickly take a look.
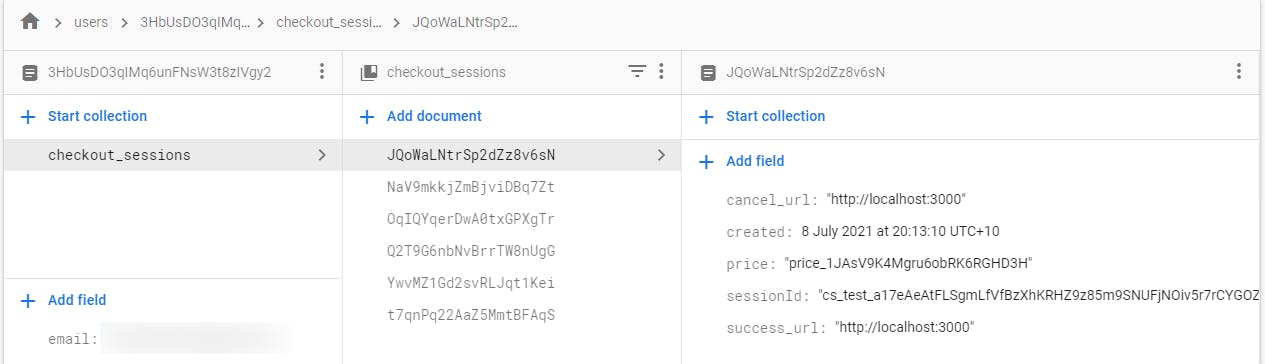
To subscribe the user to a specific pricing plan, create a new doc in the
checkout_sessionscollection for the user. The extension will update the doc with a Stripe Checkout session ID which you then use to redirect the user to the checkout page.
Sounds easy enough!
- Create a new doc in the
checkout_sessionssubcollection within that users document, inside our Firestore. - The extension automatically updates that document with a valid Checkout session ID
- We'll navigate the user to the checkout session by grabbing that ID
Let's create another function to handle this logic.
Create a new file within the stripe folder, called createCheckoutSession.ts.
We'll implement the logic we described above in this file:
import firebase from "../firebase/firebaseClient";
import getStripe from "./initializeStripe";
export async function createCheckoutSession(uid: string) {
const firestore = firebase.firestore();
// Create a new checkout session in the subollection inside this users document
const checkoutSessionRef = await firestore
.collection("users")
.doc(uid)
.collection("checkout_sessions")
.add({
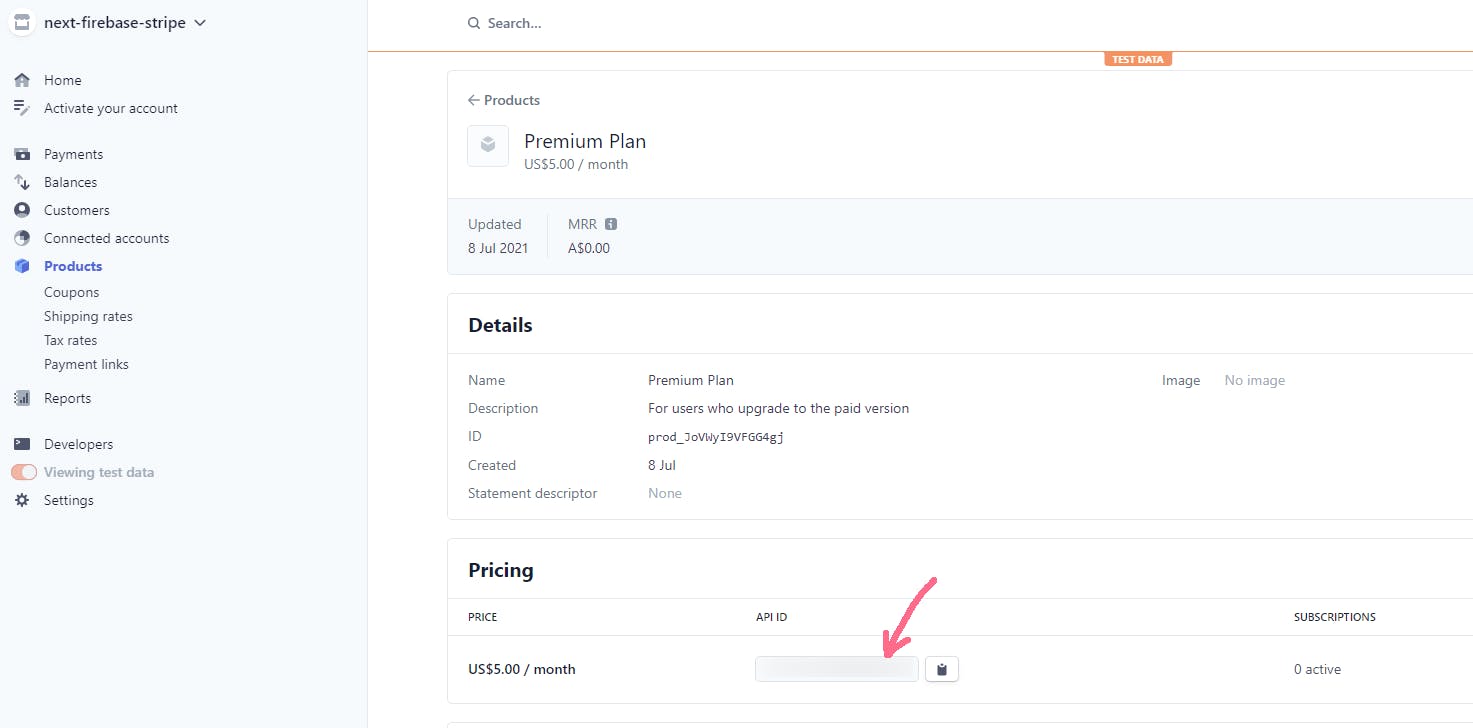
// replace the price_XXX value with the correct value from your product in stripe.
price: "price_XXX ",
success_url: window.location.origin,
cancel_url: window.location.origin,
});
// Wait for the CheckoutSession to get attached by the extension
checkoutSessionRef.onSnapshot(async (snap) => {
const { sessionId } = snap.data();
if (sessionId) {
// We have a session, let's redirect to Checkout
// Init Stripe
const stripe = await getStripe();
stripe.redirectToCheckout({ sessionId });
}
});
}
Make sure you have the correct value for the price field, which you should grab from your product in Stripe (see below image):
Now let's bring it all together on the home page.
index.tsx:
Let's start out with some basics of grabbing the currently signed in user:
import React from "react";
import Login from "../components/Login";
import styles from "../styles/Home.module.css";
import firebase from "../firebase/firebaseClient";
import { useAuthState } from "react-firebase-hooks/auth";

export default function Home() {
  const [user, userLoading] = useAuthState(firebase.auth());
  console.log("User is:", user);

  return (
    <div className={styles.container}>
      {!user && userLoading && <h1>Loading...</h1>}
      {!user && !userLoading && <Login />}
      {user && !userLoading && <h1>Hello, {user.displayName}</h1>}
    </div>
  );
}
Once you've logged in to your GitHub account, you should see a Hello, <name> on your homepage, at http://localhost:3000.
Here, we are using the useAuthState hook to grab the currently signed in user, and showing the display name of that user - simple stuff.
Now let's add some buttons to upgrade our user to a premium user.
Let's change the section where there is a user && !userLoading to:
{user && !userLoading && (
        <div>
          <h1>Hello, {user.displayName}</h1>
          <button onClick={() => createCheckoutSession(user.uid)}>
            Upgrade to premium!
          </button>
        </div>
      )}
Here we are simply creating a button to call the function we defined earlier, createCheckoutSession, and passing the current user's uid into the function as an argument.
Note: You'll need to import this function:
import { createCheckoutSession } from "../stripe/createCheckoutSession";
If we go back to our home page now, and click the "Upgrade to Premium" button,

We are successfully taken to a Stripe checkout session! 🥳🥳
If you were NOT taken to a Stripe checkout session, you are able to debug the logs of why in the Logs tab of Firebase's cloud Functions.
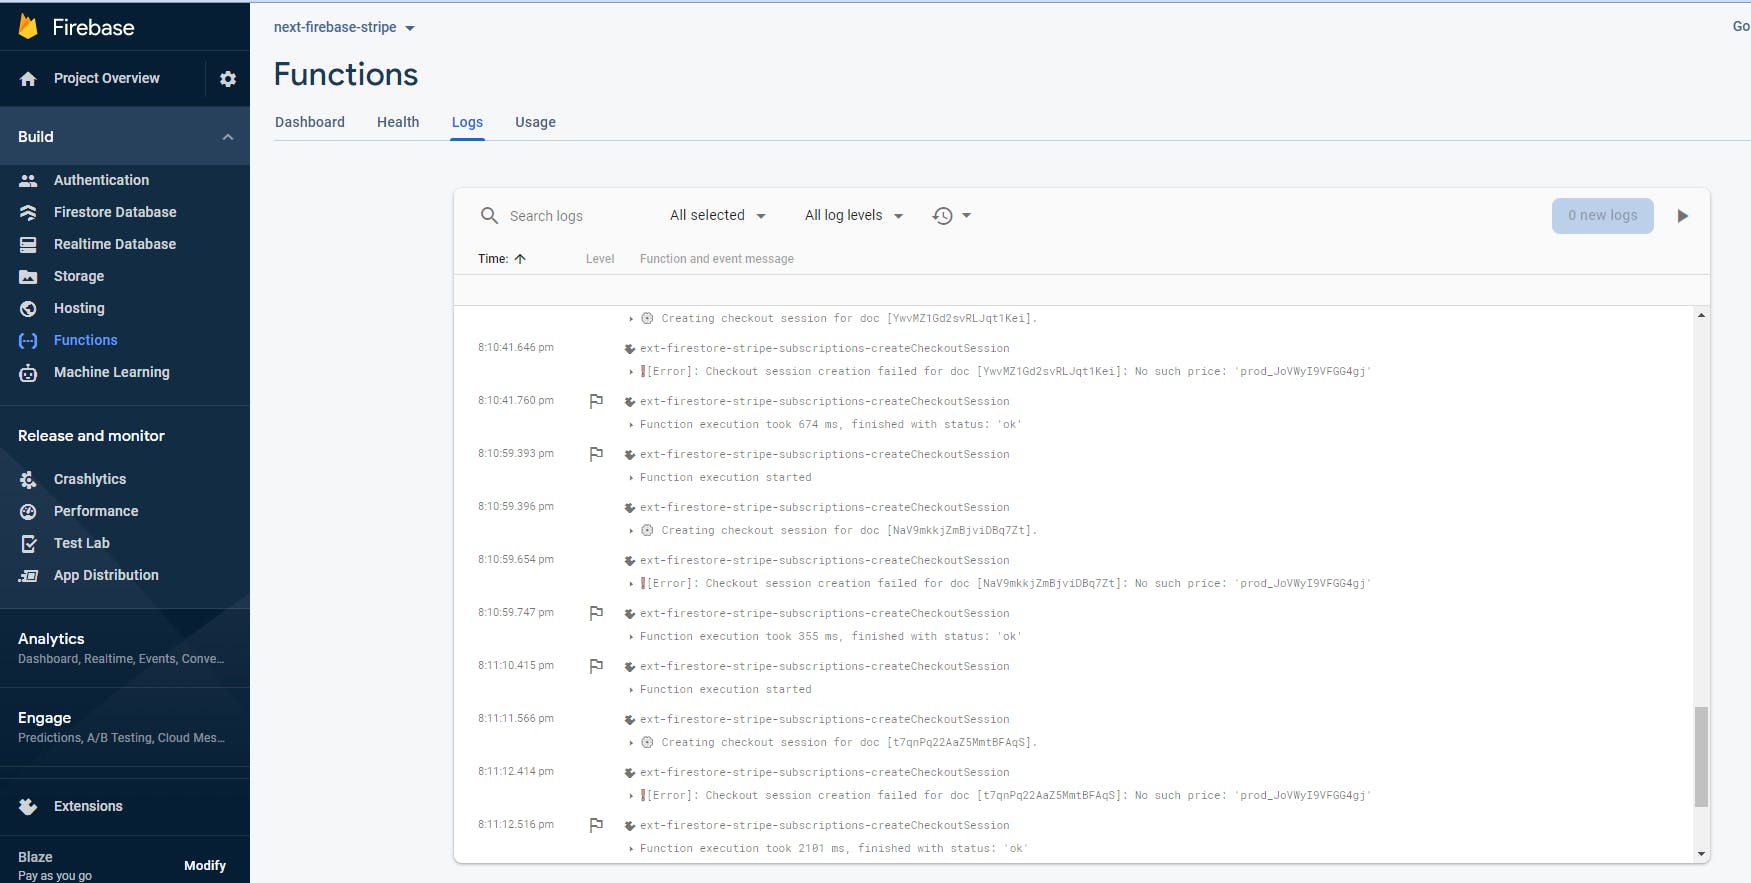
Before we make a test transaction, let's take a look at what's happened to our Firestore database.
The first thing that we can notice is that we've had a products collection created for us (which is automatically synced up with our Stripe products!)
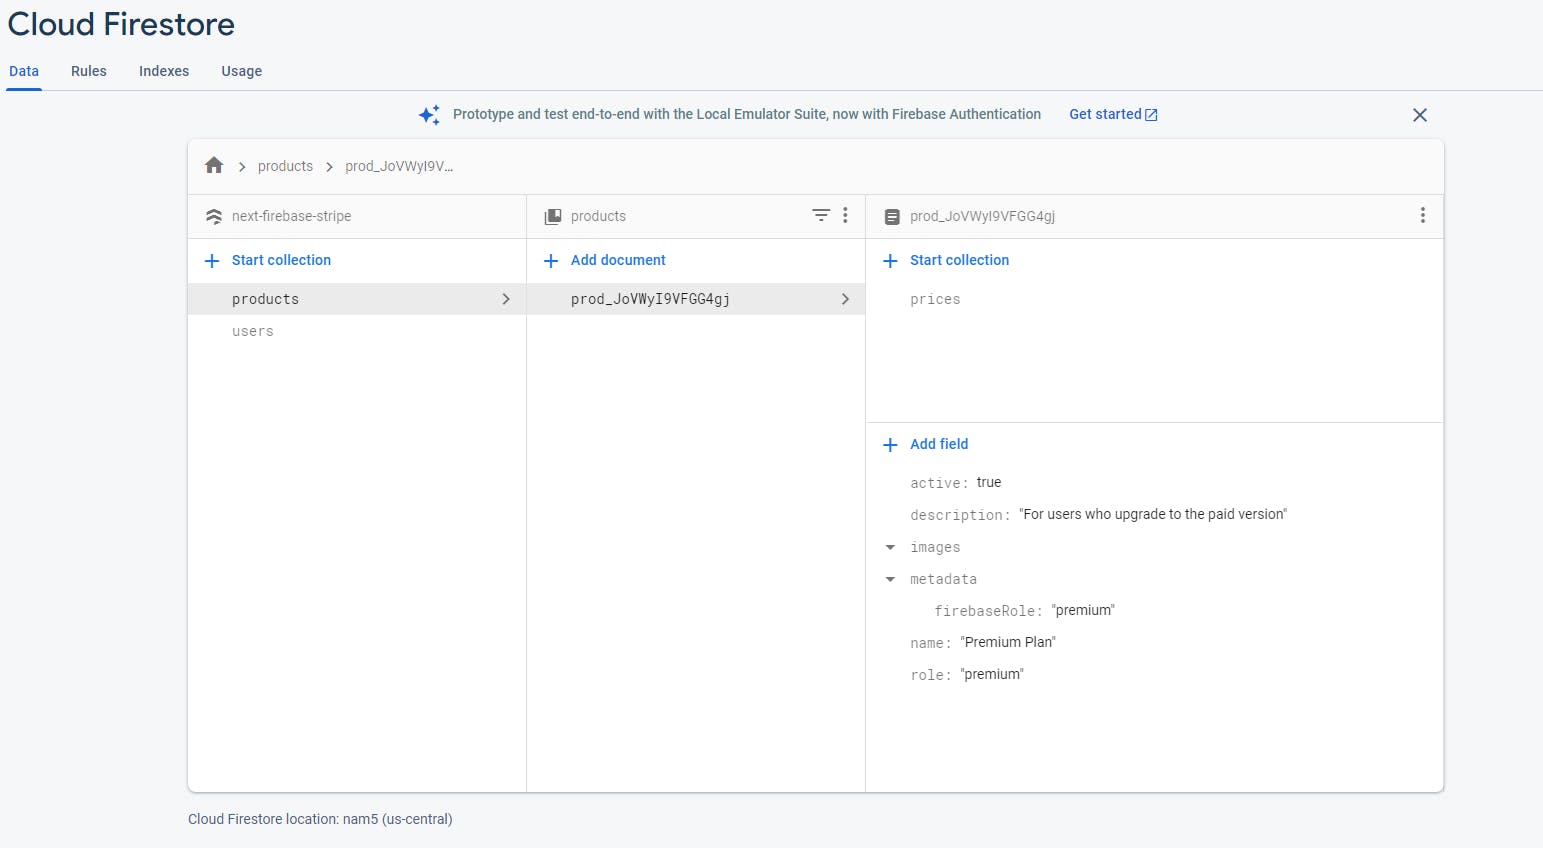
You could use this collection to read your products and dynamically grab their prices and product information with live-updating data.
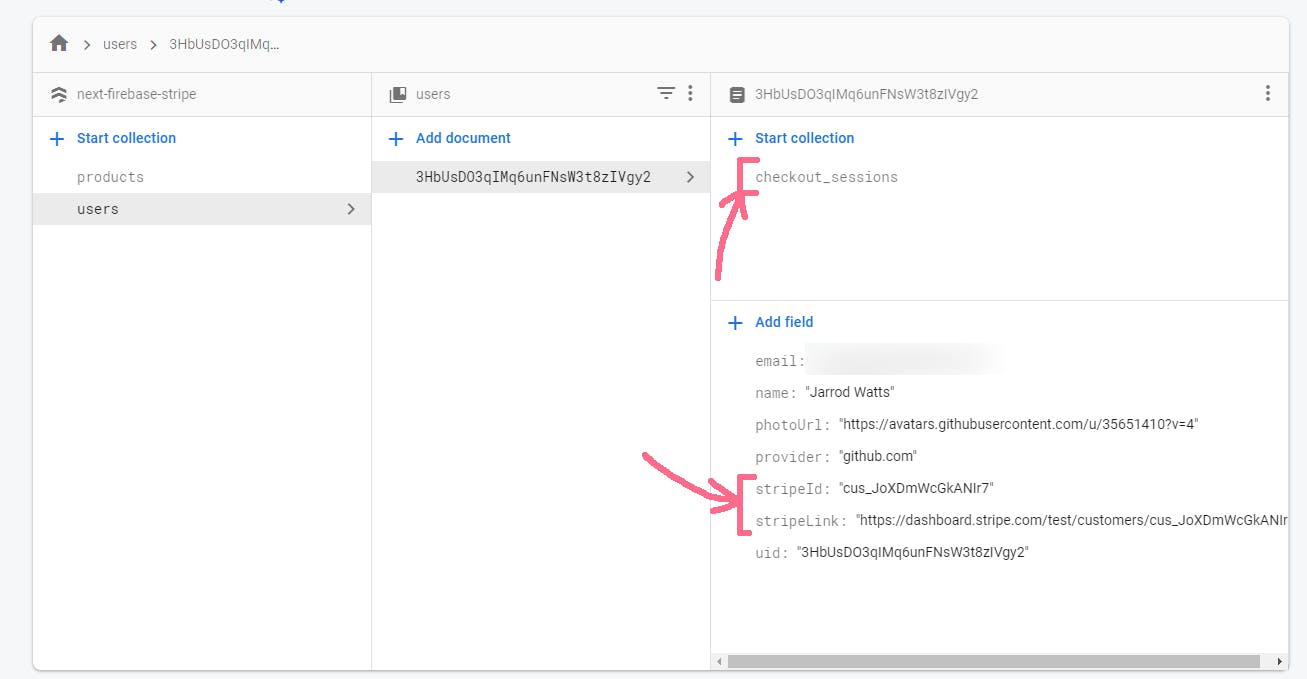
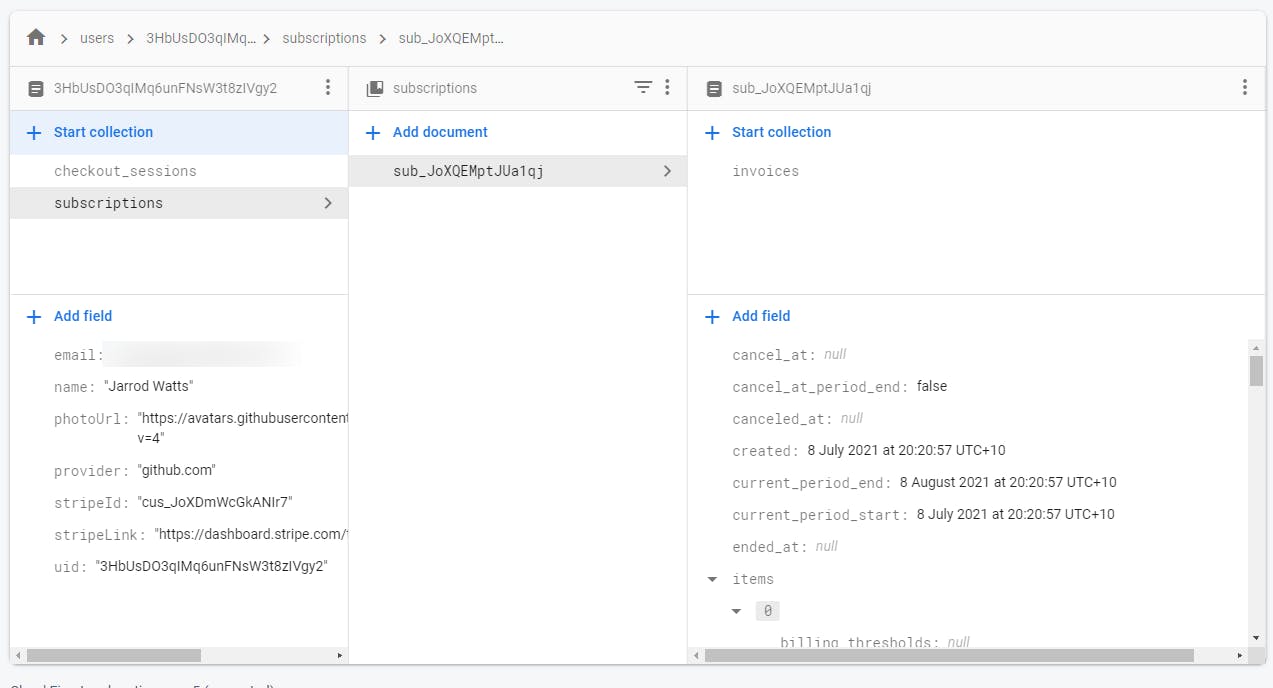
We've also had information about our customer in Stripe added to the user document, in addition to a new sub-collection named checkout_sessions.
Let's go back and make a test transaction now.
To test a payment, you can use one of Stripes test cards . We'll use 4242 4242 4242 4242 as our test card.
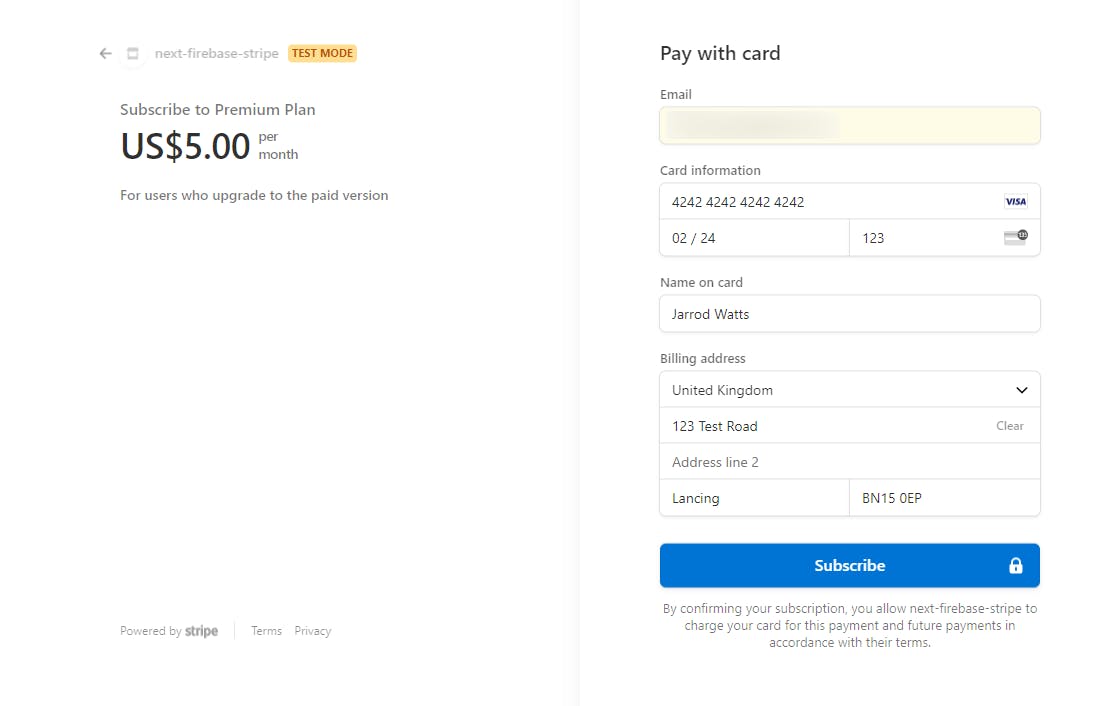
Hit Subscribe! And Check out your Stripe Dashboard!
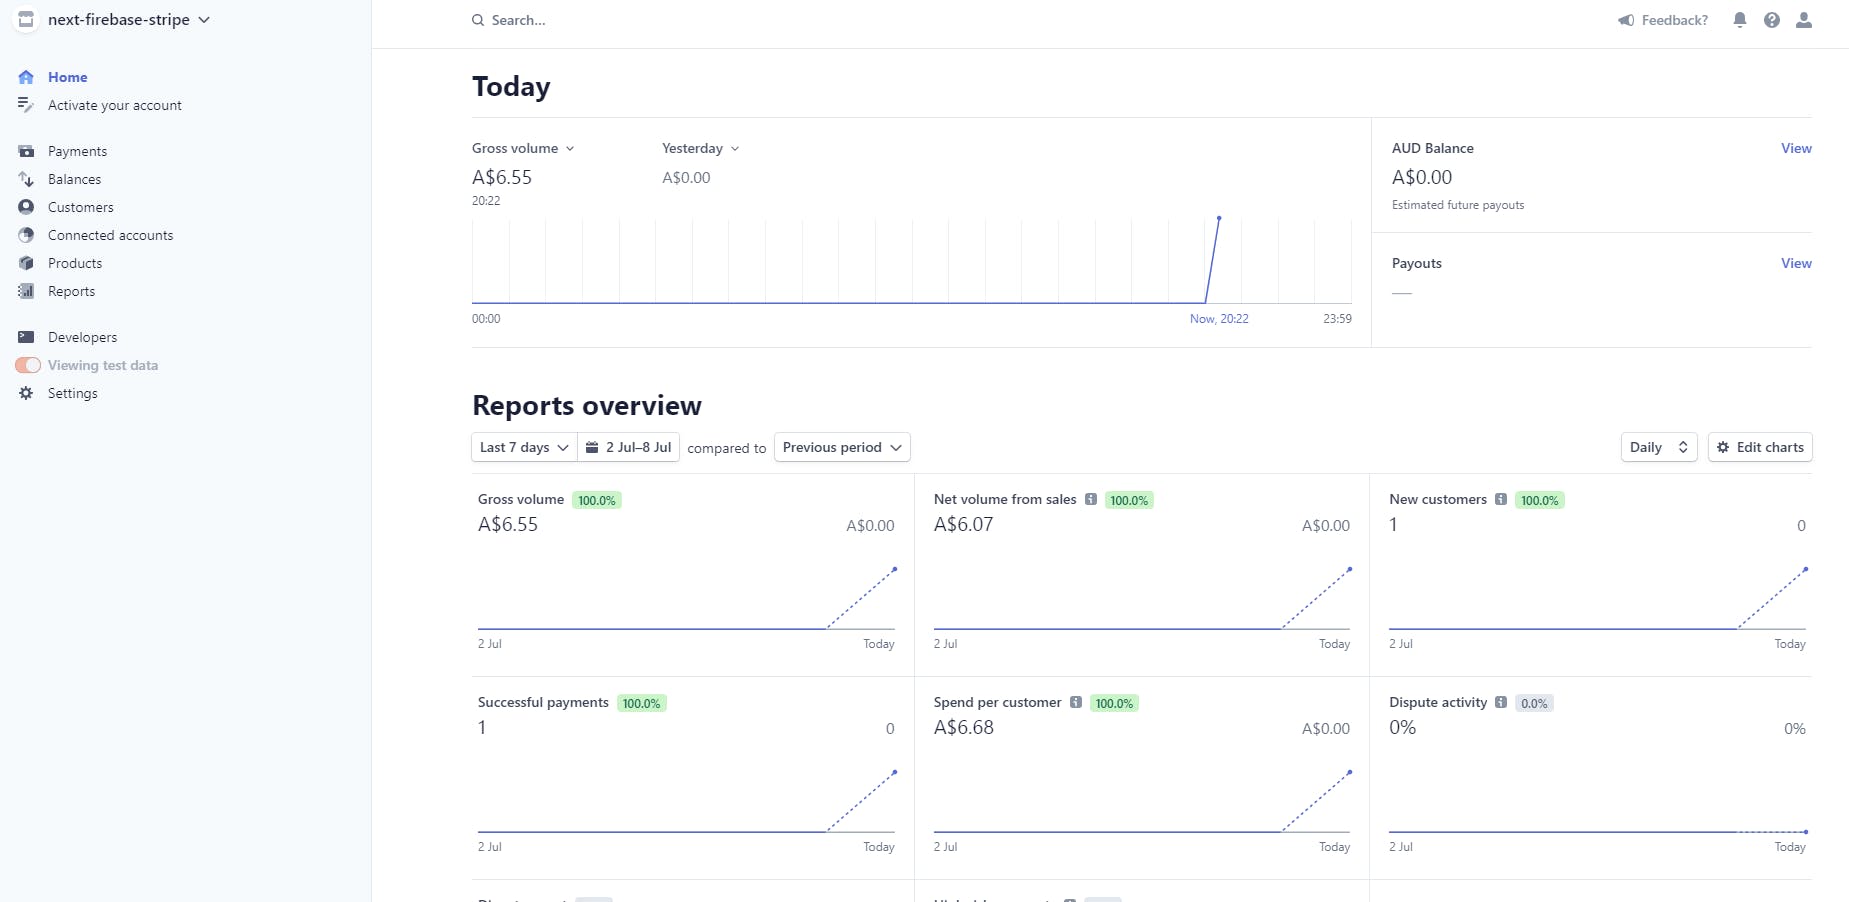
Woohooo! We got a new customer! And more importantly, we've successfully linked that customer in Firebase and Stripe!
We can also view that customer's subscription data in their newly created subscriptions subcollection in Firebase:

Detecting Premium Customers
To detect whether or not a customer is a premium or a free customer, we can use the firebaseRole metadata value we configured earlier.
To do that, we'll create another function inside our famous stripe folder, called isUserPremium.ts.
import firebase from "../firebase/firebaseClient";

export default async function isUserPremium(): Promise<boolean> {
  await firebase.auth().currentUser?.getIdToken(true);
  const decodedToken = await firebase.auth().currentUser?.getIdTokenResult();

  return decodedToken?.claims?.stripeRole ? true : false;
}
Let's also create a custom React hook, called usePremiumStatus so that we can quickly and easily ask if the currently signed in user is a premium member.
usePremiumStatus.ts:
import { useState, useEffect } from "react";
import firebase from "../firebase/firebaseClient";
import isUserPremium from "./isUserPremium";

export default function usePremiumStatus(user: firebase.User) {
  const [premiumStatus, setPremiumStatus] = useState<boolean>(false);

  useEffect(() => {
    if (user) {
      const checkPremiumStatus = async function () {
        setPremiumStatus(await isUserPremium());
      };
      checkPremiumStatus();
    }
  }, [user]);

  return premiumStatus;
}
This is de-structures the claims out of the currently signed in user, which looks like this:
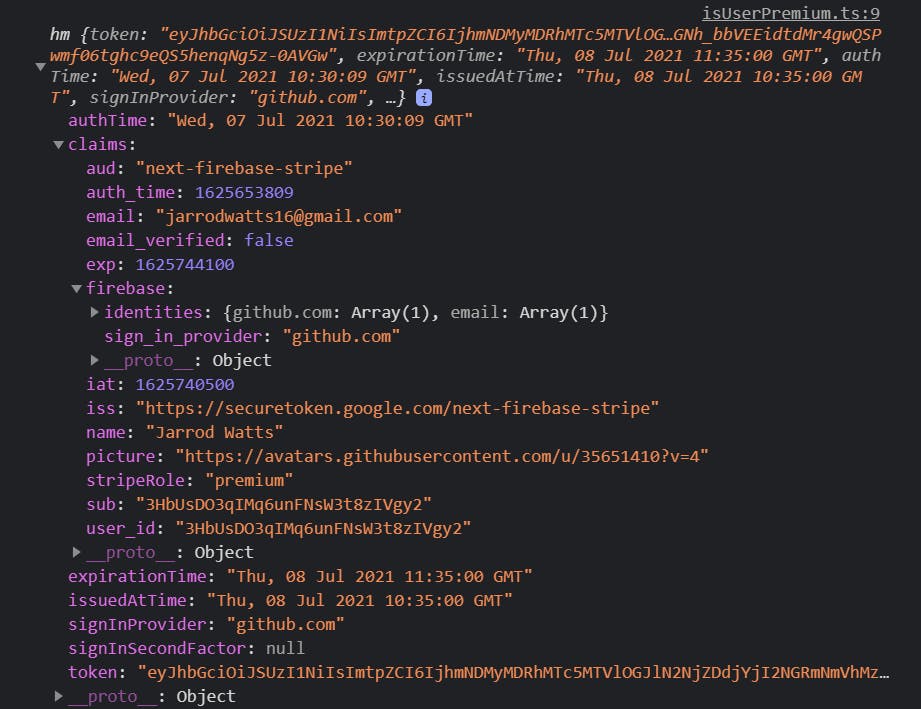
As you can see the firebaseRole is set to premium, since after all - we are a paying customer!
Let's give the customer a reward on the homepage for subscribing to our product, we'll modify our existing code on index.tsx again (only need to change the user && !userLoading block)!
Firstly we'll need to grab the premium status of the user out of our new hook:
const userIsPremium = usePremiumStatus(user);
Then display different contents depending on this value:
      {user && !userLoading && (
        <div>
          <h1>Hello, {user.displayName}</h1>
          {!userIsPremium ? (
            <button onClick={() => createCheckoutSession(user.uid)}>
              Upgrade to premium!
            </button>
          ) : (
            <h2>Have a cookie 🍪 Premium customer!</h2>
          )}
        </div>
      )}
Here we are using the ternary operator to make a quick check:
- If the user is not premium, show them the button to sign up for premium
- If the user is premium, show them a COOKIE! 🍪🍪

Outro
What a journey! If you made it this far, thank you for reading - I really appreciate you!
If you enjoyed this kind of content, I have been posting more and more on my other socials too! I'd love if you checked them out.
YouTube 👉 youtube.com/c/jarrodwatts
Twitter 👉 twitter.com/JarrodWattsDev
GitHub 👉 github.com/jarrodwatts
Tik Tok 👉 tiktok.com/@jarrodwattsdev
Website 👉 jarrodwatts.com
If you're feeling really generous, you can support me with Hashnode's Sponsor feature - which all goes directly to me, and then invested back into more content like this!
Sponsor Me 👉 blog.jarrodwatts.com/sponsor ❤️
Thanks for reading!
Conclusion
In this article, we've implemented a subscription payment system with Next.JS, Firebase, and Stripe.
We've set up ALL of this!
- Created a new Next.JS project
- Set up Authentication in Firebase
- Created a Firestore Database in Firebase
- Created a Stripe Account, and a subscription product to go with it.
- Synchronised products with Stripe and our Firestore Database
- Set up a way of accepting subscription payments with Stripe
- Synchronised customer AND subscription data between Stripe and Firebase
- Added custom claims to Firebase users to determine whether they are free or premium customers.
- Exclusively shown premium content to paying customers
If you're looking to build your own SaaS or include subscription payments into your Next.JS websites, this is an amazingly simple way to implement an extremely complex feature in an elegant manner.
Thanks so much for reading!